Camping field guide
How to Waterproof a Tent
A tent’s waterproofing isn’t one job. It’s three. Rainfly DWR, interior seams, and the floor coating each fail differently and need different products. A two-hour afternoon resets a tent to factory-new and adds years to gear that would otherwise leak.
How to waterproof a tent comes down to three systems, in order: refresh the rainfly’s DWR coating so water beads up and rolls off; seal the seams from the interior side using a sealer matched to your tent fabric (silicone for silnylon, urethane for PU-coated nylon and polyester); and restore the floor’s polyurethane coating only if it’s flaking, peeling, or sticky. Most tents need the first two every 1–3 seasons; the floor is rare.
Done right, you reset the tent to factory-new in a single afternoon. Done wrong (detergent on the fly, exterior seam sealing, storage while damp), you can shorten a $300 tent’s life to a single bad season.
Three systems, three different fixes
Most tent leaks get blamed on the wrong thing. The fly looks fine, so people start with the floor. Or the seams look intact, so they spray the whole tent with DWR and wonder why it still leaks. The first job in waterproofing a tent isn’t applying any product; it’s identifying which of the three independent systems is actually failing.
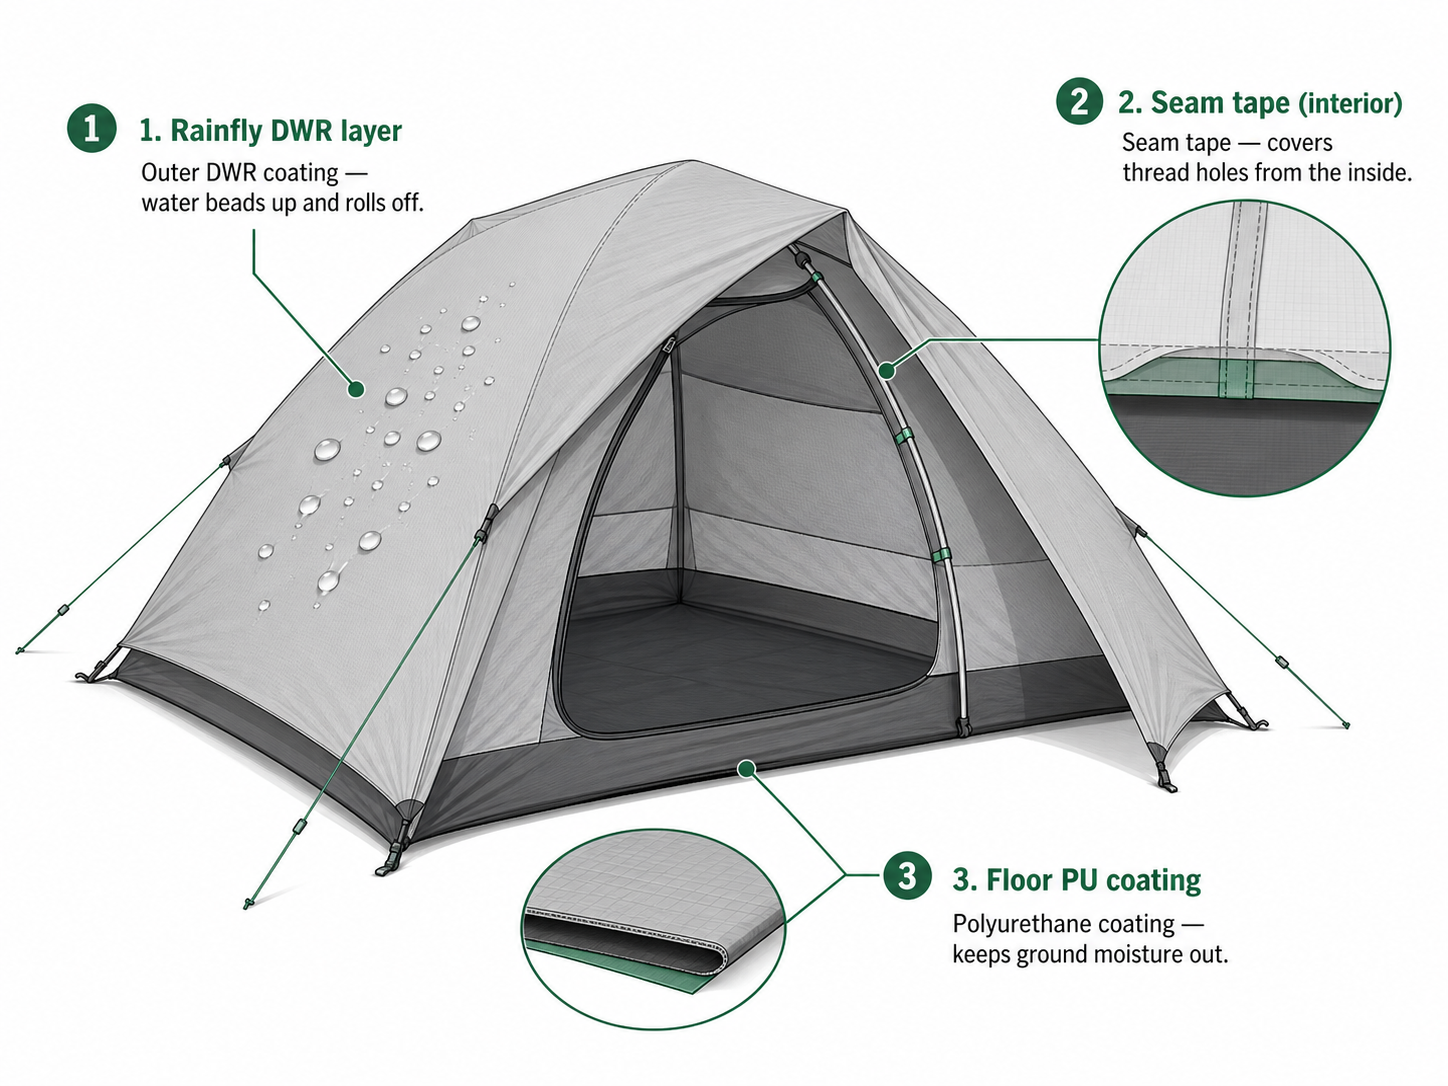
1. The rainfly’s DWR coating
A thin chemical layer on the outside of the fly that makes water bead up and roll off. It wears off first, usually within 1 to 2 seasons of regular use. When it fails, water soaks into the fly fabric instead of rolling off; you’ll see darker patches where the fabric has wetted out.
2. The seams
Every place a needle punched through the fabric is a potential leak. Factory seam tape covers the thread holes from the inside, and over time it peels, cracks, or develops gaps. When seams fail, water tracks down threads into the tent in narrow steady drips, often hours into a storm.
3. The floor’s polyurethane coating
The inside of the tent floor is coated with polyurethane (PU) to keep ground moisture out. The PU layer can flake, peel, or hydrolyze (turn sticky and smell sour) as it ages, especially if the tent is stored damp. When the floor fails, you wake up with a wet sleeping pad even when the rainfly looks dry.
Seven supplies, zero detergents
A full waterproofing job uses the same short list of products regardless of how big or expensive your tent is. The total cost runs $30 to $50 for everything, most of which lasts for several waterproofing cycles. The single most important rule: no laundry detergent, anywhere, ever. Detergent residue strips DWR faster than rain wears it down.
| Item | What it does | Approx. cost |
|---|---|---|
| Tech wash (Nikwax Tech Wash, Gear Aid Revivex Synthetic Wash) | Cleans the tent without stripping the DWR coating | $10–15 |
| Soft sponge or non-abrasive cloth | Cleaning without scrubbing through coatings | A few dollars |
| Seam sealer (Gear Aid Seam Grip WP or Seam Grip SIL) | Reseals seams; match to fabric type (see Section 4) | $8–10 |
| DWR refresh spray (Nikwax TX.Direct, Gear Aid Revivex) | Restores water beading on the rainfly | $15–20 |
| PU restoration product (Gear Aid Seam Grip TF) optional | Re-coats floor only if the existing PU is failing | $10–15 |
| Small paintbrush (½” or so) | Applies seam sealer in thin even coats | $2 |
| Spray bottle | Tests DWR before and after the work | — |

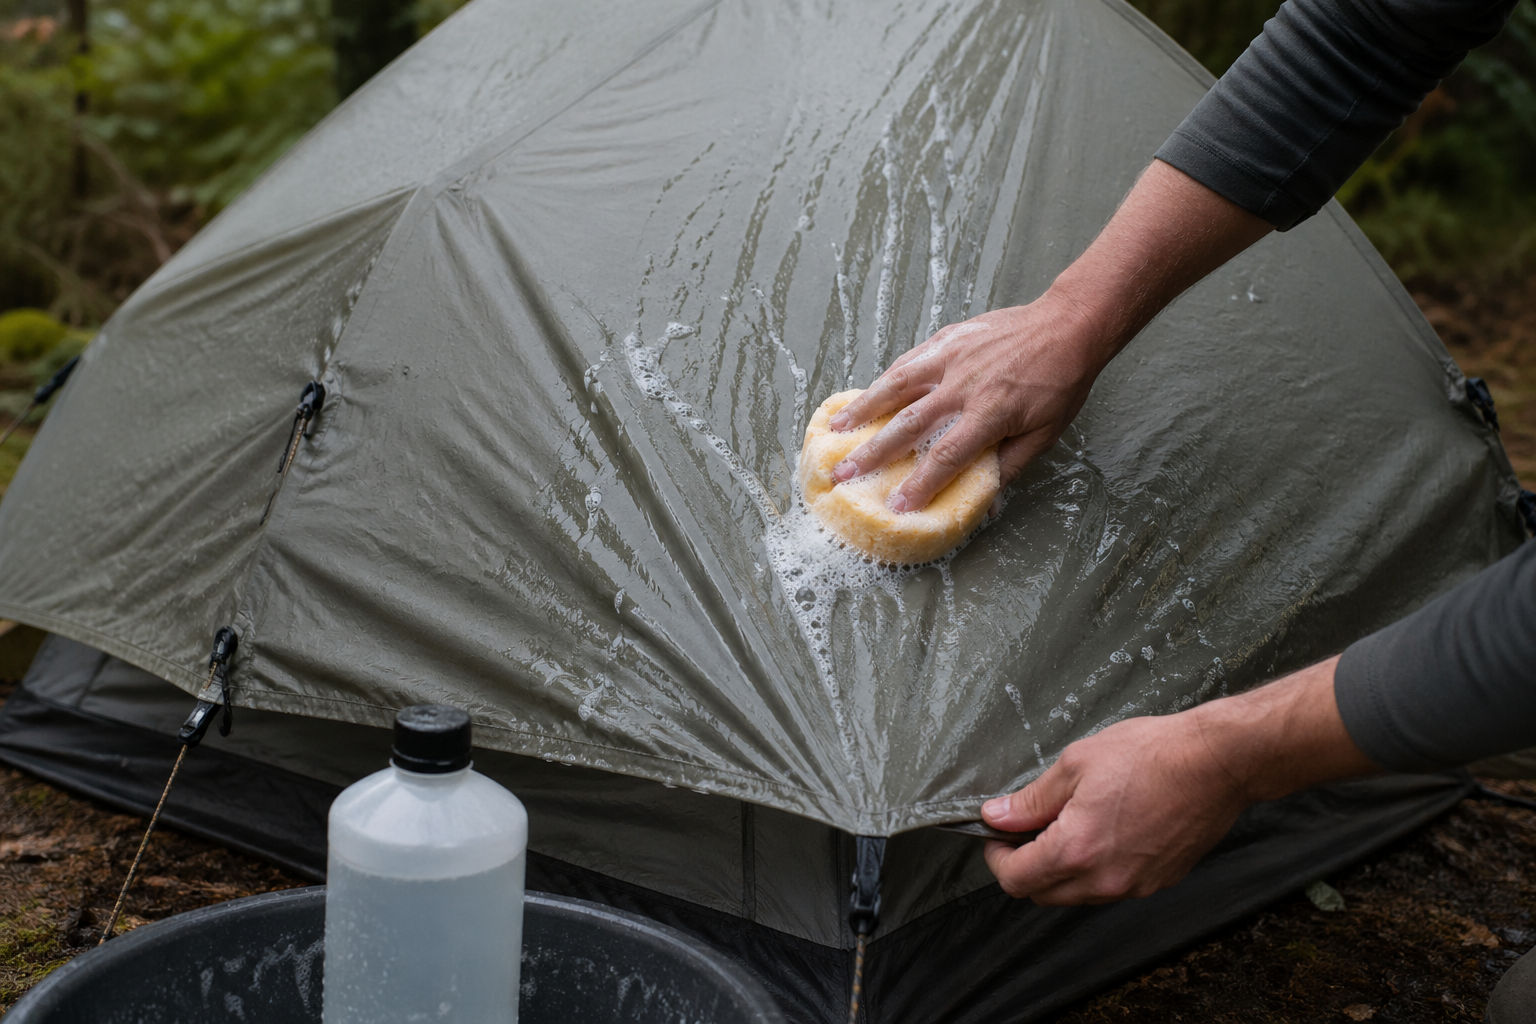
Wash the tent without stripping the DWR
You can’t waterproof a dirty tent. Dirt, body oils, sunscreen, pine sap, and DEET all interfere with whatever you’re about to apply. The cleaning step is also where most tents pick up invisible damage, because the temptation to throw the whole thing in a washing machine is strong and the consequences are slow to show up.
Step-by-step
1. Pitch the tent on a dry, sunny day. You need access to all surfaces and the whole thing needs to dry completely before any further work. Don’t rush this; a tent that’s still damp under a stuff sack pocket will doom whatever sealer you apply tomorrow.
2. Mix tech wash with cool water per the bottle (usually a capful per gallon). Cool, not warm; heat plus surfactants accelerates DWR breakdown.
3. Wipe down rainfly, walls, and floor with a soft sponge. Pay extra attention to the rainfly (the dirtiest part) and the inside of the floor.
4. Rinse thoroughly with clean water from a hose or buckets. No pressure washer; high pressure forces water through the fabric and damages the very coatings you’re trying to protect.
5. Let it dry completely. An hour or two of direct sun is fine; longer than that and UV starts to age the fabric. Move it to shade once it’s mostly dry. Total dry time is typically 4 to 6 hours on a warm day.
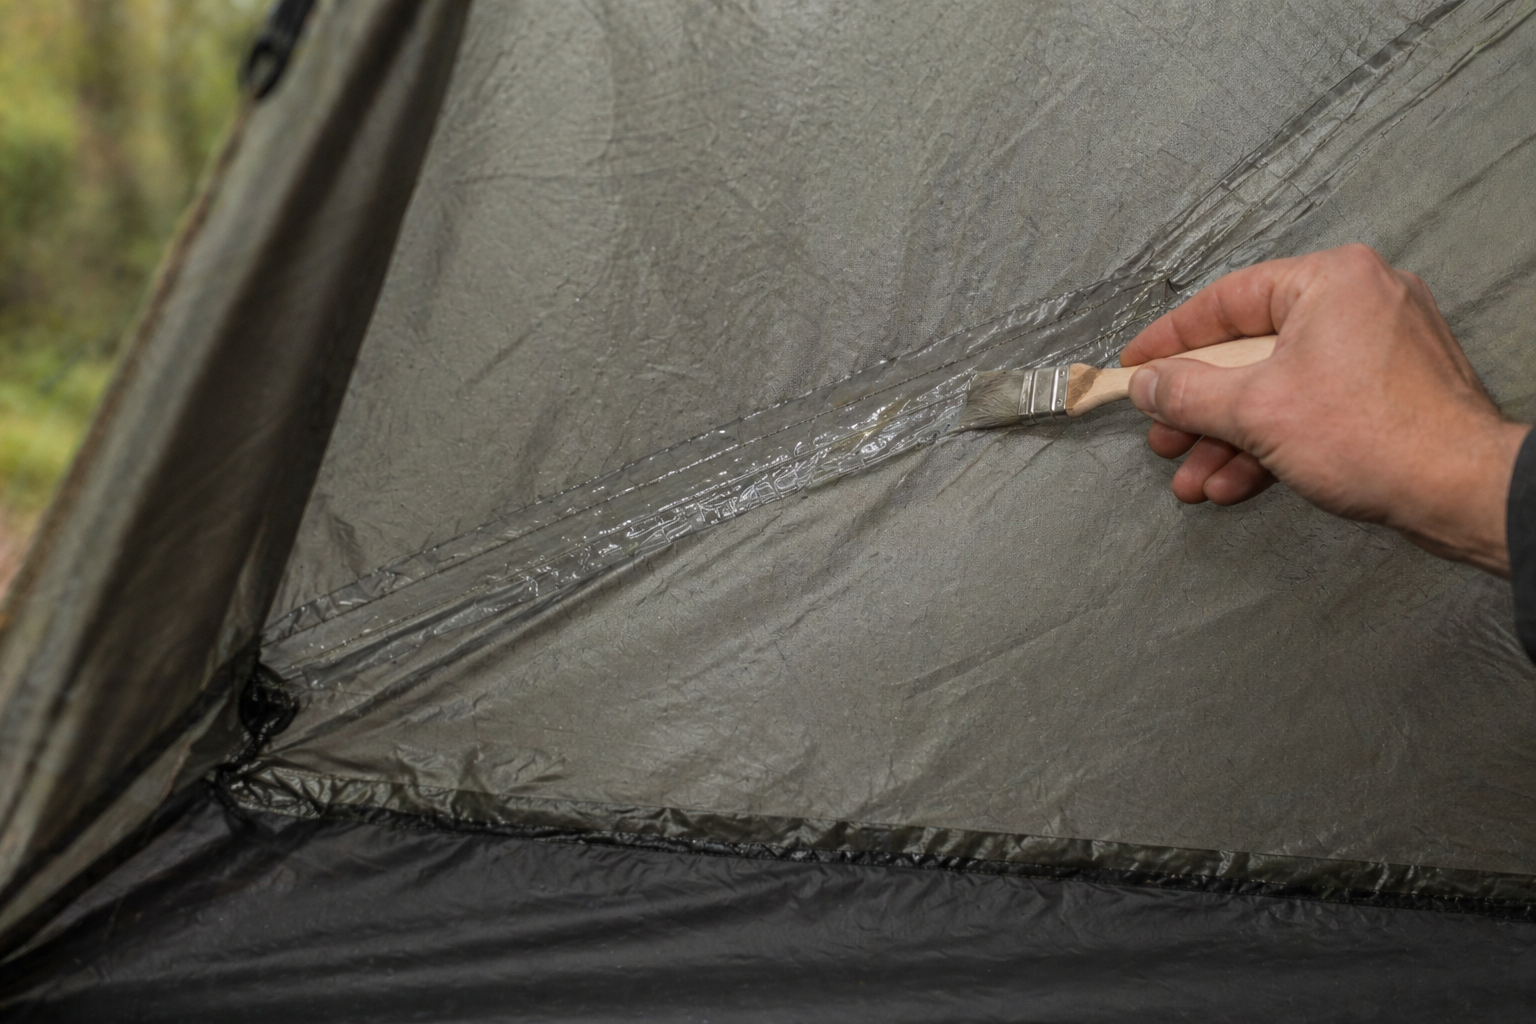
The seam fix most people miss
If you only learn one thing from this guide, learn this. The seams are sealed from the interior side, not the exterior. The reason is simple: water doesn’t soak through the fabric on either side of a seam; it travels down the thread holes from the outside and emerges on the inside. Sealing the outside doesn’t block the path. Sealing the inside does.
This is the most common waterproofing mistake by a wide margin. People see the stitching from the outside, dab sealer along the thread line, declare victory, and watch the same seam leak the next time it rains. Don’t do that.

Step-by-step
1. Set the tent and rainfly up indoors or in a garage. A controlled, dust-free environment matters; sealer cures slowly enough that windborne grit can settle into it.
2. Peel off any failing seam tape. Don’t yank. Work slowly with your fingernails or a plastic scraper. If a section of tape is still adhered well, leave it; you’re only removing what’s already failing.
3. Wipe the seams with rubbing alcohol on a clean cloth. This removes residue and helps the new sealer bond.
4. Apply seam sealer to the inside of every seam. Use the small paintbrush. Thin even coats are better than thick globs. Cover the stitching plus about a quarter inch on either side. Pay extra attention to high-stress areas: corners, pole sleeves, guy-out points, and the rainfly’s ridge seams. These are where water concentrates and where leaks usually start.
5. Cure for at least 8 hours, longer if it’s humid. Don’t pack the tent until the sealer is completely dry to the touch and not tacky.
Match the sealer to the fabric type
This is the second most common waterproofing mistake. Tent fabrics react differently to sealers, and using the wrong one means the sealer won’t bond. The four common cases below cover almost every tent on the market.
Silnylon · silicone-impregnated nylon
Common on ultralight tents (Tarptent, Big Agnes Copper Spur HV UL, Hyperlite Mountain Gear single-wall designs). The silicone in the fabric prevents urethane sealers from bonding. Use a silicone-based sealer such as Gear Aid Seam Grip SIL. Many silnylon tents ship without factory seam tape and require sealing before the first trip; check the manufacturer’s instructions.
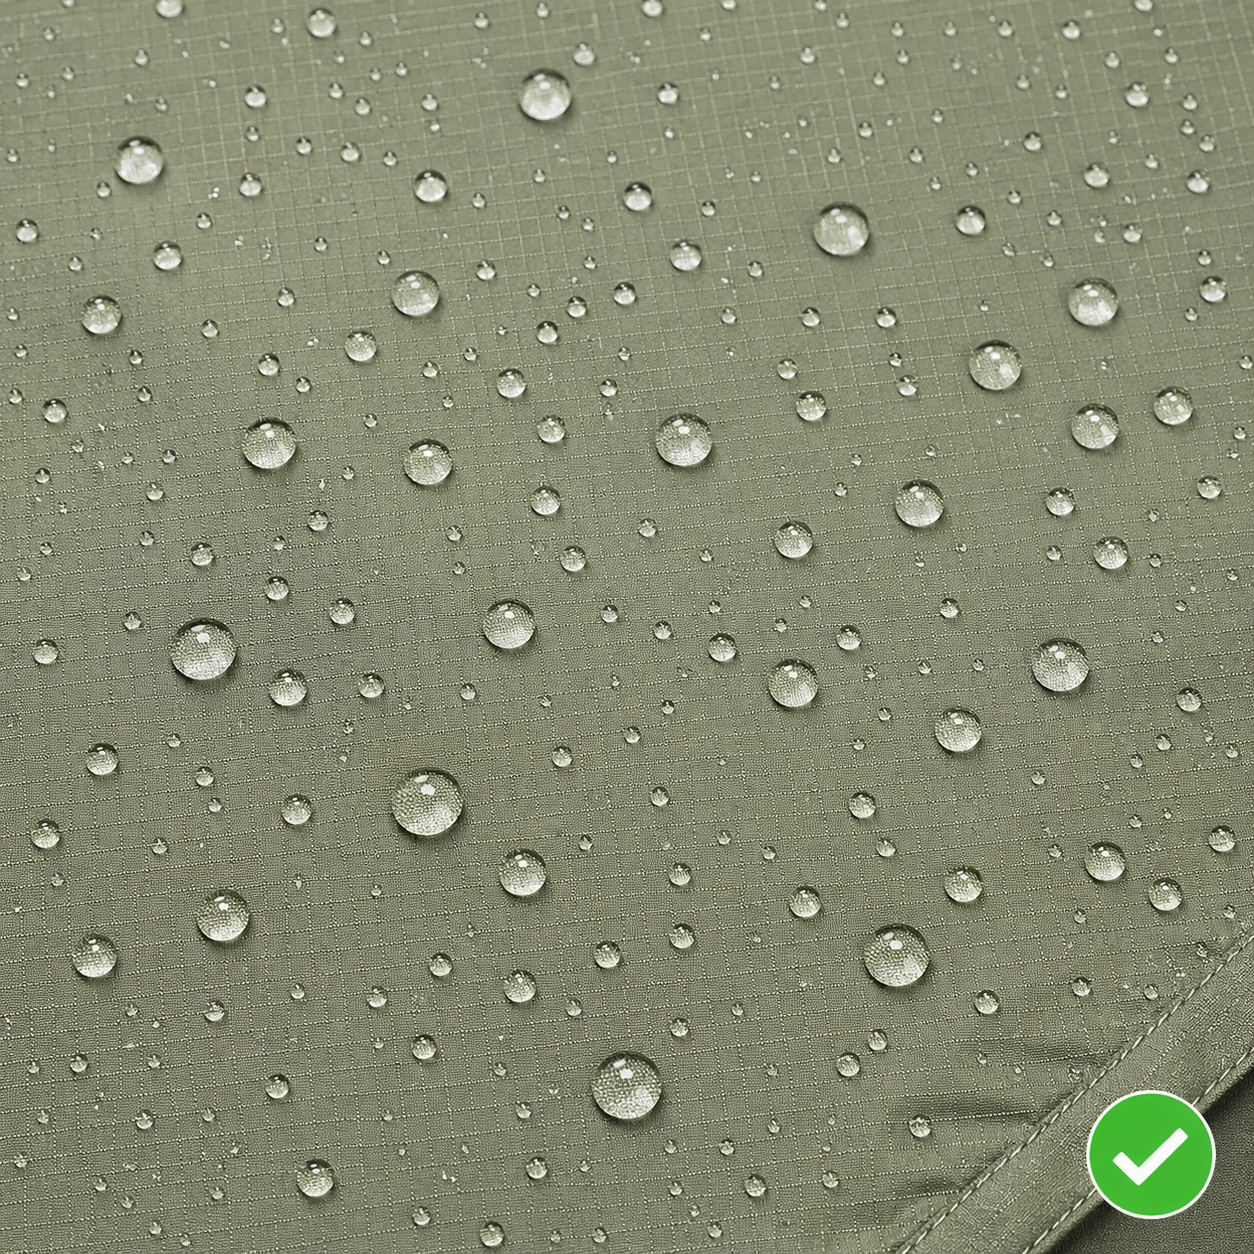
Restore the rainfly’s water beading
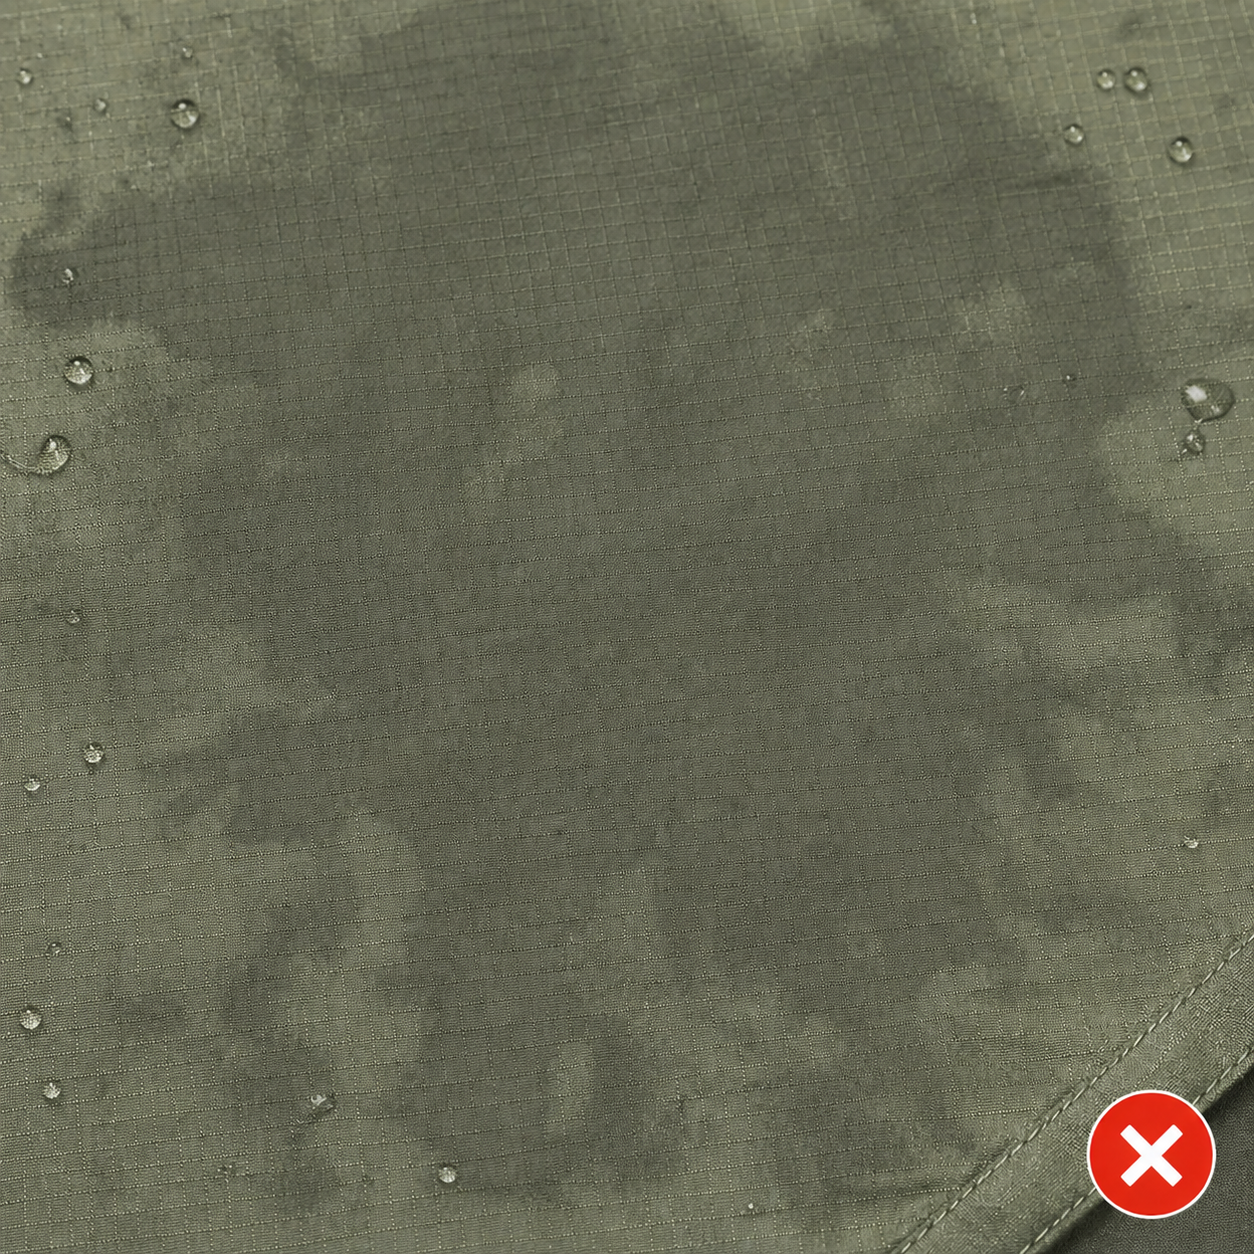
The DWR (durable water repellent) coating is the rainfly’s first line of defense. When it works, water hits the fly and rolls off in beads. When it fails, water soaks into the fabric (a state called “wetting out”), the fly gets heavy, and water eventually makes its way through to the inside. The good news: DWR is the easiest of the three systems to refresh. Twenty minutes of work plus a 24-hour cure and you’re back to factory performance.
The DWR test
Spray the rainfly with water from a spray bottle. If water beads up and rolls off, the DWR is fine and you don’t need this step. If water soaks in and the fabric darkens where it lands, the DWR is gone and water will start finding its way through to the inside.
Step-by-step
1. Hang or pitch the rainfly so you have access to the entire outer surface.
2. Confirm the fly is clean and damp. For most spray-on DWR products, slightly damp fabric absorbs the coating better than bone-dry fabric. Read the bottle; some products are spray-on-dry. If the bottle says damp, mist the fly with the spray bottle until it’s evenly moist but not dripping.
3. Spray an even coat across the entire outer surface. Hold the bottle 6 to 8 inches away. Don’t soak any single spot; overlap your strokes and aim for uniform coverage.
4. Wipe off any excess with a clean cloth within a few minutes. Pooled DWR leaves streaks and stiff spots that don’t beat the original problem.
5. Heat-activate if the product calls for it. Some DWR formulas need heat to bond. A low-heat dryer cycle (if the fly fits) or a hair dryer over the surface works. Many modern spray-on products skip this step entirely; check the label.
6. Cure for 24 hours before packing. Test it again with the spray bottle: water should bead immediately and roll off when you tilt the fabric.
Restore the floor only if it’s failing
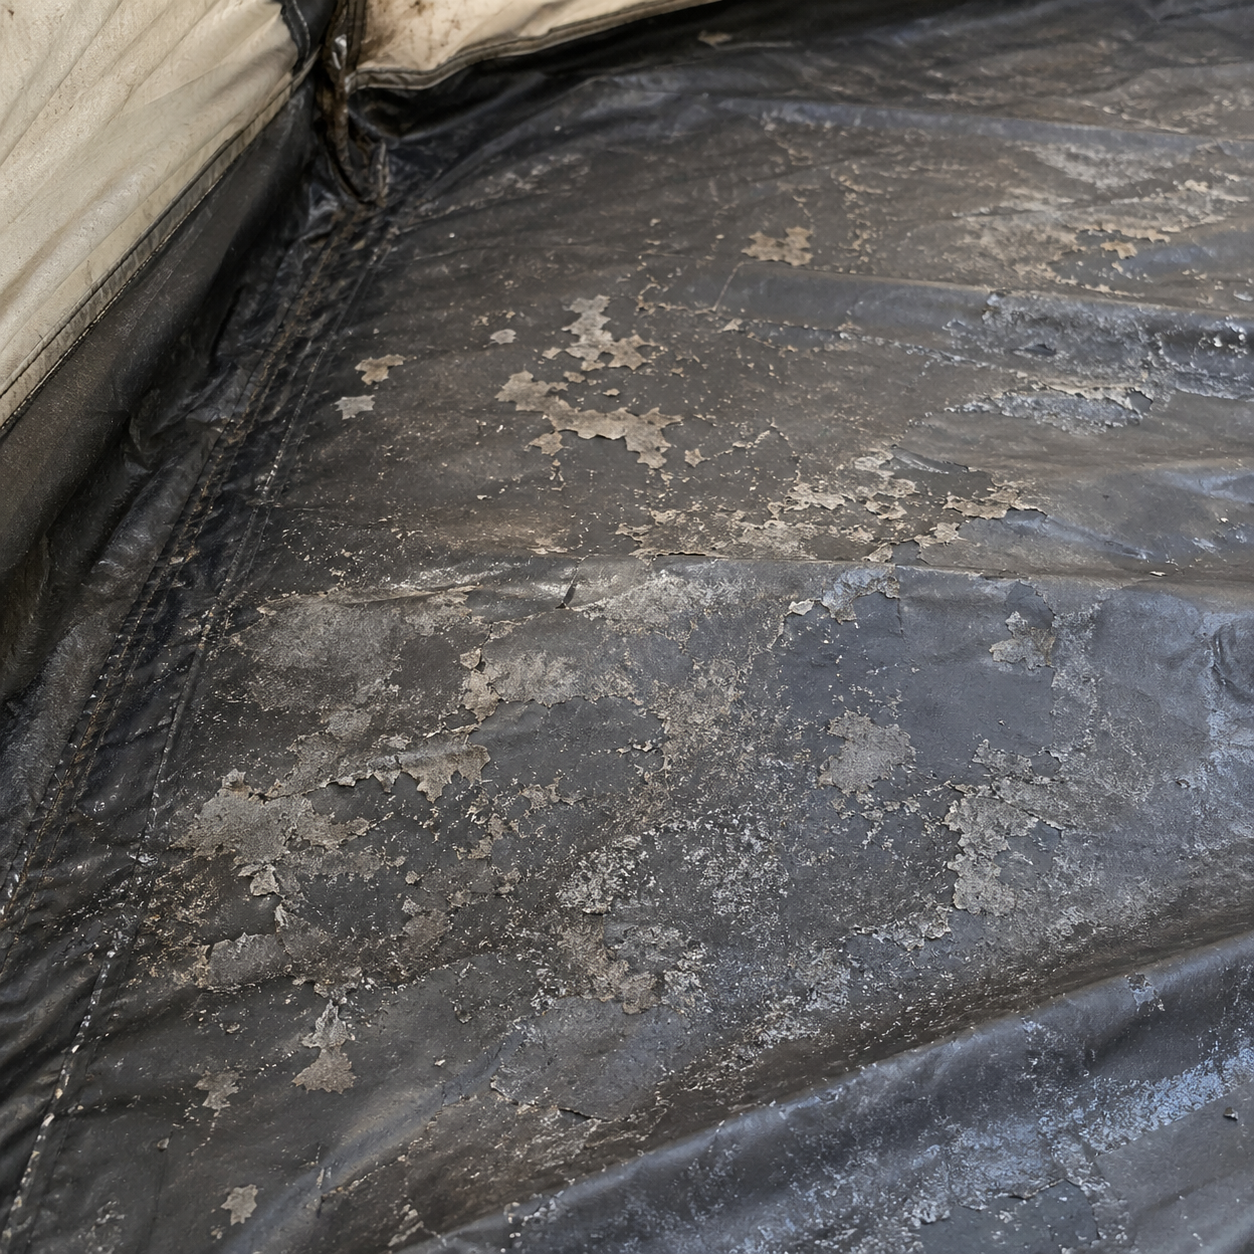
This is the section most people don’t need. Floor coatings on quality tents last 5 to 10 years if the tent is stored properly. Skip this entire step unless you’ve checked and confirmed the polyurethane coating is failing.
How to tell
Turn back a corner of the floor or look at the underside. Three signs of failure: visible flaking or peeling of the inner coating; a sticky or tacky feel when you run a finger across it; or a sour vinegar-like smell, which indicates hydrolysis. If the floor is smooth and odor-free, walk away from this section.
Step-by-step (only if needed)
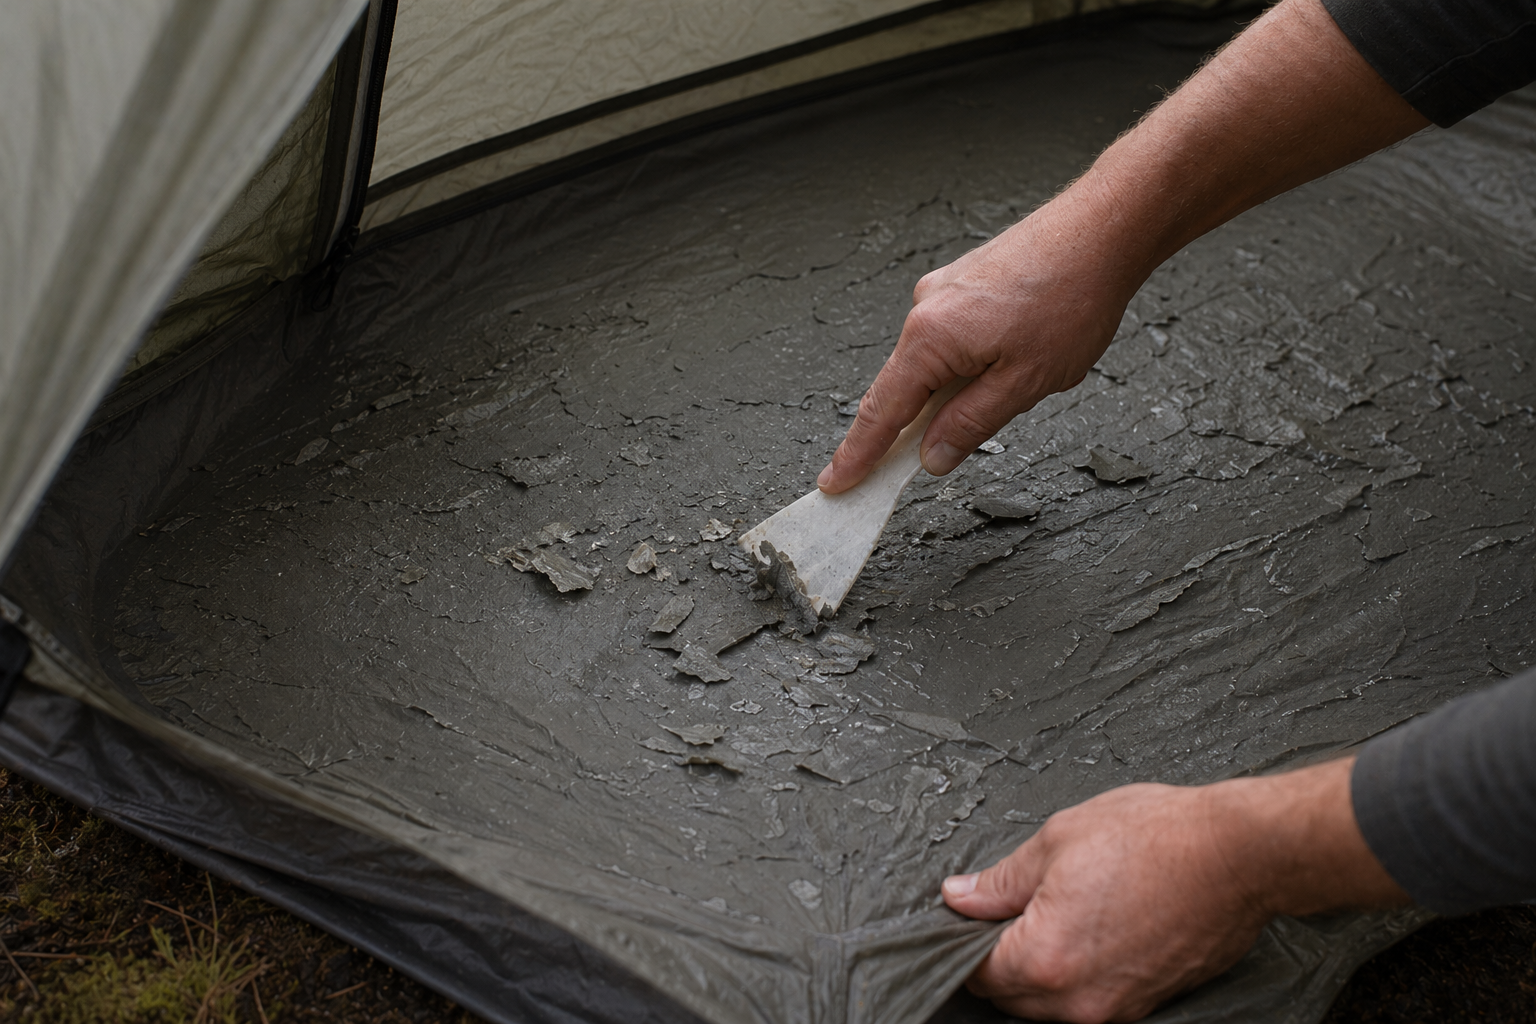
1. Lay the tent flat with the coated side facing up.
2. Gently scrape off any flaking PU with a soft plastic scraper or your fingernails. Don’t gouge the fabric underneath. The goal is to remove what’s already failing, not to scrape down to bare fabric.
3. Wipe the surface clean with rubbing alcohol on a cloth.
4. Apply a thin even layer of PU restoration product (Gear Aid Seam Grip TF is the standard choice). Use a foam brush or the applicator that comes with it. Thin and even beats thick and uneven; a too-thick layer dries unevenly and stays tacky.
5. Cure for 24 to 48 hours before folding or packing. This is genuinely a workshop project; rushing the cure produces a sticky mess that ruins the tent.
By use case, not by calendar
How often to waterproof a tent depends almost entirely on how much you use it and in what conditions. There’s no useful “every 12 months” answer; a tent left in the sun for two summer weekends ages faster than one used carefully on twenty wet nights. The matrix below covers the four common use patterns and what each one needs.
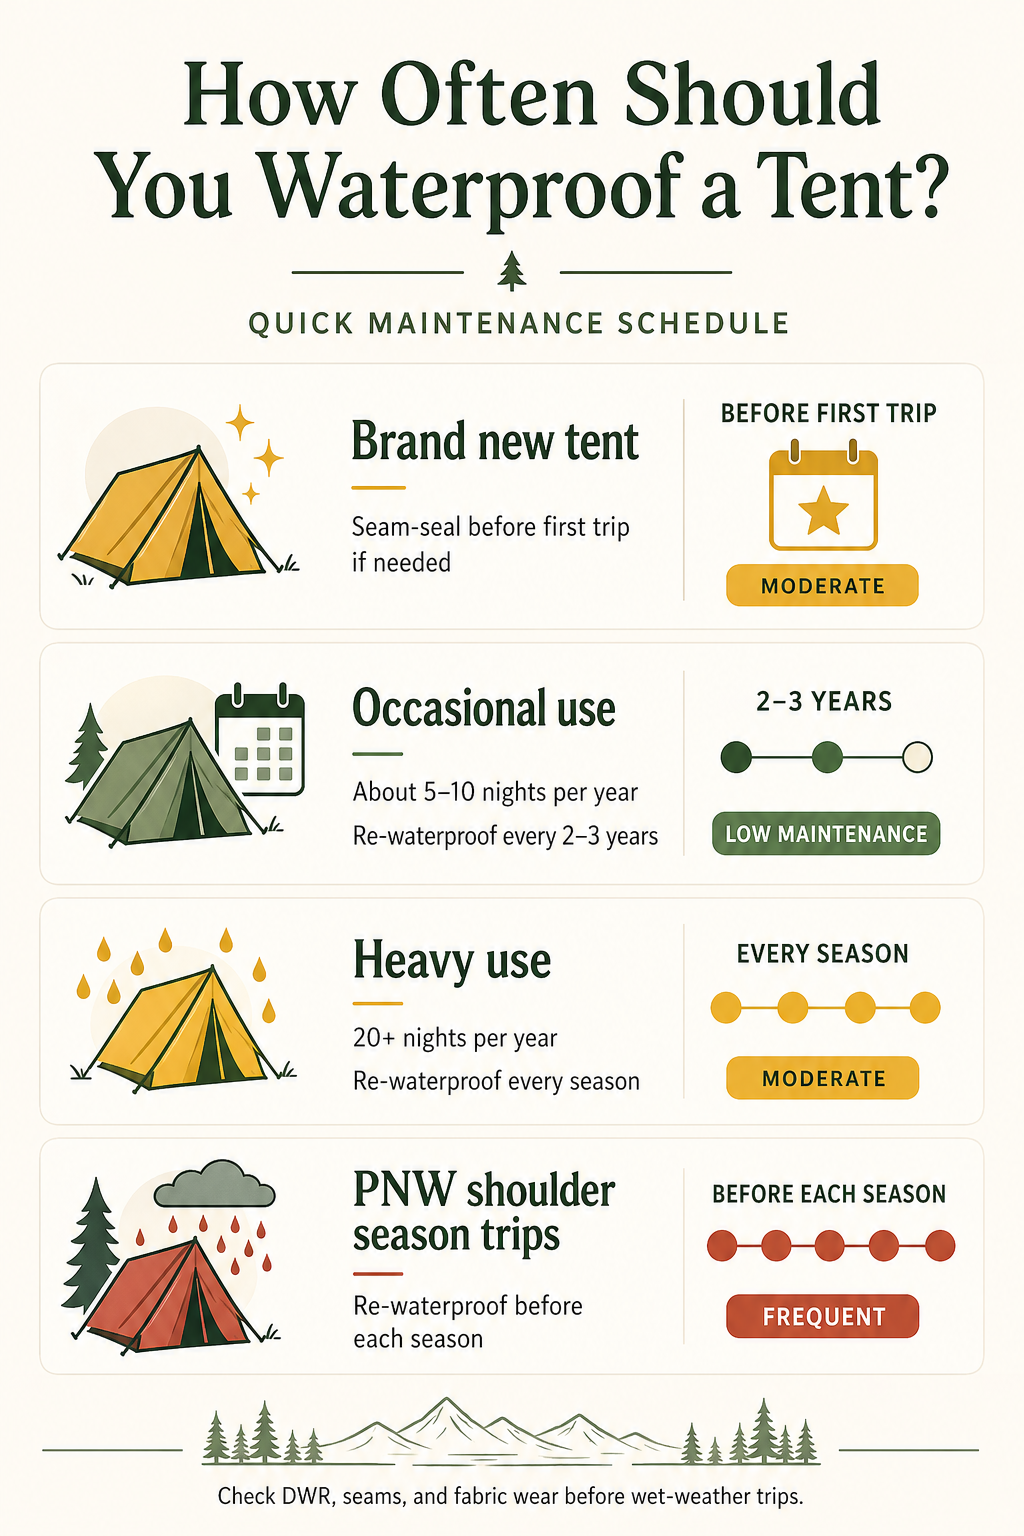
Frequency, by use pattern
Sun exposure ages a tent faster than rain. A tent stored set up for two weeks of summer can lose more DWR life than one used carefully for fifty nights. Pack it down when you’re not using it.
The four common cases
Brand new tent
Usually no work needed for the DWR or floor; both are fresh from the factory. Some ultralight silnylon tents ship without seam tape and require seam sealing before the first trip; check the manufacturer’s instructions. For mainstream tents, factory waterproofing is good for at least the first season.
Occasional use (5 to 10 nights per year)
Full waterproofing every 2 to 3 years. Test the DWR before each season; if it still beads, leave the rest alone. The longer you can stretch between full cycles without leaks, the better.
Regular use (15 to 25 nights per year)
Full waterproofing every season, ideally before the first wet trip of the year. The seams especially benefit from annual attention; tape that’s good in May can fail by October.
Heavy use or PNW shoulder seasons
Pre-season inspection on every system, plus DWR refresh whenever the test fails. If you’re tenting on the Coast in October or in the Cascades after first snow, treat the tent as a piece of working equipment that needs maintenance every season, not as a piece of recreational gear that can wait.
Five mistakes, and how to avoid each
Almost every tent waterproofing failure is one of five things. The figure below maps the wrong-versus-right for each, and the prose covers the why and the fix.

1. Using laundry detergent
The single biggest DWR killer. Tide, Persil, dish soap, OxiClean, anything with surfactants will strip the DWR off the fly and leave residue that interferes with future treatments.
Fix: use only tech wash (Nikwax, Gear Aid Revivex Synthetic) or hand-wash with cool water alone. Never throw a tent in a washing machine even on gentle, even with no detergent; residue from previous loads is enough.
2. Sealing the exterior of the seams
Water tracks down thread holes from the outside, emerges on the inside, and drips into the tent. Sealer on the exterior side doesn’t block the path.
Fix: all seam sealing is interior-side, where the stitching threads are visible. See Section 4 for the full process.
3. Storing the tent wet or stuffed
The fastest way to ruin a tent. Mildew breaks down the PU floor coating from the inside out, and once hydrolysis starts, it’s irreversible.
Fix: tents come out of the pack within 24 hours of any wet trip, full stop. Pitch in a garage, on a porch, or hang from a clothesline until completely dry. Long-term storage should be loose in a mesh bag, not compressed in the original stuff sack.
4. Using the wrong sealer for the fabric
Silicone sealer on a PU-coated tent (or vice versa) won’t bond. The seams will leak exactly where you “fixed” them, and you’ll have to remove the failed sealer and start over with the right product.
Fix: identify the fabric before buying any sealer. Section 4 covers the four common cases. If you can’t tell from the tent itself, search the manufacturer’s site for “fabric” or “specs.”
5. Pressure washing
High pressure forces water through the fabric weave and damages the coatings you’re trying to protect. People do it because it feels efficient.
Fix: garden hose at low pressure or rinse with buckets. Cleaning a tent should take 30 minutes, not five.
Find the right products
Sealers, sprays, and repair kits tested on Oregon trails. Ranked by what actually holds up after a season of use.

Sealers tested across silnylon, polyurethane, and dyneema. Ranked by bond strength, cure time, and flexibility through cold-weather use.
See picks →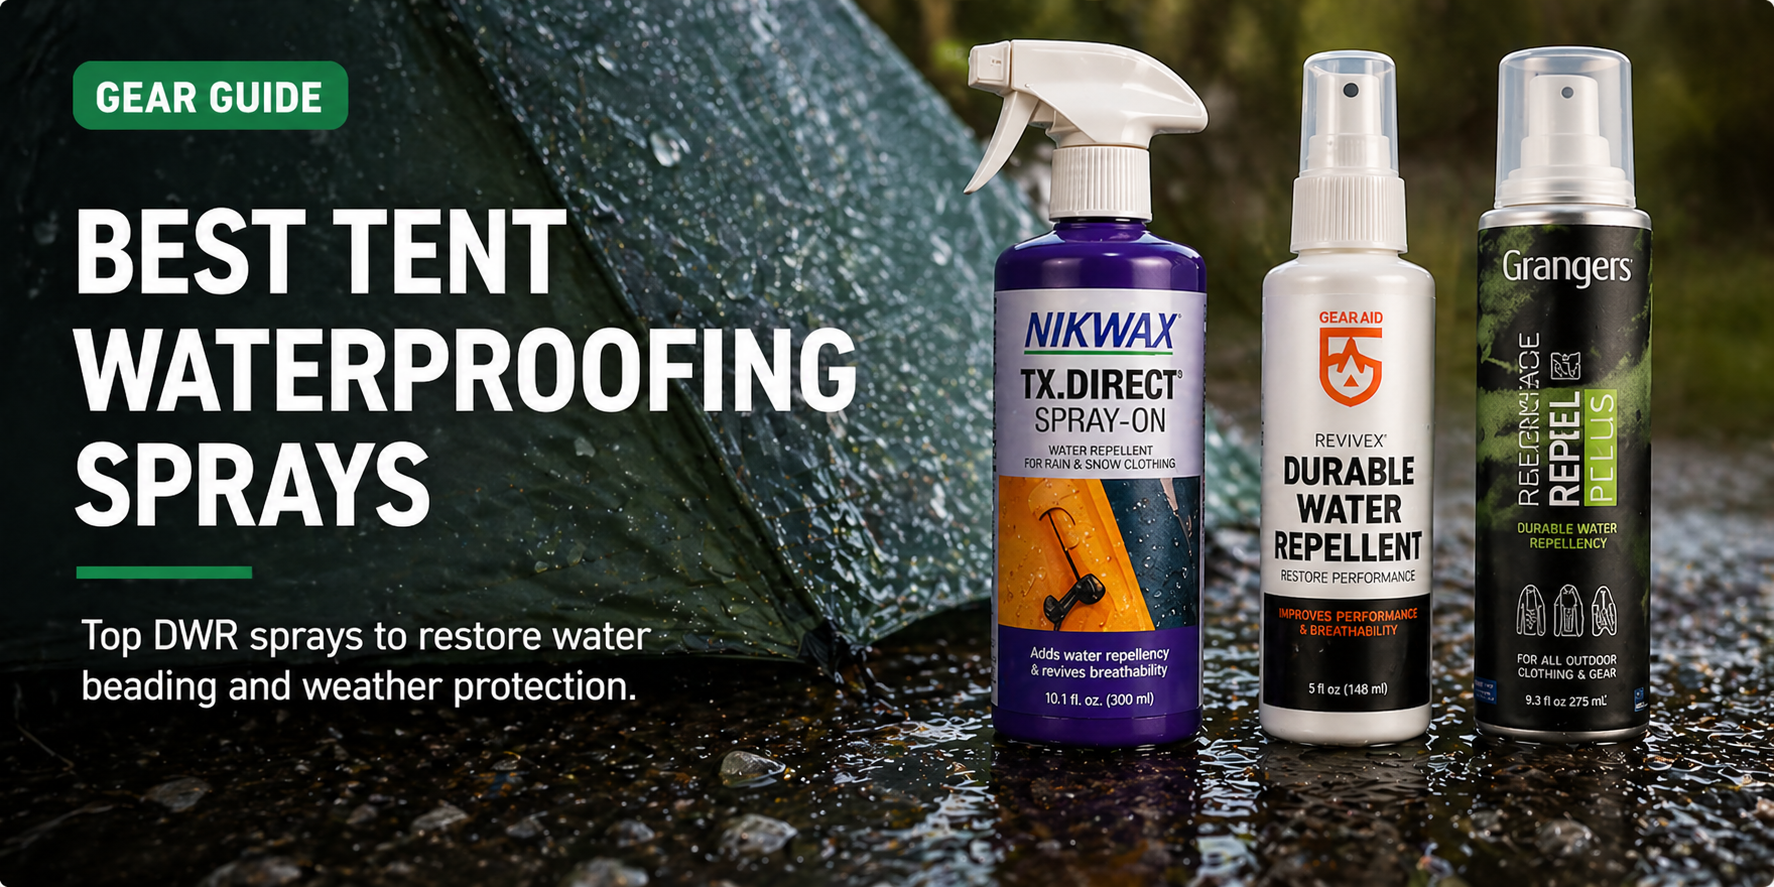
DWR sprays compared on real rainflies. Ranked by water beading after application, durability across washes, and ease of even coverage.
See picks →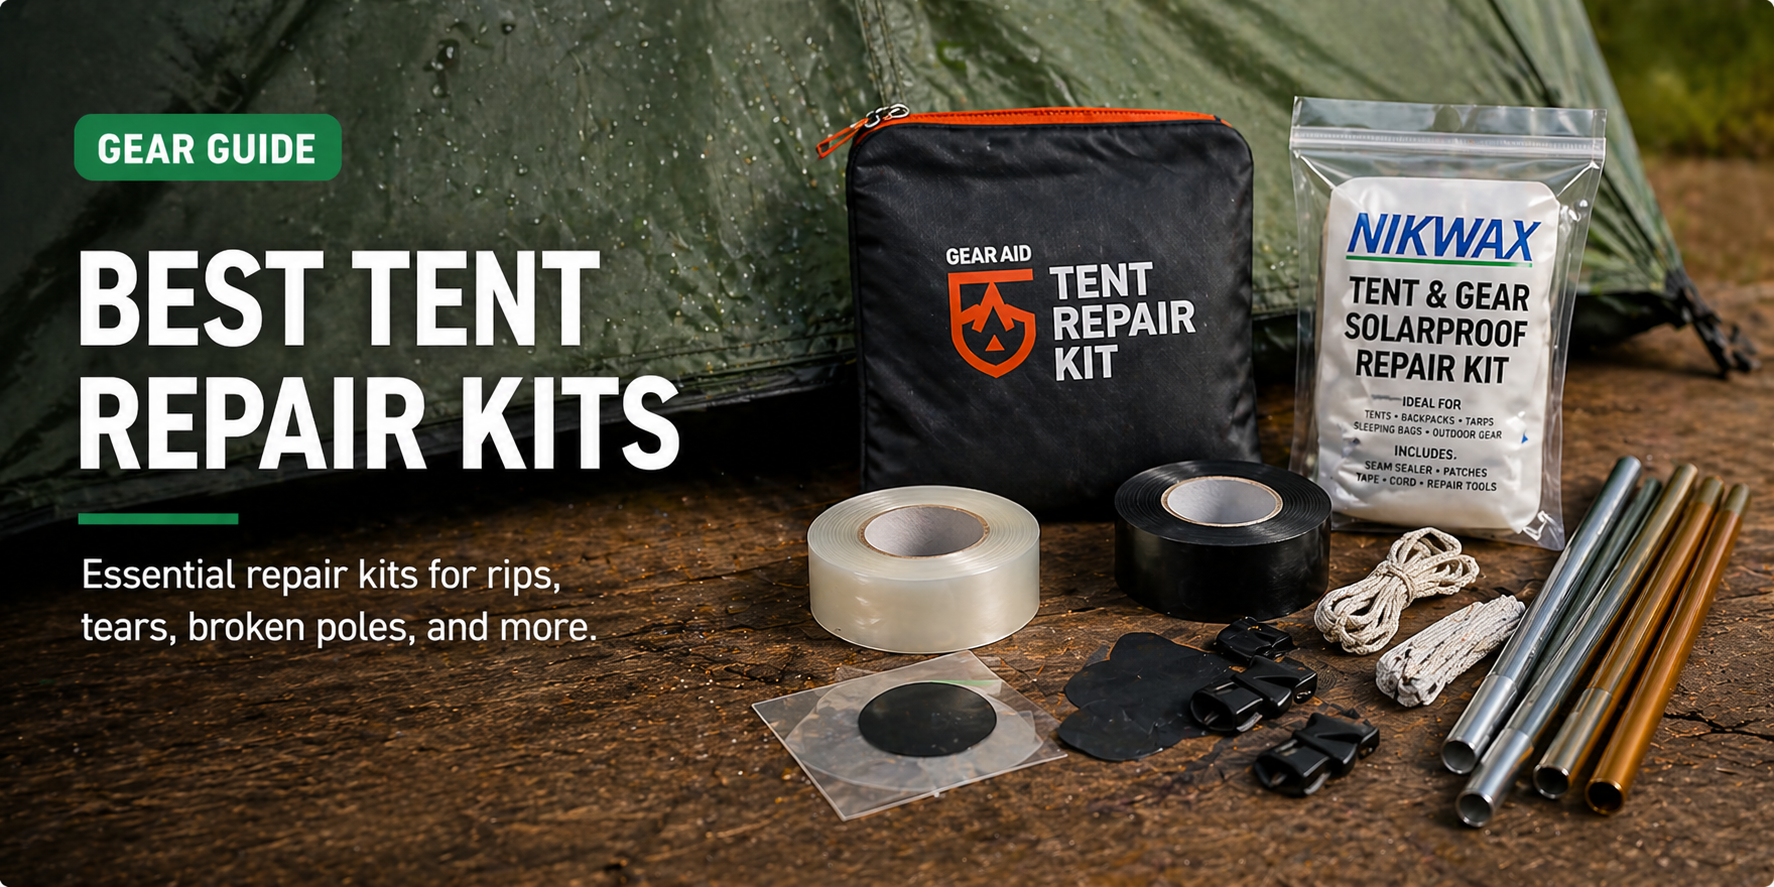
Field-ready kits for seam tape, fabric patches, and pole splints. Tested on multi-day trips when something fails on the trail.
See picks →
Every camping gear roundup on Oregon Tails in one place. Tents, stoves, sleeping systems, lanterns, and more.
View hub →Tent waterproofing, answered
Three systems, in order. Refresh the rainfly’s DWR coating so water beads up and rolls off the outer fabric. Seal the seams from the interior side, where the stitching threads are visible, using a sealer matched to your tent fabric (silicone-based for silnylon, urethane-based for polyurethane-coated nylon and polyester). Restore the floor’s polyurethane coating only if it’s flaking, peeling, or sticky.
The full process takes about 2 hours of active work plus 24 hours of curing time.
It depends on how often you use it and in what conditions. Occasional users (5 to 10 nights per year) can go 2 to 3 years between full waterproofing. Heavy users (20+ nights per year) or anyone hiking PNW shoulder seasons should re-waterproof every season, ideally before the first wet trip.
Sun exposure ages a tent faster than rain, so a tent left set up for two weeks in summer sun can lose more DWR life than one used carefully for fifty wet nights.
Usually not for the DWR or floor; those are fresh from the factory. But many ultralight silnylon tents ship without seam tape and require seam sealing before the first trip. Check the manufacturer’s instructions; if it says to seal seams before use, do it.
For mainstream car-camping and mid-range backpacking tents, factory waterproofing is good for at least the first season and you can wait until you see issues before doing anything.
Generally no. Most tent manufacturers explicitly recommend against it because agitation damages coatings and stitching, and home machines have detergent residue from previous loads that strips the DWR. Spot-clean by hand with a sponge and tech wash instead.
The exceptions are some heavy-duty canvas tents (which are washed differently anyway) and a few specific synthetic tents whose manufacturers approve it; check your specific tent’s care instructions before risking it.
Silnylon (silicone-impregnated nylon, common on ultralight tents like Tarptent and Big Agnes Copper Spur models) needs a silicone-based sealer such as Gear Aid Seam Grip SIL. Standard polyurethane-coated polyester or nylon tents (most car-camping and mid-weight backpacking tents) need a urethane sealer like Gear Aid Seam Grip WP.
Using the wrong one means the sealer won’t bond and the seams will leak, so identifying your fabric before buying is the most important first step.
Spray the rainfly with water from a spray bottle. If water beads up and rolls off, the DWR is fine. If water soaks in and the fabric darkens where it lands (called wetting out), the DWR is gone and water will start finding its way through to the inside.
This 20-second test is the most honest diagnostic in tent care; do it as part of your pre-trip routine before any shoulder-season trip.
The polyurethane coating has hydrolyzed: broken down from moisture and age. This is what happens when a tent is stored damp for long periods. Once hydrolysis starts, it’s hard to reverse.
You can scrub off the failing coating with rubbing alcohol and apply a PU restoration product, but if the smell is strong and the coating is widely affected, the tent is usually near the end of its life. The lesson is preventive: tents come out of the pack and dry within 24 hours of any wet trip, every time.
You shouldn’t need to. The waterproofing all lives on the outer fly and the bottom of the floor. The interior walls are usually breathable mesh or non-coated fabric on purpose; that’s how condensation escapes from your breath and body heat.
Coating the inside would trap moisture and cause more problems than it solves. If you’re getting wet inside the tent, the issue is almost always failed DWR on the fly or unsealed seams, not anything to do with the interior fabric.
