Backpacking field guide
How to Pack a Hiking Backpack
A loaded pack is a load-bearing system. Where every item sits relative to your spine, your hips, and the pack’s frame is the difference between a pack that rides with you and one that rides you.
Pack a hiking backpack in zones: heavy items (food, water, fuel) in the middle, pressed against your back; sleeping gear at the bottom; bulky-but-light layers at the top; wet or dirty gear in the front pocket; and anything you need on the move in the lid and hipbelt pockets. The goal is a stable load stacked over your hips, not one that rides your shoulders.
01: Primer · How to Pack a Hiking Backpack
The difference between a pack that rides and one that rides you
Most of the difference isn’t fitness, fancy gear, or the pack itself. It’s where each item sits relative to your spine, your hips, and the pack’s frame.
A backpack isn’t a duffel with straps. It’s a load-bearing system, and the way you fill it decides whether you glide up switchbacks or list sideways down them. The diagram below breaks a hiking pack into anatomical zones. Each zone has a job, and putting the right category of gear in the right zone is what separates a comfortable all-day carry from a miserable one.
See the best hiking backpacks guide if you’re also shopping for a new pack.
02: Diagram · How to Pack a Hiking Backpack
How to pack a hiking backpack, zone by zone
Heavy things close to your back. Light things at the ends. The things you will actually reach for in the pockets you can open without stopping.
Side cross-section · your back sits to the right of the frame
CLICK ANY ZONE
Select a zone
Tap any zone in the diagram, or use the pills below, to see what goes there and why.
Try clicking the core zone. It’s where most people get packing wrong.
03: Step by step · How to Pack a Hiking Backpack
The loading order, from empty to trail-ready
Pack in this sequence and every zone ends up balanced without re-doing anything. Skip around and you’ll be unloading half the bag to wedge the stove somewhere that doesn’t exist.

Lay everything out first
Spread your full kit on the floor in categories: sleep, shelter, kitchen, clothes, hydration, safety. If it doesn’t fit visually, it won’t fit in the pack.
Setup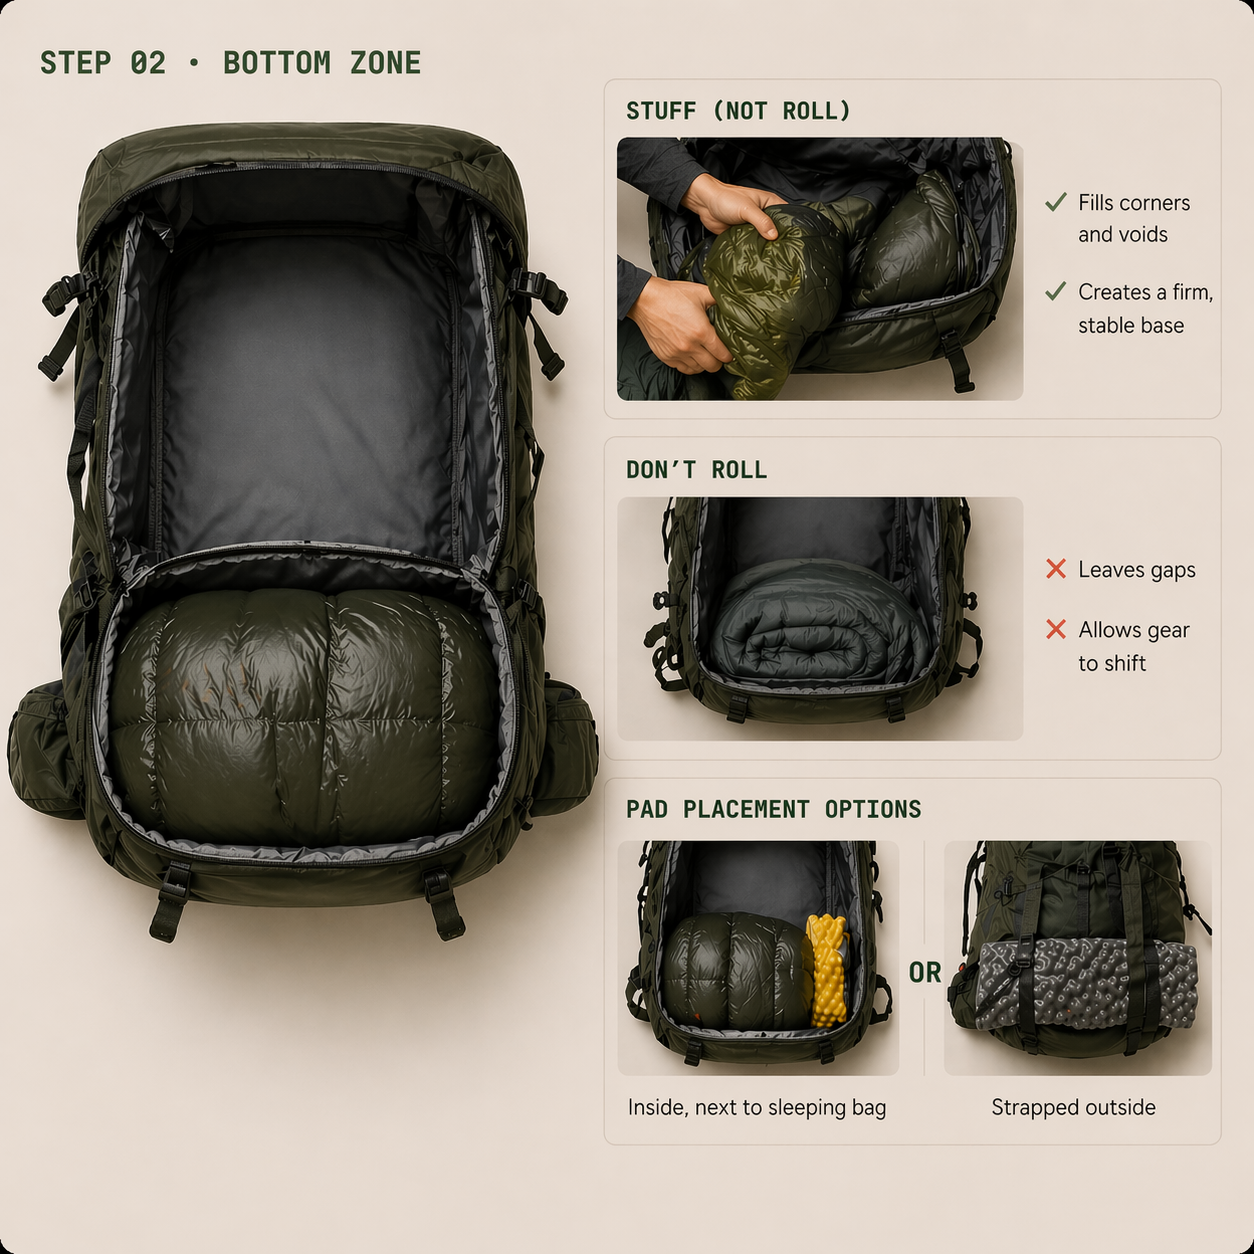
Sleeping bag into the bottom
Stuff (not roll) your sleeping bag into the base. Stuffing fills awkward corners; rolling leaves gaps. Pad goes next to it or strapped outside.
Bottom zone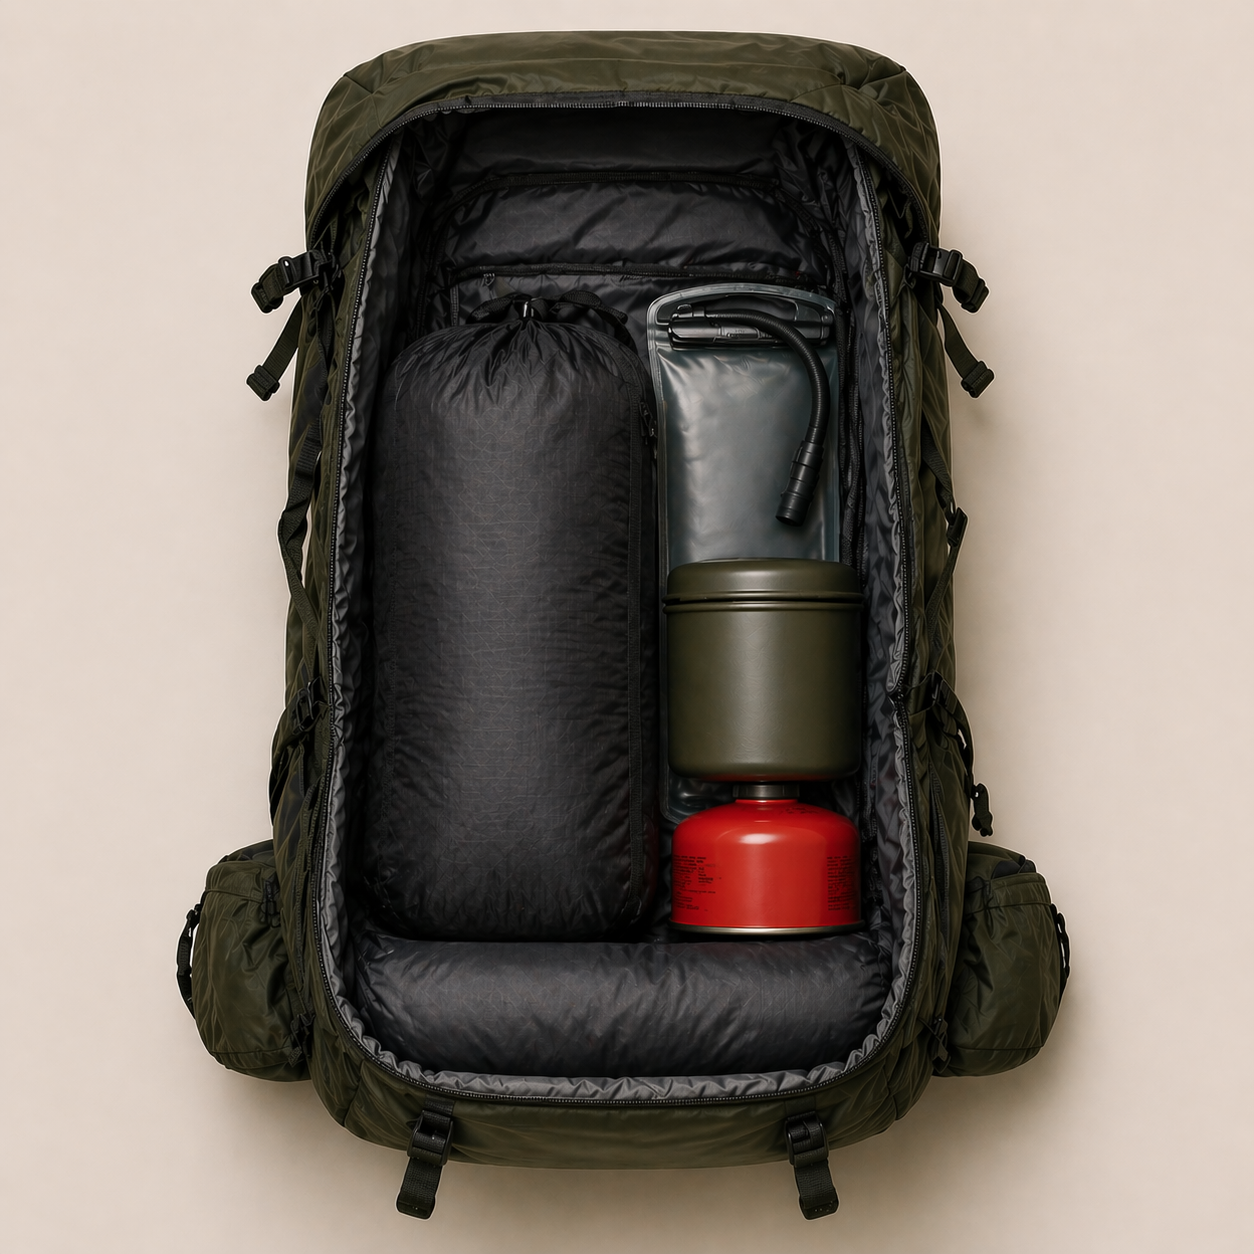
Heavy gear against your back
Food bag, bear canister, stove fuel, water reservoir, and anything else dense goes in the core zone, pressed flat against the pack panel closest to your spine.
Core zone
Medium gear wraps around it
Tent body, cookset, and insulated layers fill the remaining core and top-zone space. Think of them as packing peanuts that keep the heavy gear pressed tight against the frame so nothing shifts.
Core / top
Light and bulky at the top
Rain shell, puffy, camp shoes. These fill volume without adding weight where it would tip you backward.
Top zone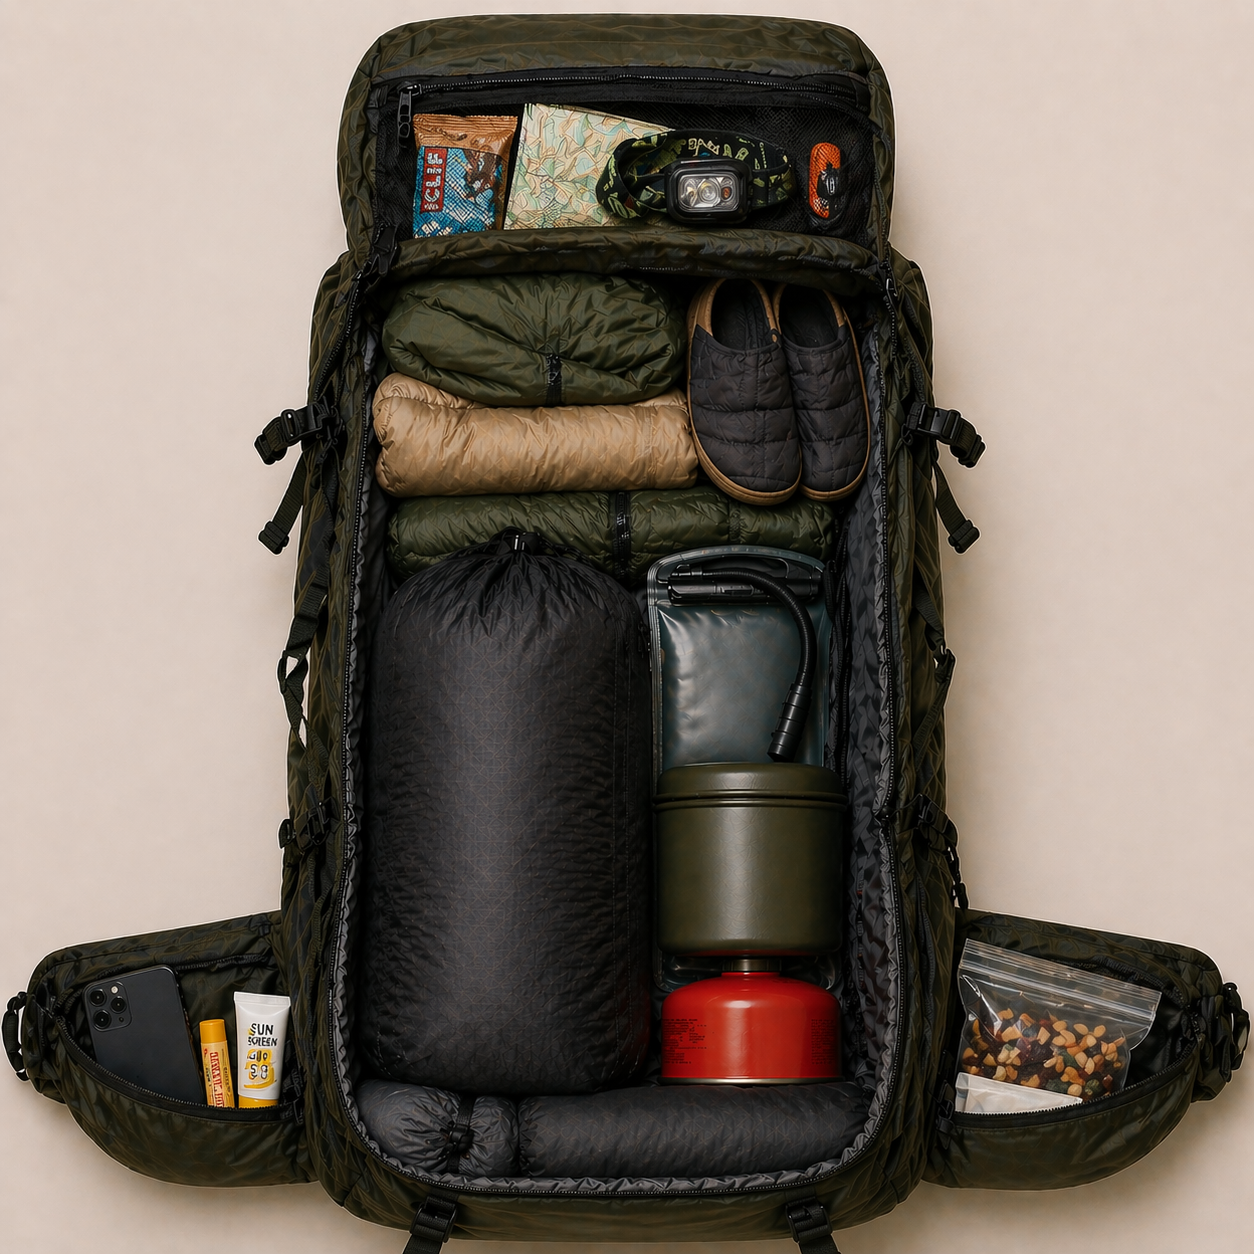
Grab-and-go in the lid and hipbelt
Snacks, map, headlamp, phone, lip balm, sunscreen. If you need it without stopping, it lives here.
Lid / hipbelt
Wet and dirty into the front pocket
Rain fly, wet socks, the trowel kit. Keeps the filthy stuff isolated from dry gear without a second stuff sack.
Front pocket
Compress, shoulder, adjust
Cinch every strap before lifting. Loosen shoulder straps, tighten hipbelt on your hipbones, then snug the shoulders. Load-lifters last.
Finishing04: What goes wrong · How to Pack a Hiking Backpack
Three mistakes that wreck your back before mile two
If the pack feels wrong in the first mile, it’s almost always one of these. All three are fixable at the trailhead.
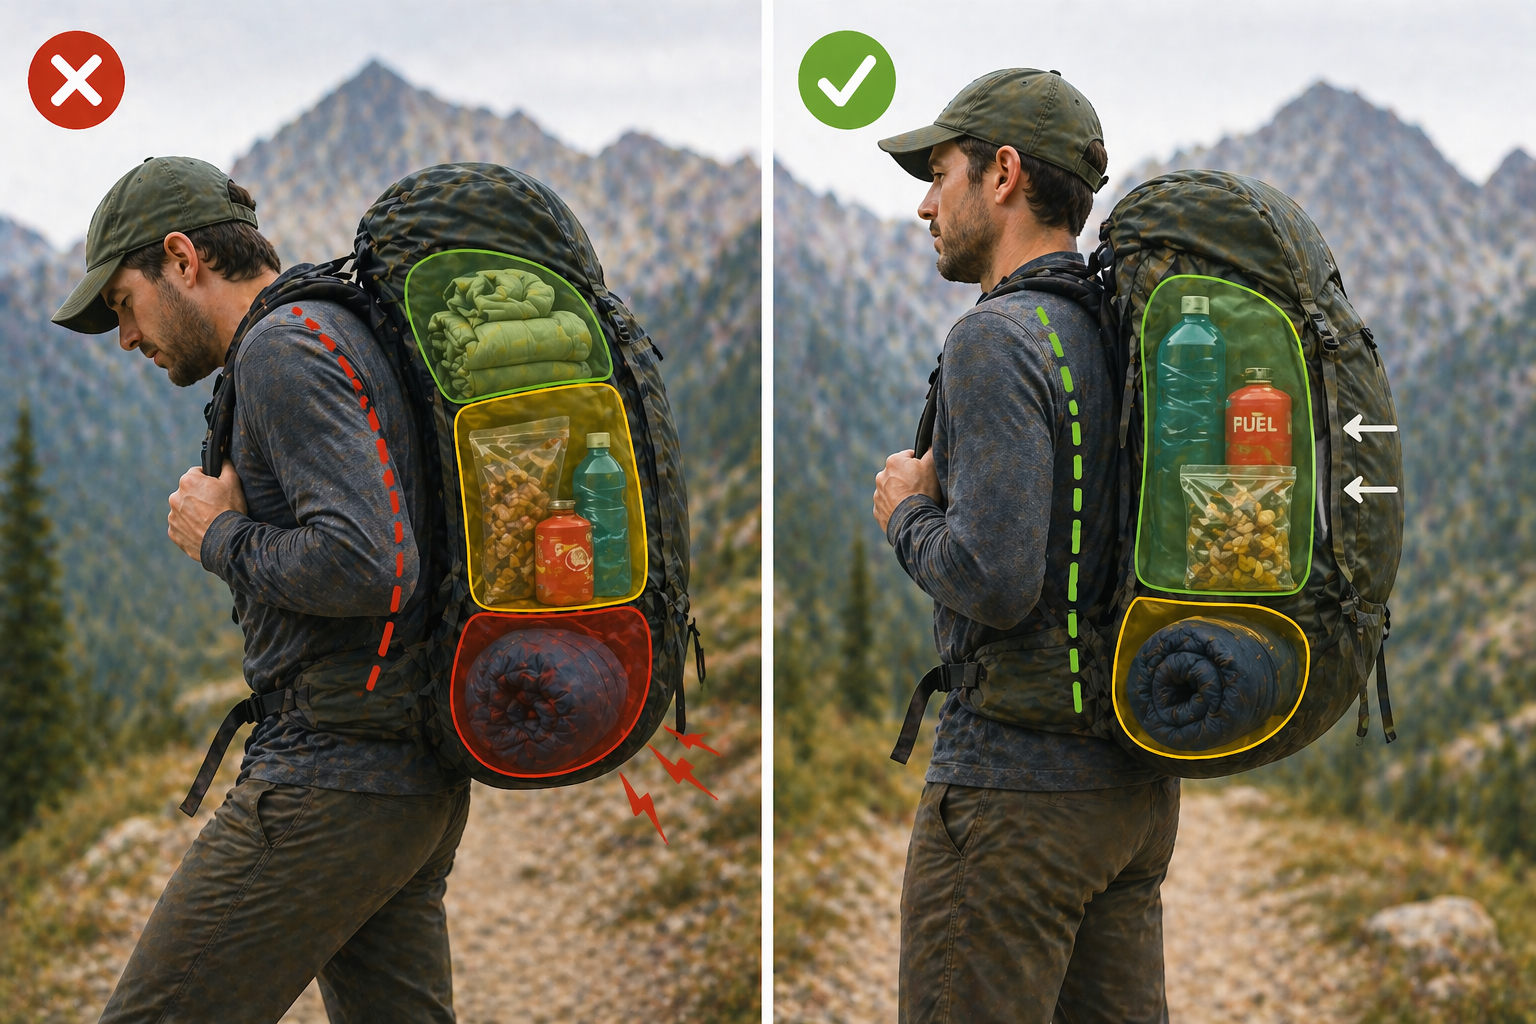
Heavy items at the bottom
Common instinct: big stuff on the bottom, small on top. Wrong for a hiking pack. A low center of gravity drags your shoulders back and forces you to lean forward. You’ll feel it in your lower back within an hour.

Weight hanging off the outside
Strapping boots, pots, or a tent to the outside of the pack feels efficient but creates a swinging mass that fights you every step. It also snags on branches and destabilizes you on scrambles.

Hipbelt worn like a regular belt
A hipbelt is not a waist belt. Worn on the waist it does nothing; the pack’s weight stays on your shoulders and you’ll be massaging your traps for a week afterward.
05: Reference · How to Pack a Hiking Backpack
Typical weights & where they go
Rough weights for common gear, with the zone each item belongs in. Useful when you’re deciding whether a just-in-case item is worth its real estate.
| Item | Typical weight | Zone | Note |
|---|---|---|---|
| Sleeping bag (3-season) | 2–3 lb | Bottom | Stuff loose; don’t use a compression sack inside the pack. |
| Tent (2-person) | 3–5 lb | Core / Top | Body inside, fly in the front pocket, poles in the side sleeve. |
| Food (per day) | 1.5–2 lb | Core | Heaviest thing in the bag after day one. Place carefully. |
| Water (1 L) | 2.2 lb | Core | Bladder in the sleeve against the frame; spare bottle in side pocket. |
| Stove + fuel | 0.5–1.5 lb | Core | Wedge between food and water reservoir. |
| Insulated jacket | 0.7–1.2 lb | Top | Stuff into corners; doubles as a pillow. |
| Rain shell | 0.5–1 lb | Lid / Top | Keep accessible. Weather changes fast above treeline. |
| Headlamp + batteries | 0.2 lb | Lid | Top pocket so you can find it in the dark. |
| First aid kit | 0.4–0.7 lb | Lid | Grab-accessible, never buried. |
| Bear canister | 2–3 lb empty | Core | Dense and rigid. Always against the back panel. |
06: Common questions · How to Pack a Hiking Backpack
Packing, answered
What if my pack is half-empty?
Compress aggressively. Most packs have internal and external compression straps specifically for this. Use all of them. A half-empty pack will slosh around and shift your center of gravity with every step, which is worse than a heavier pack that’s properly compressed.
Should the sleeping pad go inside or outside the backpack?
Inside if it’s inflatable and fits. Outside (strapped to the bottom or underneath the lid) for foam pads that won’t compress. Never clip a sleeping pad to just one strap. It needs two points to stay still.
Where does water go: reservoir or bottles?
Both, usually. A bladder in the dedicated sleeve keeps a large volume centered against your spine. A hard bottle in a side pocket lets you drink without unshouldering, and acts as backup if the bladder springs a leak.
How do I know if I’ve packed my backpack correctly?
Lift the pack by the top handle and shake it gently. You should hear almost nothing move. Then put it on. It should feel like the weight is stacked over your hips, not pulling you backward or sideways. If you feel yourself leaning forward to compensate, the load is too low or too far from your back.
How heavy should a hiking backpack be?
A loaded pack should generally not exceed about 20% of your body weight for comfortable hiking, or up to 30% for experienced backpackers on multi-day trips. For a 160-pound hiker, that’s roughly a 32-pound target ceiling. Skew heavier if you’re strong and conditioned, lighter if you’re newer to backpacking or carrying on steep terrain.
Does packing a frameless backpack work differently?
Yes. A frameless pack needs you to create the structure. Line the back panel with a folded foam pad or a tightly stuffed sleeping bag, then pack dense items against that flat surface. Without a frame, a lumpy load becomes lumpy on your back.
07: Watch · How to Pack a Hiking Backpack
The loading order, walked through
See the whole sequence in action: base fill, core, mid-weight wrap, lid stuffing, and the final strap cinch.
Keep reading
More backpacking guides

The complete starting point for trips from one night at the coast to a week on the PCT. Links to everything in the cluster.
Shop the cluster
Find the right backpack
