Hiking field guide
How to Choose a Hiking Backpack
A hiking backpack is load-bearing architecture worn on your back. The volume it holds, the torso length it’s built for, and the way the hipbelt transfers weight decide whether you carry the pack or the pack carries you.
Choose a hiking backpack by matching three things to the trip you take most often: capacity in liters (15–30 L for day hikes, 35–50 L for overnights, 50–70 L for multi-day), torso length in inches (measure C7 vertebra to iliac crest), and hipbelt size (the padded wings must wrap the top of your hip bones, not your waist).
Buy for fit first, volume second, features third. An internal frame in the 3–4 lb empty-weight range handles nearly everything most hikers actually do.
This guide walks through the full decision in order: capacity, fit, frame, features, and empty weight, with trip-specific recommendations at the end. Each section is short enough to skim and specific enough to act on. It pairs with our guide to packing a backpack once you have the right one, and with the backpack reviews hub if you’re ready to look at specific models.
A backpack isn’t a bag. It’s a frame you wear.
The thing separating a $50 school bag from a $250 hiking pack isn’t the fabric or the zippers. It’s the frame, the suspension, and the load-transfer system that moves weight off your shoulders and onto your hips. When you carry 25 pounds for eight hours, that engineering is the only thing between you and a sore back.
Two packs with the same volume can feel completely different on the same body, and the same pack can feel radically different on two different bodies. That’s why choosing one has more in common with buying boots than buying a jacket. Volume tells you how much it holds. Fit tells you how it carries. Both have to be right.
How many liters you actually need, by trip length
Pack capacity is measured in liters and the ranges are stable across brands. Pick the smallest range that covers your longest typical trip. Buying oversized tempts you to bring things you don’t need, and every unused liter is dead weight and unused surface area flapping on your back.
Daypack · 15 to 30 liters
Big enough for a day out. Water, snacks, an insulating layer, a rain shell, a first aid kit, and a map. Below 15 liters you’re into running-vest territory. Above 30 and you’re carrying more than you need on a day hike.
Compression straps matter here too. A well-designed 50-liter pack can cinch down to a comfortable 30-liter day carry, but a 30-liter daypack can’t expand. If you need flexibility, size up and compress.
Torso length is the real size, not waist or shoulders
Pack size charts aren’t based on your height. They’re based on your torso length, the distance from the bump at the base of your neck (your C7 vertebra) down the curve of your spine to the top shelf of your hip bones (your iliac crest). That one measurement is what makes a pack fit.
Two people the same height can have torso lengths 3 inches apart. Leg length is where most height variation lives. That’s why a 6-foot friend can’t tell you what pack size you need, and why trying on your partner’s pack tells you almost nothing.
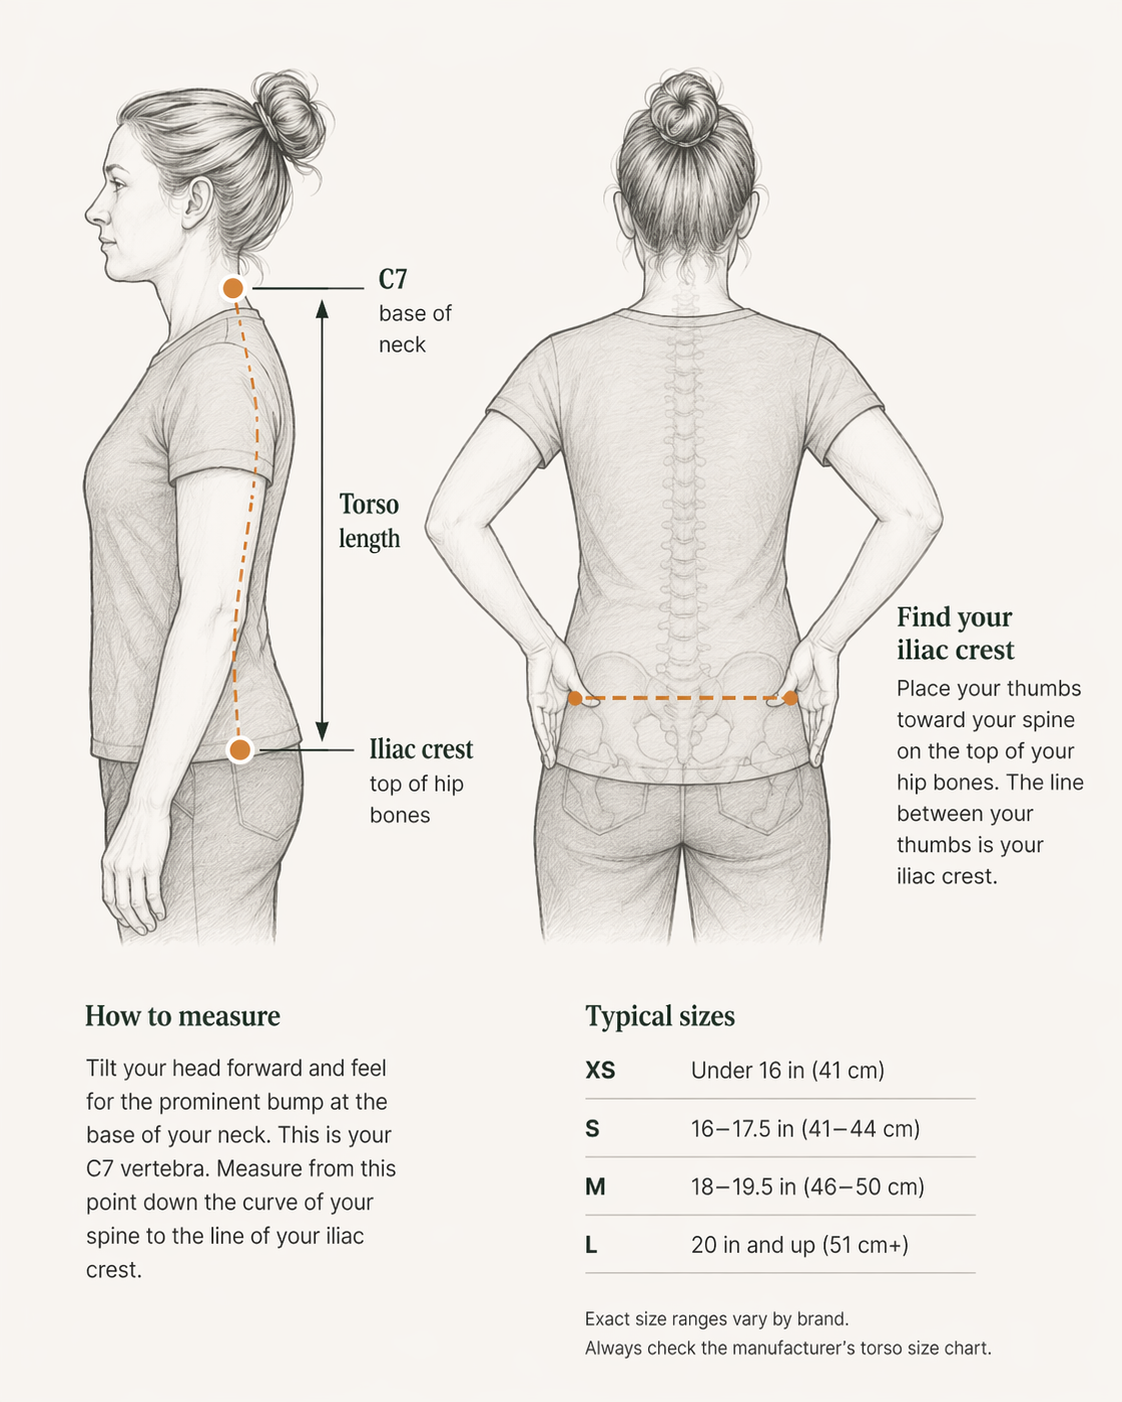
The two landmarks
Top: C7 vertebra, the bump at the base of your neck when you tilt your head forward. Bottom: iliac crest, the shelf of your hip bones. Run a soft tape between them along the curve of your spine.
Typical sizes
The hipbelt is where the weight goes
A hiking backpack is designed to move 60 to 80 percent of its load onto your hips through the padded wings of the hipbelt. Those wings must wrap the iliac crest, the top shelf of your hip bones, not your waist. If the hipbelt lands on your belly button or drops onto your thigh bones, the pack doesn’t fit.
Most packs come with either a fixed hipbelt sized to the frame, or an interchangeable belt in S/M/L options. Women’s-specific packs typically pair a narrower frame with a shorter hipbelt range. If your waist-to-hip differential is pronounced, the women’s cut usually sits better regardless of gender.
Load-lifters, sternum strap, harness
The shoulder straps do two jobs: they hold the pack against your back and they stabilize the top of the load. The load-lifter straps, the small angled straps running from the tops of the shoulder straps back to the pack, pull the upper pack body toward your body and should sit at roughly 45 degrees when the pack is loaded. If they’re vertical, the pack is too small; if they’re horizontal, too large.
The sternum strap clips across your chest and keeps the shoulder straps from slipping outward. Position it a few inches below your collarbones, tight enough to close the straps but not so tight it restricts breathing.
Internal, external, or frameless, and why it matters
The frame is the skeleton the pack is built around. It determines how weight transfers to your hips, how the pack moves on uneven terrain, and how much the empty bag weighs. There are three real options.
| Frame type | Best for | Strengths | Weaknesses |
|---|---|---|---|
| Internal frame | Almost everything | Moves with you on scrambles, narrow profile for trail travel, stable on uneven ground | Can feel hot on the back; less useful for wide or boxy loads |
| External frame | Heavy, boxy loads on maintained trail | Excellent ventilation through airgap, easy to lash irregular items, carries very heavy loads efficiently | Tips on uneven terrain, catches branches, dated designs |
| Frameless | Ultralight hikers under 20 lb base weight | Lightest empty pack weight, simplest construction, packs down small | Requires careful packing to create structure; uncomfortable with >25 lb loads |
Internal frame is the default
For 95 percent of hiking, internal frame is the right answer. Modern internal frames are pre-contoured to the curve of your back, use a single aluminum stay or a perimeter frame sheet, and distribute load evenly. They move well on uneven terrain, scramble comfortably, and keep a narrow profile on brushy trail.
External frame is a niche tool
External frame packs (think old-school Kelty with a visible aluminum ladder) shine when you’re carrying very heavy, boxy, or irregular loads on trails with minimal scrambling. Classic use cases are hunting pack-outs, carrying building materials into remote sites, or summer trips in hot climates where the airgap between pack and back is worth the trade-off. Not the right choice for a typical Oregon backpacking trip.
Frameless is for committed ultralighters
Frameless packs like the Hyperlite Southwest or Zpacks Nero skip the frame entirely to save weight. They only work if your total load stays under about 20 to 25 pounds and you know how to pack so that your sleeping pad and stiff gear create the frame. For a beginner or anyone carrying more than a minimal kit, skip frameless and take the extra pound for a real frame.
Features that earn their weight, and the ones that don’t
Every feature adds ounces. The question isn’t whether a feature is useful in the abstract, it’s whether it’s useful often enough to justify carrying it every mile for years. Here’s what actually matters.
Features worth paying for
Padded, sized hipbelt with pockets
Non-negotiable on any pack over 30 liters. Hipbelt pockets hold your phone, snacks, lip balm, and sunscreen, and you can reach them without taking the pack off. This is one of the most-used features on a multi-day trip.
Hydration sleeve
Almost universal now. Pairs with a 2 or 3-liter reservoir and keeps water centered against the frame where it should be. A front-mounted port on one or both shoulder straps is standard.
Load-lifter straps
The small straps running from the top of each shoulder strap to the upper pack body. They pull the top of the load toward you and are essential on anything 40 liters and up. If the pack you’re looking at doesn’t have them, keep looking.
Stretch front pocket
The big external mesh pocket on the face of the pack. Holds a rain jacket, a wet fly, a hat, snacks, a map. Saves opening the main compartment 20 times a day. Nearly every modern pack has one; if yours doesn’t, that’s a red flag.
Dual side water bottle pockets
Reachable-while-wearing pockets are a recent upgrade on many packs. They let you drink from a hard bottle without unshouldering, which turns out to be more useful than the weight suggests.
Top lid with a pocket
The lid pocket is for grab-and-go gear: headlamp, first aid, snacks, map. Some ultralight packs skip the lid to save weight; a roll-top plus a stretch front pocket can replace it, but you lose fast access.
Features you probably don’t need
Separate sleeping bag compartment
A bottom zipper with an internal divider to reach your sleeping bag. Sounds useful. Rarely is. You pack the sleeping bag once in the morning and take it out once at night. The compartment divider adds weight and restricts how you fill the main bag. Most ultralight and modern packs have skipped it for a reason.
Integrated rain cover
A sewn-in cover sounds convenient but adds 4 to 6 ounces you’re always carrying, whether it’s raining or not. A standalone rain cover weighs the same but you only bring it when rain is likely. A pack liner (a waterproof sack inside) is lighter still and protects better.
Extra zippers and sub-pockets
Every zipper is a failure point and a weight add. Packs designed for backcountry use tend toward minimalism; packs designed for travel lean into organization. Know which you’re buying.
Fancy suspension systems
Tensioned mesh back panels (the Osprey Anti-Gravity is the best-known example) are comfortable in hot weather but add weight and can pull the load away from your center of gravity. For most 3-season hiking they’re a nice-to-have, not a must-have.
What the empty pack weighs, and what it costs you
The weight of the pack itself, empty and with nothing in it, comes directly out of your useful carrying capacity. A 5-pound pack carrying a 25-pound load puts 30 pounds on your back. A 3-pound pack with the same load puts 28 pounds on your back. Over a 10-mile day, that’s real.
| Category | Typical empty weight (50 L) | Best for | Trade-off |
|---|---|---|---|
| Ultralight | 1.5 – 2.5 lb | Sub-25 lb loads, experienced hikers | Thin fabrics, minimal padding, pricier per ounce saved |
| Standard | 3 – 4 lb | Typical 3-season backpacking | Best balance of weight, comfort, durability for most hikers |
| Heavy-hauler | 5 – 7 lb | Winter, hunting, 50+ lb loads | Carries big loads well, but heavy itself |
For a 3-season pack you’ll carry on trips under 4 nights, a 3 to 4 pound standard pack is the sweet spot. Ultralight is worth it once you’ve already trimmed the weight of your other gear (tent, bag, pad, cooking kit) and are trying to crack a sub-20-pound base weight. If your base weight is 28 pounds, a 2-pound pack doesn’t fix that problem.
Premium materials like Dyneema Composite Fabric (DCF) and Ultra 200 can cut a half-pound off a standard pack, but they come with a price premium (often 50 to 100 percent over comparable nylon) and slightly reduced durability over the long run. Worth it for thru-hikers. Probably not worth it for three weekends a summer.
What to buy, by what you actually do
Trip-type recommendations, with the exact spec to ask for. Brand-specific picks live in the backpack reviews hub; this section is about the spec itself.
The weekend warrior
You hike day trips most weekends and go camping a few times a summer. Buy one pack in the 40 to 50 liter range, standard empty weight (3 to 4 lb), internal frame, with a full hipbelt, lid, and stretch front pocket. Compress it down for day trips; fill it for overnights. Osprey Kyte/Kestrel, Gregory Zulu/Jade, and Deuter Aircontact Lite all fit this profile.
The day hiker (short trips only)
You hike for the day and come home. Buy a 20 to 28 liter daypack with a real padded hipbelt (not a webbing waist strap), a hydration sleeve, dual water bottle pockets, and a rain cover. Osprey Talon/Tempest, Gregory Nano, and REI Flash series are the usual suspects.
The multi-day backpacker
You take trips of 3 nights or more and your total load pushes past 30 pounds. Buy a 55 to 65 liter pack with a sturdy internal frame, a substantial hipbelt, and load-lifters that actually pull the load forward. Osprey Atmos/Aura, Gregory Baltoro/Deva, and Granite Gear Blaze are the classics.
The ultralight thru-hiker
Your base weight is already under 15 pounds, you’ve done overnight trips with a standard pack, and you’re ready to save weight on the pack itself. Buy a 50 to 60 liter frameless or minimal-frame pack (Hyperlite, Zpacks, Gossamer Gear, Pa’lante) in the 1.5 to 2.5 pound range. Not a starter purchase.
Oregon-specific considerations
For the wet west-side coast and Cascades, prioritize a pack with good drainage, a rain cover, and fabric that dries quickly. The Gorge and Mt. Hood see a lot of mixed weather, so a 45 to 55 liter pack with generous compression is the versatile choice. East of the Cascades, drier conditions mean weight and ventilation matter more than waterproofing.
Find the right backpack
Roundups tested on Oregon trails, organized by the decision you’re actually making.

Best Hiking Backpacks
Top picks from 15 to 75 liters, day hikes through multi-day backpacking. Reviewed by capacity and fit.
See picks →
Best Lightweight Hiking Backpacks
Sub-3-pound packs ranked by warmth-to-weight, durability, and real Oregon trail use.
See picks →
Best Hiking Backpacks for Women
Women’s-specific frames, shorter torso ranges, and hipbelt cuts. Tested by fit as well as feature set.
See picks →
Best Budget Hiking Backpacks Under $80
Entry-level packs that don’t cut corners on fit or support. What to look for and what to skip.
See picks →Choosing a backpack, answered
Size is measured two ways: volume in liters, and fit in torso-length inches. For volume, use 15 to 30 liters for day hikes, 35 to 50 for overnight trips, 50 to 70 for multi-day backpacking, and 70+ for extended or winter trips. For fit, measure from your C7 vertebra to the top of your iliac crest and match that number to the manufacturer’s torso-size chart.
Tilt your head forward and feel the bump at the base of your neck, that’s your C7 vertebra and the top of the measurement. Put your hands on your hip bones with your thumbs pointing toward your spine, the line across your back is your iliac crest and the bottom of the measurement. Have a friend run a soft tape between those two points along the curve of your spine.
The number in inches is your torso length. Most adults fall between 16 and 21 inches, and exact size cutoffs vary a little by brand.
For the average hiker’s most common trip, 35 to 50 liters is the right range. This size handles day hikes with layers and food, long day hikes in variable weather, and overnight trips with light gear. Smaller packs limit you, larger packs tempt you to bring more than you need. The 35 to 50 L range is the most versatile single pack most hikers can own.
Internal frames are better for most hiking. They hug your back, move with your body on uneven terrain, and balance well on scrambles and switchbacks. External frames excel in specific cases: heavy, boxy loads (elk-hunting pack-outs, for example), maintained trails where stability matters less, and hot weather where the airgap between pack and back improves ventilation.
For typical 3-season hiking in Oregon or anywhere with mixed terrain, choose an internal frame.
Not required, but often a better fit. Women’s-specific packs typically have shorter torso ranges, narrower shoulder straps shaped to avoid the chest, and hipbelts contoured for a smaller waist with a wider hip flare. If your torso is under about 17 inches or you have a pronounced hip-to-waist ratio, a women’s pack will almost always fit better than a men’s equivalent.
If you’re tall or have a longer torso, a men’s or unisex pack may be the better match regardless of gender. Try both cuts when you can.
A well-designed 50-liter internal frame pack weighs 3 to 4 pounds empty. Ultralight options run 1.5 to 2.5 pounds but trade away durability and padding. Traditional heavy-haulers exceed 5 pounds but carry big loads more comfortably.
Every ounce of empty pack weight comes directly out of your useful carrying capacity. For 3-season hiking with a sub-30-pound total load, a 3-pound pack is the sweet spot.
Yes, in any climate where sustained rain is realistic, which includes most of the Pacific Northwest most of the year. Many packs include a cover stashed in a bottom pocket. If yours doesn’t, buy one that matches your pack’s volume.
An alternative is a pack liner: a waterproof sack inside the pack that protects contents without covering the exterior. Serious backpackers often use both, because a rain cover alone leaves the straps and back panel exposed.
A daypack is 15 to 30 liters, usually lacks a supportive frame, and is designed for loads under 15 pounds. A hiking backpack is typically 35 liters or larger, includes a structured frame and padded hipbelt, and is engineered to transfer significant weight to your hips.
The hipbelt is the key distinction: a daypack hipbelt is a thin webbing strap for stability, while a hiking pack has a substantial padded wing belt that bears 60 to 80 percent of the load.
