Camping gear field guide
How to Choose a Tent Footprint
A tent footprint is a piece of insurance you wear under your shelter. What material it’s made of, how it’s sized to your tent, and where you actually pitch it decide whether it earns its weight or causes problems.
Tents are advertised by their fabric specs, but the part that fails first is almost always the floor. Pinch a 20D silnylon floor against a single buried pine cone for one night and you can put a hole through it without trying. The footprint is the cheap, generic, easy-to-replace layer that takes that abuse so the expensive layer doesn’t have to.
The decision isn’t really whether to use one. The decision is what kind, sized how, used how. This guide covers how to choose a tent footprint, including the sizing rules, the materials worth knowing, and the DIY options that work as well as anything from a tent manufacturer for a fraction of the cost. If you’re still picking your shelter, our best camping tents roundup covers floor materials and durability ratings for every model we recommend.
1. What a tent footprint actually is
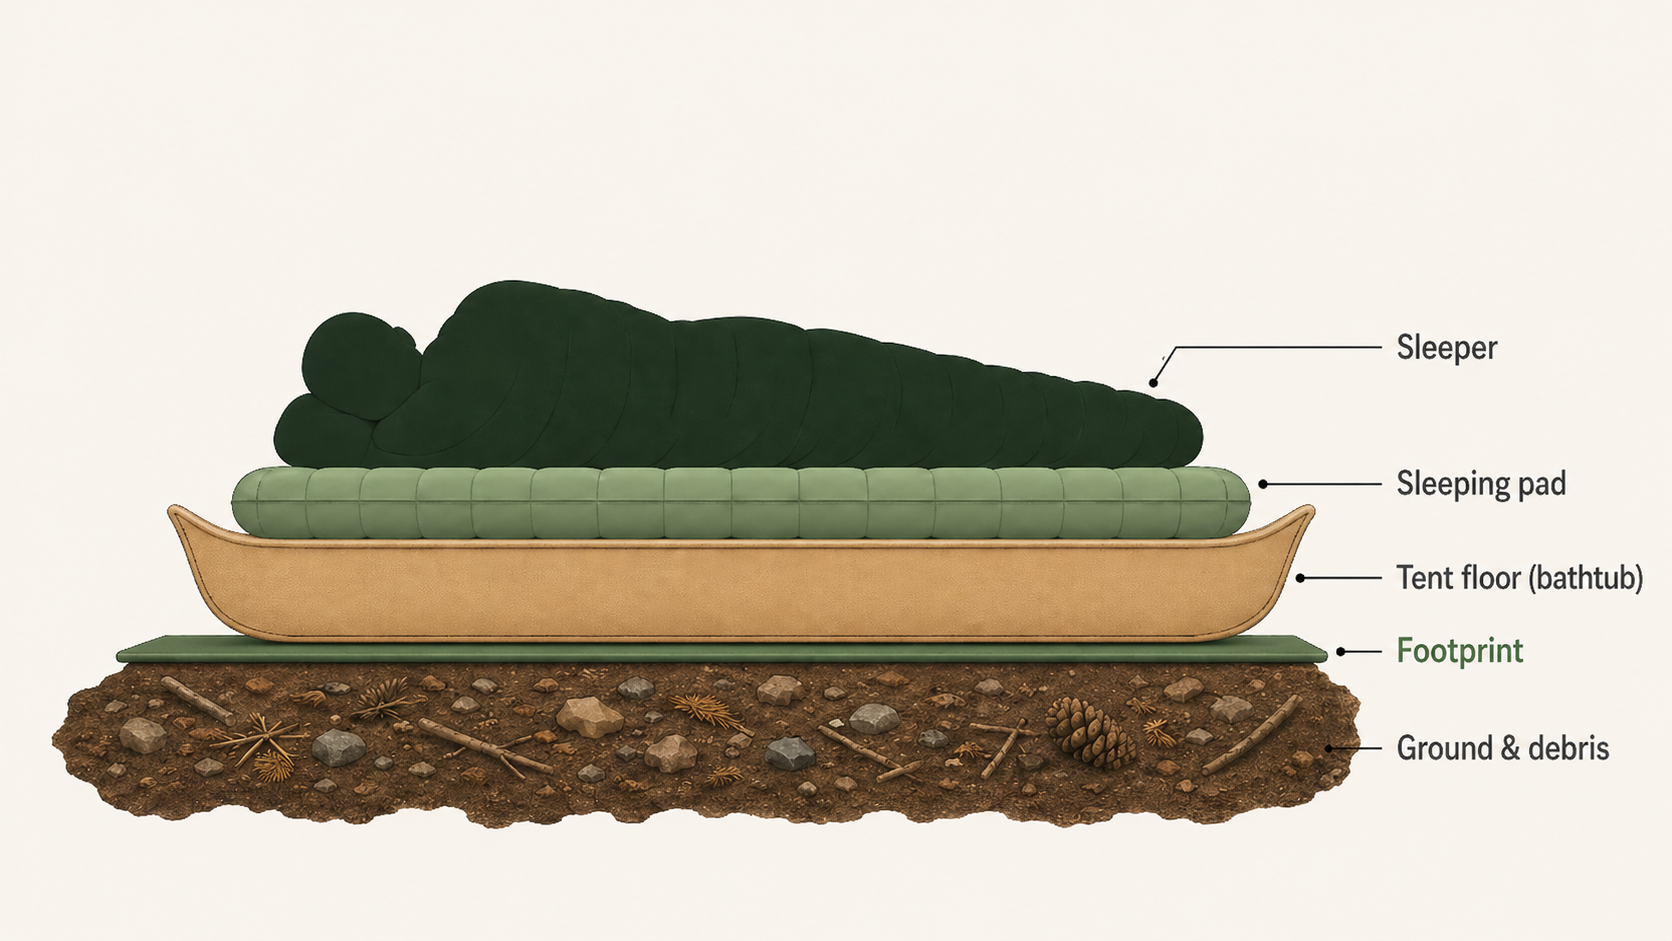
A tent footprint is a sheet of waterproof fabric — typically polyester, nylon, polyurethane-coated synthetics, or specialty materials like Tyvek or Polycro — that goes between the ground and your tent’s floor. It’s cut to roughly the shape of your tent base, slightly smaller, and it serves four jobs:
- Abrasion protection. Grit, gravel, twigs, and pine needles wear holes in tent floors over time. The footprint absorbs that wear.
- Puncture protection. A buried stick or sharp rock that would punch through a 15D ultralight floor often won’t make it through a 70D footprint.
- Moisture barrier. Wet ground transfers moisture upward into your tent floor through condensation and capillary action. A second waterproof layer slows or stops it.
- Cleanliness. When you pack up, the dirty side is the footprint, not the tent. The tent floor stays clean enough to fold without scrubbing.

What it isn’t: insulation. A standard footprint is a single thin layer with essentially zero R-value. If the ground is cold, you fix that with a sleeping pad, not a footprint. It also isn’t a structural component on most tents — the tent stands without it. The exception is a fastpitch setup, where some tents use the footprint plus the rainfly and poles to pitch without the inner tent body.
2. Do you actually need one?
The honest answer is: probably yes, but not always. Three variables decide it: the surface you camp on, how often you camp, and what your tent floor is made of.
| Your situation | Footprint? | Why |
|---|---|---|
| Ultralight tent (15–20D floor) on any terrain | Yes | Thin floors puncture from pine needles. The footprint cost is trivial vs. tent replacement. |
| Mid-weight tent (30–70D floor) on gravel, granite, or root-heavy sites | Yes | Hard or sharp surfaces accelerate floor wear by 3–5x. |
| Mid-weight tent on grass or forest duff, occasional camping | Optional | Low-friction surface; floor wear is slow. Skip if shaving weight. |
| Heavy car camping tent (70D+ floor) on a maintained campground | Optional | Floor will outlast the rest of the tent without help. Footprint is convenience, not necessity. |
| Any tent, frequent camping (20+ nights/year) | Yes | Wear is cumulative. The math always favors the footprint past about 30 nights of use. |
| Cowboy camping (no tent) on a sleeping pad | Yes — as a groundsheet | Protects the pad from punctures; gives you a clean surface to sit on. |
I’ve put roughly 600 nights on a Big Agnes Copper Spur over a decade of Oregon trips. The original 20D floor still has no holes. Every footprint I’ve used during those nights has been retired with visible wear. That’s the whole point — the footprint is the sacrificial layer.
3. How to Choose a Tent Footprint by Material
There’s no single best material. How to choose a tent footprint by material comes down to whether you’re carrying it on your back or throwing it in a car, and how much you’re willing to spend up front to save weight.
| Material | Weight* | Durability | Cost | Best for |
|---|---|---|---|---|
| Polyester (factory footprint) | 8–16 oz | High | $40–100 | Car camping, set-and-forget. Fits perfectly out of the box. |
| Tyvek (DIY) | 4–7 oz | High | $10–20 | Thru-hiking, durable ultralight. The thru-hiker default. |
| Polycro / window film (DIY) | 1.5–3 oz | Medium | $8–15 | Ultralight backpacking where every ounce matters. |
| DCF (Dyneema) groundsheet | 1.5–3 oz | Very high | $80–200 | Premium ultralight, expedition use. |
| Silnylon (DIY or aftermarket) | 4–8 oz | High | $25–60 | Mid-weight middle ground; packs small. |
*For a 2-person tent footprint, roughly 5 x 7 ft.
Denier explained, briefly
Denier (D) is a measure of fiber thickness. Higher denier means thicker threads, which generally means more durable but heavier fabric. A 70D polyester footprint is roughly twice as thick as a 30D one. For footprints, anything 50D and above is considered durable. Below 30D you’re trading ruggedness for weight savings, which is fine if that’s your goal.
Waterproof rating
Most factory footprints have a hydrostatic head rating of 1,500 to 5,000 mm. Anything 1,500+ keeps ground moisture out for normal conditions. The number on the label matters less than the seam construction and the polyurethane coating wearing out over time. After 5+ seasons, even a high-rated footprint can start letting water through where the coating has thinned.
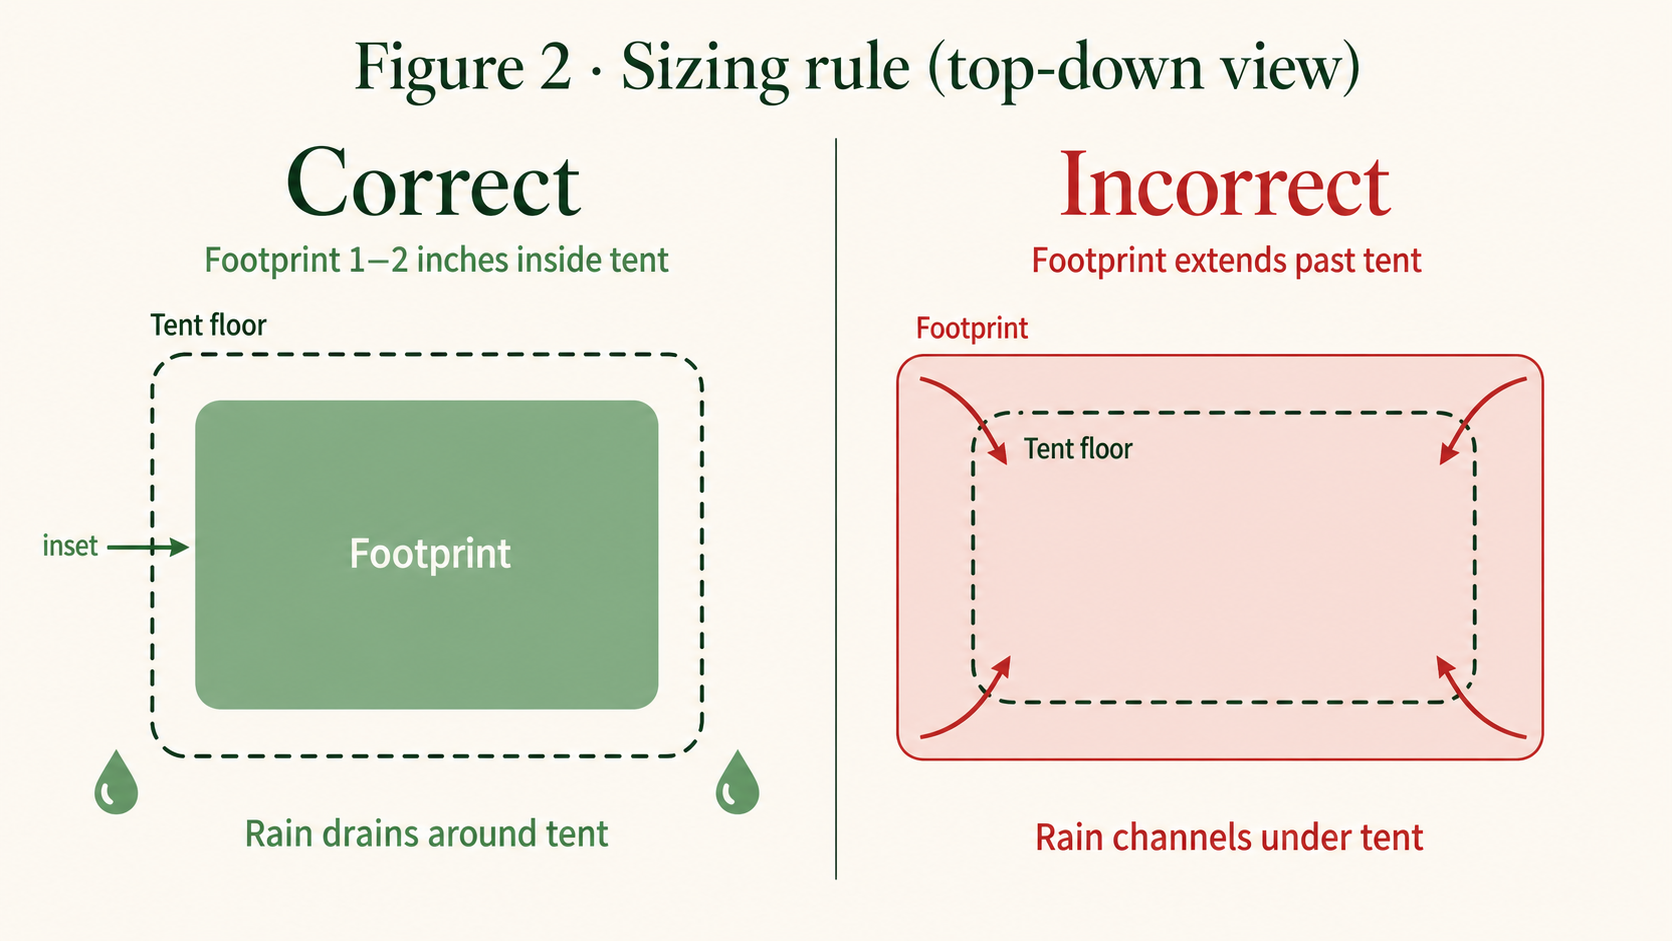
4. Sizing: the rule that matters more than anything
When you’re working out how to choose a tent footprint, if you remember nothing else, remember this: the footprint must be smaller than the tent floor. One to two inches inset on every side. Never larger.
Why this is critical: when rain runs off the rainfly, it falls to the ground around the tent. If your footprint extends beyond the tent’s perimeter, that runoff lands on the footprint and is then channeled directly under your tent floor, where it pools. You wake up with a wet sleeping bag in a tent that did nothing wrong. The footprint did this to you.
An oversized footprint is worse than no footprint at all. It actively makes your tent wetter. If you’re using a generic tarp as a footprint, you must trim it.
How to size a generic footprint to a specific tent
Pitch the tent on a flat surface — driveway, lawn, basement floor. Lay your footprint material on top and trace the floor outline with a marker. Cut along a line one to two inches inside the trace. Round the corners to match the tent’s curves. That’s it. Ten minutes of work and the footprint will fit better than most factory ones because factory footprints are often deliberately undersized further to save weight, sometimes to the point of leaving corners unprotected.
5. How to lay one down correctly
Once you know how to choose a tent footprint, setup is six steps. The whole process takes about 90 seconds once you’ve done it twice.
- Clear the site. Sweep the ground with your boot. Pull out twigs, pinecones, and small rocks. The footprint is the backup; site selection is the first line of defense.
- Orient the footprint. Lay it flat with the door end aligned to where your tent door will be. If it has grommets, those go at the pole corners.
- Tuck edges inward. Make sure no fabric extends past the eventual tent floor perimeter. If it does, fold the excess under itself.
- Pitch the tent on top. Set the tent up directly over the footprint, aligning corners. The tent floor should slightly overhang the footprint on every side.
- Walk the perimeter. Before staking, circle the tent and confirm no footprint material is poking out anywhere. This is a 15-second check that prevents the whole night-of-pooled-water problem.
- Stake the tent normally. The footprint usually doesn’t need its own stakes. Exception: fastpitch fly-only setups that connect through the footprint grommets.

If the ground slopes, orient the tent so your head is uphill and the footprint’s long axis matches the slope. Any rain that does get under the tent will run away from your gear instead of pooling at your feet.
6. DIY footprints: Polycro, Tyvek, and the rest
How to choose a tent footprint when going DIY: manufacturer footprints aren’t bad, just expensive for what they are. The DIY options are equal or better in performance for one-fifth to one-tenth the price, and you can size them perfectly to your tent.

Polycro (heat-shrink window film)
Sold as window insulation kits at any hardware store, branded by 3M, Frost King, or Duck Brand. Roughly 0.6 oz per square yard, which makes it the lightest practical footprint material short of DCF. A 62 x 84 inch sheet costs around $11 and weighs about 2 ounces sized for a 2-person tent.
Pros: ultralight, packs to the size of a deck of cards, surprisingly puncture-resistant for the weight, transparent so you can see if it’s clean.
Cons: tears at notches, lasts one to two seasons of heavy use before it needs replacing, makes a slight crinkle sound. Not recommended on aggressive granite or thorny terrain.
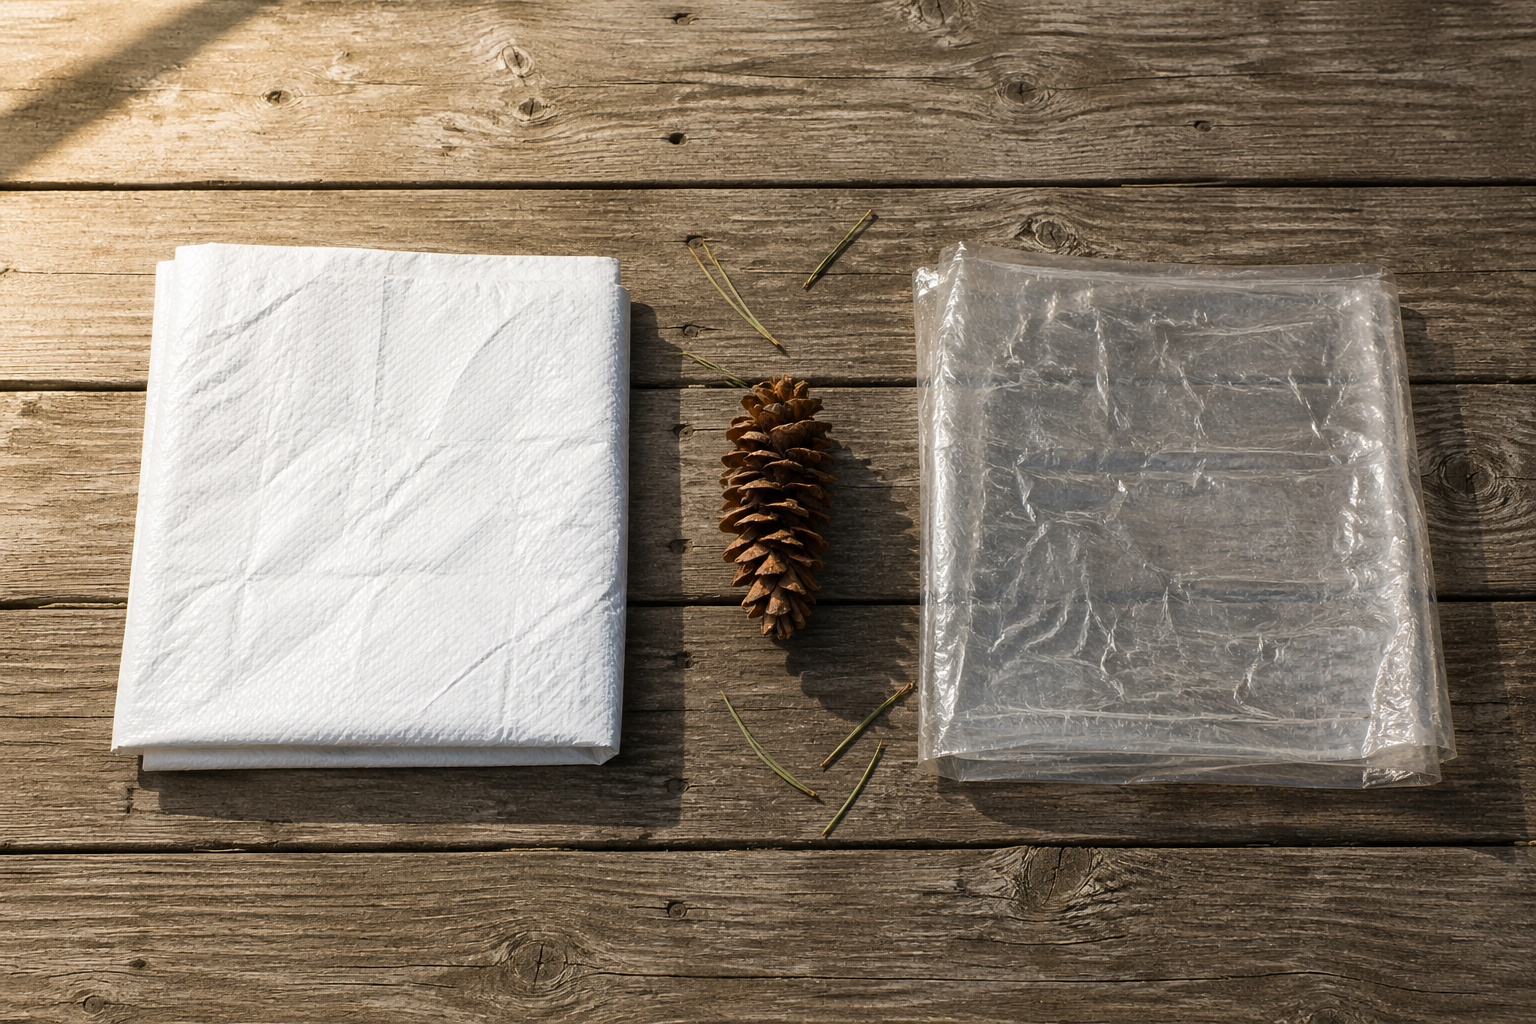
Tyvek (housewrap)
The same Tyvek used to wrap houses during construction. Sold by the roll at hardware stores or by the sheet from cottage gear vendors. Roughly 1.8 oz per square yard. A 5 x 7 ft sheet weighs about 5 ounces and costs $10 to $20.
Pros: extremely durable, lasts hundreds of nights, soft enough to use as a picnic blanket or gear-organizing surface.
Cons: stiff and noisy when new, doesn’t pack as small as Polycro. The fix for the stiffness is well-known: throw it in the washing machine on cold once or twice and it softens up dramatically.
Silnylon or DCF
Cottage gear vendors like Hyperlite, Zpacks, and Mountain Laurel Designs sell pre-made silnylon or DCF groundsheets sized for popular tents. DCF is the lightest durable option (a DCF groundsheet for a 2-person tent runs about 2 oz) but costs $80 to $200. Silnylon is heavier (5 to 8 oz) but cheaper ($25 to $60) and packs almost as small.
Sizing your DIY
Same rule as before: trace your tent floor and cut one to two inches inside. For Tyvek, you can cut with scissors or a utility knife. Polycro is best cut with sharp scissors and a steady hand — it tears easily once nicked. Don’t add grommets to a DIY footprint unless you’re using it for a fastpitch setup; grommets create tear points and aren’t needed for normal use.
7. Common footprint mistakes
Most footprint problems are user error, not material failure. Even when you’ve worked out how to choose a tent footprint, these five mistakes are still the most common:
- Oversizing. Already covered, but worth repeating: a footprint larger than your tent floor turns the footprint into a water funnel.
- Packing it wet against the tent. A wet footprint stuffed in the tent bag breeds mildew on both surfaces. Always pack the footprint in its own bag or fold it dirty-side-in if you have to pack it wet.
- Pitching on a slope without orienting it. If water does get on the footprint, you want it to drain away from you, not toward your sleeping pad.
- Skipping site prep. The footprint protects against grit and small debris. It does not protect against the pinecone you didn’t bother to move.
- Tyvek shiny side confusion. The two sides of Tyvek look slightly different. It doesn’t actually matter which side is up, but pick one and stay consistent so you always pack it the same way.

8. Caring for your footprint
Once you’ve worked out how to choose a tent footprint and used it for a few seasons, you’ll find footprints don’t need much. Three habits keep them lasting:
- Dry it before storing. Hang it over a chair or shrub at camp while you pack the rest of the tent. If you can’t dry it on the trail, dry it the moment you get home.
- Brush off mud before folding. Dried mud creates abrasion points where the fabric folds. A quick wipe with a hand or rag adds years to its life.
- Store loose, not compressed. Keep the footprint in a stuff sack with the tent or in a closet. Don’t compress it in a vacuum-pack with other gear; that creates permanent creases that eventually crack the waterproof coating.
Retire the footprint when it develops holes large enough to pass water. At that point it’s stopped being a moisture barrier and is only useful as abrasion protection — still useful, but no longer doing the full job. Most footprints retire from coating wear, not catastrophic damage. You’ll notice the inside-facing surface starting to feel less slick and more papery; that’s the polyurethane breaking down. Replace it.
Buy or make a footprint sized one to two inches smaller than your tent floor on every side. Set it up in this order: clear site, footprint, tent. Tuck any visible edge under before staking. That’s the entire system.

Pair it with the right tent and bag
A footprint protects whatever’s above it. These are the tents and sleeping bags we recommend for Oregon’s terrain and conditions, all tested on real trips.

How to Choose a Tent Footprint: FAQ
