Hiking field guide
Are Trekking Poles Worth It?
Trekking poles cut peak knee force on descents by as much as 25 percent, share workload on long climbs, and add two extra contact points on uneven ground. The cost: about a pound of carry weight and two hands no longer free.
Yes, for most hikers, most of the time. Trekking poles meaningfully reduce knee load on descents (research has measured peak compressive force reductions of roughly 12 to 25 percent), improve balance on uneven terrain, and let your upper body share work on long climbs. The cost is around 1 pound of carried weight, $60 to $200, and two hands that are no longer free.
They are clearly worth it if your hikes include sustained climbs or descents, your pack tops 15 pounds, your knees have history, or you do river crossings. They are borderline for short, flat day hikes on smooth trails. They are actively in the way for Class 3 scrambling and photography-focused outings.
What a trekking pole actually does (and what it doesn’t)
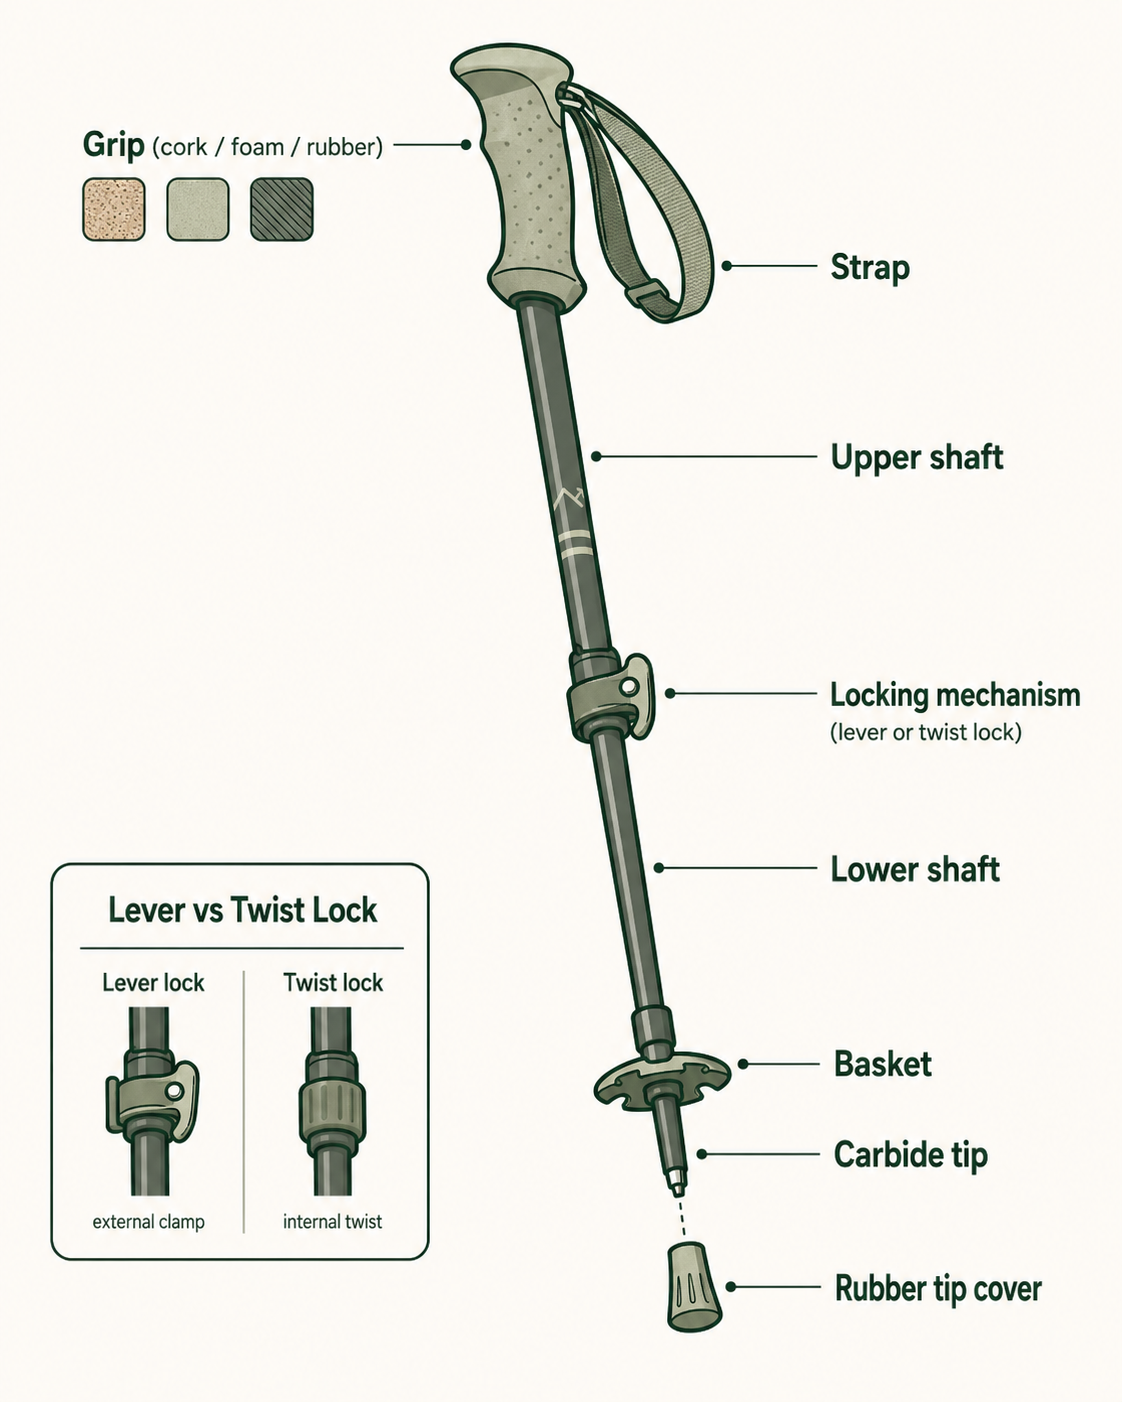
A trekking pole is a length of aluminum or carbon, 110 to 130 cm long, with a grip on top, a basket near the bottom, and a carbide tip. The job description is short: it gives you two extra points of ground contact and a lever for transferring force between your upper body and the trail.
That sounds modest. In practice it changes three things about how a hike feels. First, on descents, the poles intercept some of the impact that would otherwise travel through your knees and hips. Second, on uneven terrain, they catch you when one foot lands on something unexpected. Third, on long climbs, they let your shoulders, arms, and core take a small share of the work your legs would otherwise do alone.
What they don’t do is make you faster on smooth trail, replace good footwear, or fix an underlying knee or hip injury. Hikers who expect any of those things end up disappointed. Hikers who expect the three real benefits above tend to keep using them for years.
Two poles, one staff, or nothing?
Before getting to the case for and against, it’s worth seeing where two trekking poles sit relative to the alternatives. The decision isn’t binary.
| Setup | Best for | Trade-off |
|---|---|---|
| Two trekking poles | Anyone with knee history, sustained climbs or descents, packs over 15 lb, river crossings | One pound of carry weight, two hands occupied, $60 to $200 |
| One pole or hiking staff | Casual day hikers, photographers who want occasional balance assist, mostly flat trails | Asymmetric load, fewer balance benefits, no symmetric knee-load reduction |
| No poles (hands free) | Class 3 scrambling, photography or birding focus, smooth flat trails, technical singletrack | Full knee load on descents, no extra contact points on uneven ground |
The case for poles, with the research where it exists
Trekking pole studies are surprisingly well-funded because the same biomechanics drive injury rates in skiing, military rucking, and aging populations. Three findings come up consistently across the literature.
1. Reduced load on the knees and hips during descent
Sports medicine research has repeatedly measured reductions in peak vertical ground reaction forces and knee compressive forces when subjects use trekking poles on a downhill grade (Bohne & Abendroth-Smith, 2007). The numbers vary by grade, pack weight, and technique, but reported reductions cluster in the 12 to 25 percent range. The mechanism is simple: each correctly planted pole intercepts a small fraction of body weight that would otherwise land on the leading leg.
For a 180-pound hiker carrying a 25-pound pack down a 15 percent grade, that’s a meaningful number of pounds per step, multiplied across thousands of steps. Hikers with diagnosed knee issues, or who feel the descent the next morning, are the population that gains the most.

2. Less muscle damage and faster recovery
Multiple studies have shown that hikers using trekking poles report lower perceived exertion at the same workload, and have lower markers of muscle damage (creatine kinase, soreness ratings) 24 and 48 hours after a hard descent (Howatson et al., 2011). Practically, this means you finish the hike feeling fresher and the next day’s stairs hurt less. For anyone hiking back-to-back days on a multi-day trip, that recovery edge compounds.
3. Better balance on uneven, wet, or loose ground
The third benefit is the hardest to study but the easiest to feel. Two extra points of ground contact turn a stumble on a wet root, a rolled rock, or a loose scree slope into a near-miss instead of a fall. This is also where poles earn their keep on river crossings, where the third and fourth contact points let you probe depth and stabilize against current.
Plus a few quieter benefits
Beyond the big three, poles add a handful of smaller wins worth knowing about. The arm swing locks in a steady cadence that some hikers find genuinely helps on long, monotonous miles. Many ultralight tents and tarps (the Zpacks Plex Solo, Tarptent Notch, Six Moon Designs Lunar Solo) pitch with trekking poles instead of dedicated tent poles, which saves another half-pound from your shelter system if you’re already carrying poles anyway. They also let you push aside wet ferns on a Coast Range trail or probe ahead on a sun-warmed Eastern Oregon trail in rattlesnake country. And while it’s not their primary purpose, having two long sticks in hand makes you appear larger to a curious bear or aggressive dog, and gives you something to swing if you need it.
- Bohne, M. & Abendroth-Smith, J. (2007). Effects of hiking downhill using trekking poles while carrying external loads. Medicine & Science in Sports & Exercise.
- Howatson, G., Hough, P., Pattison, J., Hill, J. A., Blagrove, R., Glaister, M., & Thompson, K. G. (2011). Trekking poles reduce exercise-induced muscle injury during mountain walking. Medicine & Science in Sports & Exercise.
- Knight, C. A. & Caldwell, G. E. (2000). Muscular and metabolic costs of uphill backpacking: are hiking poles beneficial? Medicine & Science in Sports & Exercise.
The case against, which is mostly about hands and ounces
Most articles about trekking poles skip the downsides. They exist, and they’re real enough that some experienced hikers leave the poles at home for specific trips.
- Knee load reduction12 to 25 percent less peak force on descents, depending on grade and technique.
- Better balanceTwo extra contact points on uneven ground, river crossings, and loose surfaces.
- Less next-day sorenessLower muscle damage markers after long descents.
- Upper body shares workShoulders and core take a small but real share of the climbing effort.
- Shelter pole optionDoubles as tent or tarp poles for many ultralight setups.
- Hands occupiedNo casual phone, camera, or snack access without stowing or stopping.
- Carry weightPairs run 14 to 24 ounces. Carbon trims that to 9 to 14 ounces but at higher cost.
- MoneyDecent aluminum poles start near $60. Quality carbon poles run $150 to $200.
- Wrist fatigue if used wrongGripping the pole instead of using the strap leads to sore hands by mile 6.
- Trail wearUntipped poles damage delicate alpine soils. Rubber tip caps fix this; many hikers forget.
- In the wayClass 3 scrambling, ridge walking, and bushwhacking all require stowing.
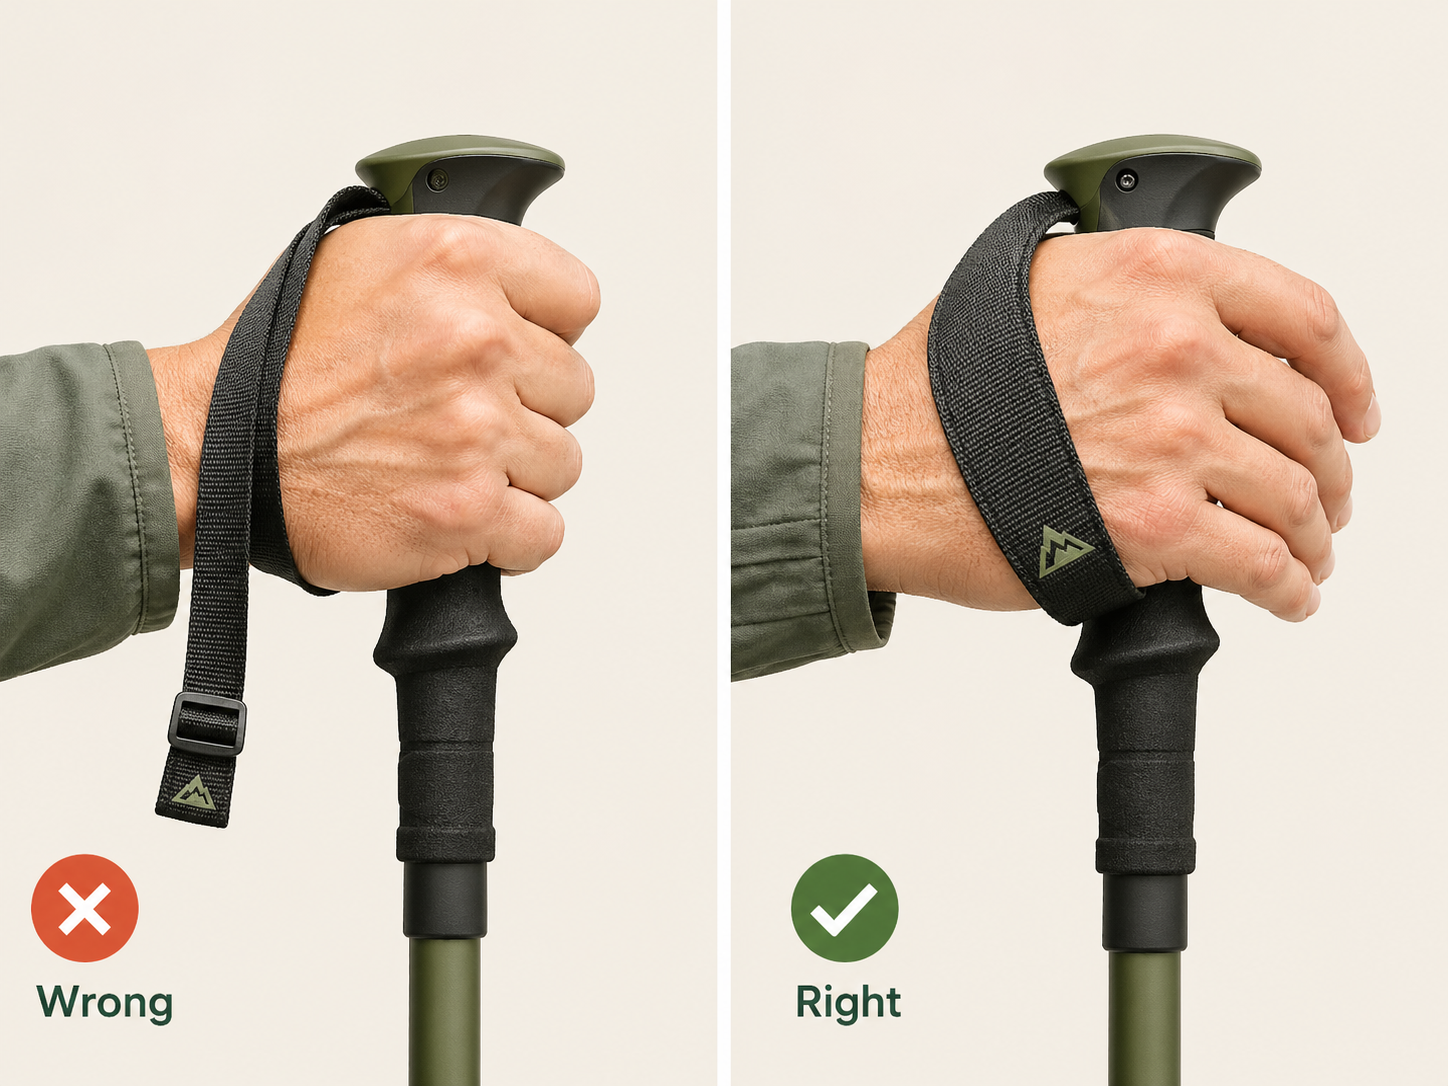
The most common drawback isn’t on the list above because it’s not the poles’ fault: people use them wrong. The number-one mistake is gripping the handle all day instead of letting the strap take the load through the wrist. That alone turns poles from a tool into a chore. Section 5 fixes that.
Worth it for you, by what kind of hiker you are
The “worth it” question has different answers for different people, on different terrain. The image below maps the four contexts where the answer changes most: steep descents, river crossings, loose surfaces, and roots and wet rock. Pick the closest match to your own hiking below.

Verdict at a glance
| Hiker profile | Verdict | Why |
|---|---|---|
| Day hiker, flat or short trails | Borderline | Benefits scale with elevation gain and pack weight; short flat trails rarely justify the carry. |
| Day hiker, hilly or mountain | Yes | A sustained 1,000 ft descent makes the load reduction worth carrying poles on its own. |
| Backpacker with heavy load | Yes, clearly | Recovery edge compounds across multi-day trips; shelter-pole double-duty closes the carry-weight gap. |
| Joints, knees, age 50+ | Yes, immediately | Load-reduction research targets this population most directly. |
| Trail runner | Only for technical or vertical | Smooth singletrack: skip. Ultras and 3,000+ ft vertical: yes. |
For the full reasoning behind each verdict, including the spec to prioritize when buying, pick your closest profile below.
The day hiker
If your typical day hike is the Trail of Ten Falls, Multnomah Falls, or any Cascades summit attempt, poles are worth it. The descent alone justifies them, and a single 50-mile season usually pays back the purchase price in saved knees and reduced trailhead-to-car limping.
If your typical hike is flat: the Banks-Vernonia rail trail, paved bayfront paths, beach walks, the case is much weaker. You can skip poles or carry one, not two.
Where they’re not worth it
Four honest “no” cases where stowing the poles or leaving them home beats carrying them.

- Class 3 and above scrambling. Smith Rock summit scrambles, the South Sister climbers’ route past the false summit, the Mt. Thielsen finish: anywhere you need both hands on rock, poles are dead weight. Stow them.
- Photography or birding-focused outings. If you’re stopping every 100 yards to lift a camera or binoculars, the constant pole-stowing eats more time than the poles save.
- Short, flat, smooth trails. Beach walks, paved paths, the loop at your local nature reserve. There’s nothing to gain.
- Trail running smooth singletrack. Covered above; the swing penalty outweighs the benefit for most non-technical, non-vertical routes.
How to actually use them, because most hikers don’t
Trekking poles only deliver the benefits in section 2 if you use them correctly. The good news is that “correctly” is four small things, learnable in 15 minutes, that almost nobody is told on day one.

Length, by grade
Flat: elbow at 90 degrees with pole tip planted next to your foot. Uphill: 5–10 cm shorter. Downhill: 5–10 cm longer.
Starting estimates
1. Use the strap the right way
This is the single fix that changes the most. Bring your hand up through the strap from below, then close your fingers around the grip. The strap now sits across the back of your wrist. When you push down on the pole, the load travels through the strap into your wrist, not through a clenched grip into your fingers.
Done correctly, you can hike all day with your hand barely closed on the grip. Done wrong (most people clench the grip and ignore the strap), your hands will ache by mile 6 and you’ll give up most of the leverage you came for.
2. Adjust the length to the grade
Start with flat-ground length: forearm parallel to the trail when the tip is planted next to your foot. For sustained climbs, shorten by 5 to 10 cm so you can drive forward without overreaching. For sustained descents, lengthen by 5 to 10 cm so the pole tips reach the ground a step ahead and brake your downhill momentum.
3. Plant opposite arm to opposite leg
Right pole forward with left foot, left pole forward with right foot. This mirrors a natural walking gait and lets each pole share weight with the trailing leg. The opposite-side rhythm sounds obvious but takes a few minutes to feel automatic. A few hikers find a “double-plant” cadence (both poles forward, then a step) more comfortable on steep climbs; that’s fine.
4. Stow them when they hurt more than help
The mark of an experienced pole user isn’t constant use. It’s recognizing the half-mile of scrambling where the poles are slowing you down and clipping them to the pack. Most modern packs have side compression straps and a bottom loop made for this. Folding poles collapse to 13–16 inches and stow even faster.
What to look for, if you decide to buy
If sections 2 to 4 talked you into a pair, here’s the short version of what matters when you choose. The longer version, with model-specific picks, lives in the trekking pole reviews hub.
| Spec | What to pick | Why |
|---|---|---|
| Material | Aluminum for first pair; carbon if weight-conscious or experienced | Aluminum bends, carbon snaps. Aluminum is the durable, forgiving default. |
| Lock | Lever (external cam) lock | Faster to adjust, more reliable in cold and wet, easier to fix in the field than twist locks. |
| Grip | Cork (best) or foam (good); skip rubber | Cork wicks sweat and shapes to your hand. Foam is light and warm. Rubber slips when wet. |
| Strap | Padded, adjustable, comfortable across the back of the wrist | You’ll wear them all day. Cheap nylon webbing is unpleasant by hour two. |
| Length style | Telescoping (2 sections) for hiking; folding (Z-pole) for trail running and travel | Telescoping packs heavier but adjusts on the fly. Folding packs to 13–16 in but adjusts less. |
| Tip | Carbide steel with rubber covers | Steel grips wet rock; rubber covers protect alpine soils and pavement. |
| Anti-shock | Skip unless you have specific joint pain | Adds weight and cost; benefits are modest for hikers without diagnosed issues. |
| Pair weight | 14–18 oz aluminum, 9–14 oz carbon | The sweet spot for most hikers. Lighter than this gets fragile; heavier just penalizes you. |
The brands that consistently land in this spec range are Black Diamond, Leki, REI Co-op, Komperdell, and (at the ultralight end) Gossamer Gear and Mountain Laurel Designs. A first pair in the $70 to $120 range is a sound buy. Spend more only after you know exactly what feature you’re upgrading for.
Find the right pair of poles
Roundups tested on Oregon trails, organized by what you actually need.

Best Trekking Poles
Top picks across aluminum, carbon, telescoping, and folding designs. Tested for grip, lock reliability, and durability.
See picks →
Best Trekking Poles for Backpacking
Built for heavy loads and shelter pole double-duty. Ranked by hipbelt-pocket reach, weight-to-durability, and tent compatibility.
See picks →
Best Trekking Poles for Women
Shorter length ranges, narrower grip diameters, and lighter swing weights. Tested for fit on smaller hands and shorter torsos.
See picks →
All Trekking Pole Reviews
Every trekking pole roundup on Oregon Tails in one place, sorted by use case, audience, and price tier.
View hub →Trekking poles, answered
For flat or rolling day hikes under 5 miles, trekking poles are a coin flip. The benefits scale with elevation change, pack weight, and trail surface, so a short loop on a maintained trail rarely justifies the extra gear.
They become clearly worth it once a day hike includes a sustained climb or descent over 1,000 feet, a load over 15 pounds, or terrain like loose scree, river crossings, or wet roots. If your typical day hike is the Trail of Ten Falls or a Cascades summit attempt, yes. If it’s the Banks-Vernonia rail trail, probably not.
Yes, with the caveat that they reduce the load that causes knee pain rather than fixing knee pain itself. Sports medicine research has measured reductions in peak compressive forces at the knee on the order of 12 to 25 percent during downhill hiking with poles, depending on grade, pack weight, and technique.
For hikers with existing knee issues, that load reduction is the difference between finishing a hike comfortably and limping the last 3 miles. They are not a substitute for strengthening, weight management, or treating an underlying injury.
On uphill and flat terrain, no. They typically maintain or slightly increase pace by recruiting upper body to share the work. On downhill and uneven terrain, they often increase your safe speed because they add a third and fourth point of ground contact.
The case where they slow you down is technical, hand-over-hand scrambling and tight switchback singletrack, where they get in the way and need to be stowed.
For balance assistance and most knee-protection benefits, two poles are clearly better than one. Two poles distribute load symmetrically, mirror your gait, and stabilize you in both directions on uneven ground.
A single pole or hiking staff still helps with stream crossings, occasional balance, and probing snowfields, and many casual day hikers do fine with one. If you have a specific reason (one bad knee, one strong arm, frequent photography) you can run with one, but for most people the right answer is a pair.
For most hikers, no. Aluminum poles in the $60 to $100 range bend rather than break under stress, weigh roughly 4 to 6 ounces more per pair, and last for years. Carbon poles save 4 to 8 ounces per pair, swing faster, and dampen vibration better, but they snap under hard side-loading like a wedged tip in rocks during a fall.
Carbon makes sense if you are a thru-hiker counting every ounce, a trail runner where swing weight matters, or an experienced user who knows how to avoid side-loading. For weekend warriors and beginners, aluminum is the better answer.
Not in carry-on luggage. The TSA classifies trekking poles as bludgeoning items and they must go in checked baggage, even if collapsed. Folding poles like the Black Diamond Distance Z series compress to 13 to 16 inches and fit easily in a checked bag or duffel.
If you only carry on, you’ll need to either ship the poles ahead, rent at the destination, or buy on arrival. Always confirm current TSA rules before flying.
Stow them for Class 3 scrambling and rock-hand sections, narrow ridge walks where pole-plants can throw your balance, sustained bushwhacking through dense brush, photography or birding outings where you need free hands, and trail running on smooth surfaces where the swing penalty outweighs the benefit.
On a typical hike that mixes terrain, plan for a few sections where you’ll collapse the poles and clip them to your pack rather than dragging them along.
On flat ground with the pole tip planted next to your foot, your forearm should be parallel to the trail and your elbow at a 90-degree angle. A reasonable starting estimate is your height in centimeters multiplied by 0.66, which puts most adults between 110 cm and 125 cm.
From that flat-ground length, shorten 5 to 10 cm for sustained climbs and lengthen 5 to 10 cm for sustained descents. Adjustable poles make this easy; fixed-length poles only work if you mostly hike rolling terrain.
