Foot care field guide
How to Stop Hiking Blisters
A blister isn’t really caused by rubbing. It’s caused by repeated shear inside the skin, where the top layer slides over the layer beneath until the two pull apart, and that one mechanical fact changes everything you do to prevent one.
Most blister advice starts with friction. That’s the wrong place to start. Friction is the input, but the actual injury happens deeper inside the skin, and the prevention that works is the prevention that targets that injury and not the surface rub. This guide covers the mechanism, the four prevention systems that hold up over long miles, and the field fix for a hot spot that’s already burning in your boot. It assumes you’ll use it on real Oregon trails, where wet feet, downhill jamming, and 18-mile days are the norm rather than the exception. If you’re still picking your footwear, read how to choose hiking boots first, then come back here for the foot side of the equation.
1. What a hiking blister actually is
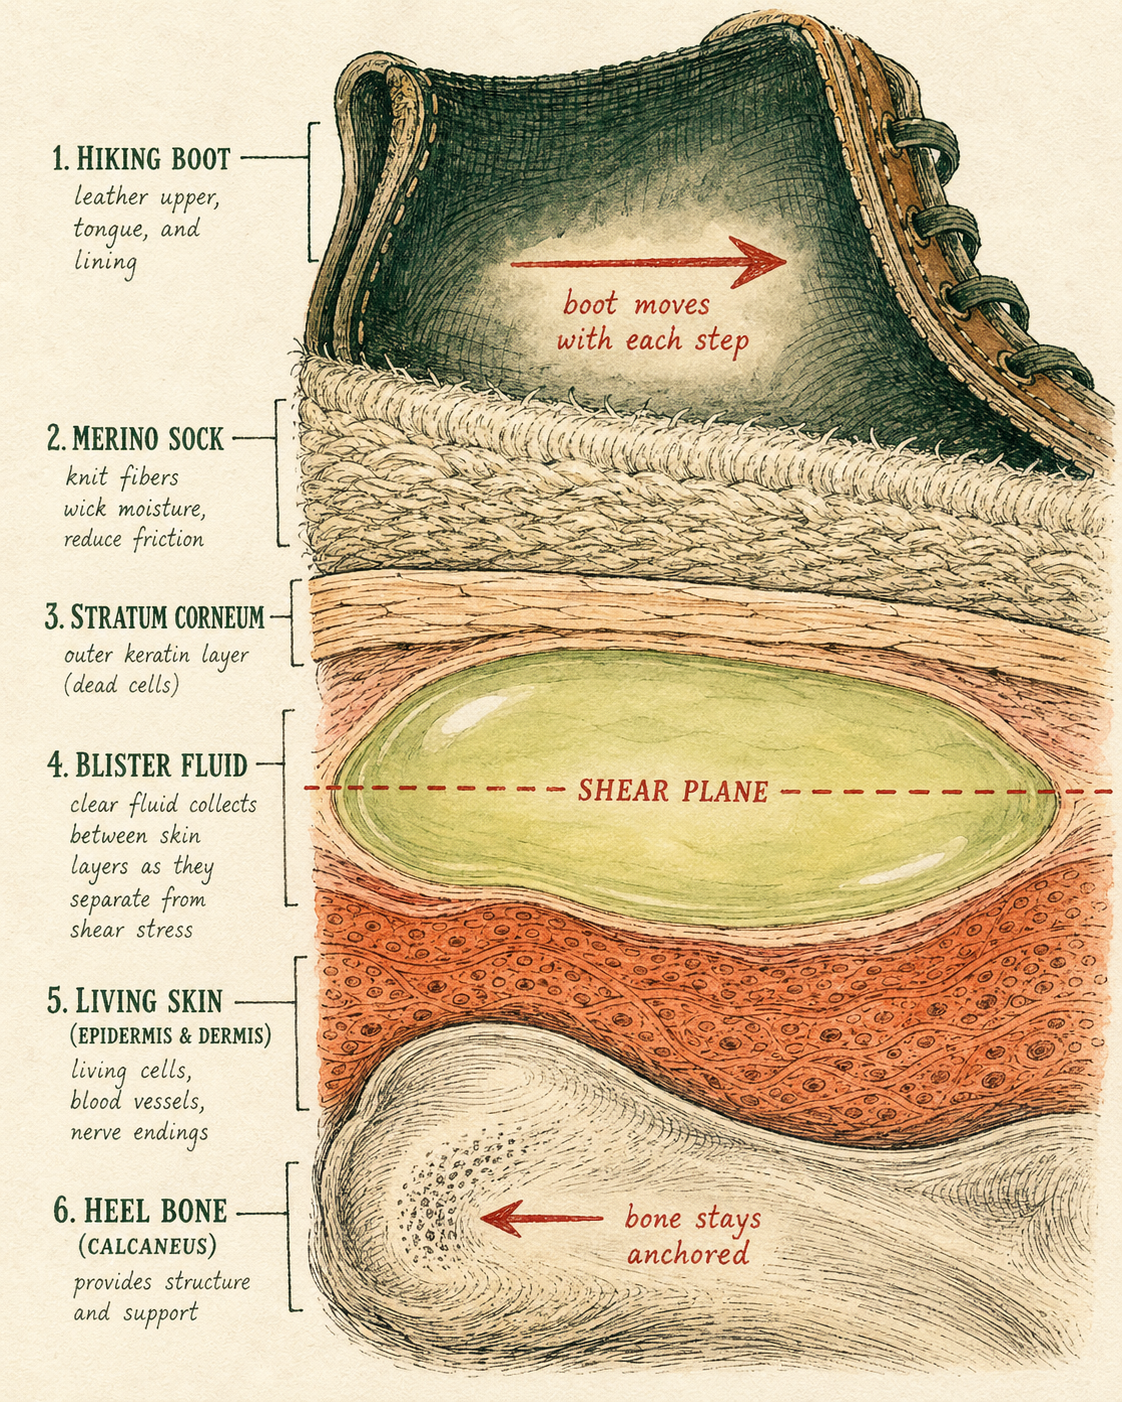
A blister is a fluid pocket between two layers of your skin. Specifically, between the outer keratin layer (the stratum corneum and the cells immediately under it) and the deeper, living layer of the epidermis. Push those layers apart hard enough and often enough, and your body floods the gap with serum to cushion the injury. That fluid pocket is the blister.
The standard explanation is “friction.” That’s a half-truth. Surface friction is real, but on its own it produces hot, red, raw skin (a friction burn or abrasion) rather than a fluid-filled pocket. The injury that creates a true blister is shear: a sliding force inside the skin where the upper layers move sideways relative to the lower layers. Each step you take, the soft tissues at the back of your heel deform under the load of your body weight while your skin is being held in place by sock and shoe. The layers slide a fraction of a millimetre. Repeat that 5,000 times in a long hiking day, and on certain skin, in certain spots, the sliding becomes a tear.
This isn’t a fringe theory. In a 2013 University of Salford study, researchers produced blisters under controlled, friction-only conditions on the heels of 30 volunteers. The first volunteer blistered after about four minutes; the last took thirty-two. Same mechanical input, eight-fold difference in skin tolerance. That kind of variation only makes sense if the failure point is internal skin behaviour rather than surface contact.
2. The three forces, and which one matters most
Shear is the prime mover, but it doesn’t act alone. Three forces decide whether a hot spot becomes a blister: shear, pressure, and moisture. Heat is downstream of all three.
Shear
The sideways sliding force inside the skin. Driven by the relative motion between your foot bones (which move with your stride) and the shoe interior (which moves with the shoe). The bigger the relative motion, the bigger the shear. Heel-strike movement is the worst offender: pilot work cited in the same Salford study measured around 15 millimetres of vertical heel displacement inside the shoe at heel strike. Fifteen millimetres, several thousand times a day, is what wears out a heel.
Pressure
Pressure doesn’t cause shear directly, but it multiplies its damage. The harder the boot presses against a given spot, the more force is transferred into the shear plane below. A boot tongue laced too tight on a high arch, a toe box jamming during downhills, a seam pressing against the side of a little toe; all of these turn small shear into blistering shear.
Moisture
Wet skin behaves like wet paper. A 2013 paper in the Journal of the Mechanical Behavior of Biomedical Materials showed that hydrated skin has dramatically lower resistance to shear than dry skin. Sweat, stream crossings, and rain all soften the upper skin layers and lower the threshold for tearing. Moisture is also what turns “I felt a hot spot at mile 3” into “I had two blisters by mile 6.”
3. Where blisters form and why
Blisters cluster on five spots. If you know yours, you can pre-treat before mile zero rather than reacting at mile six.
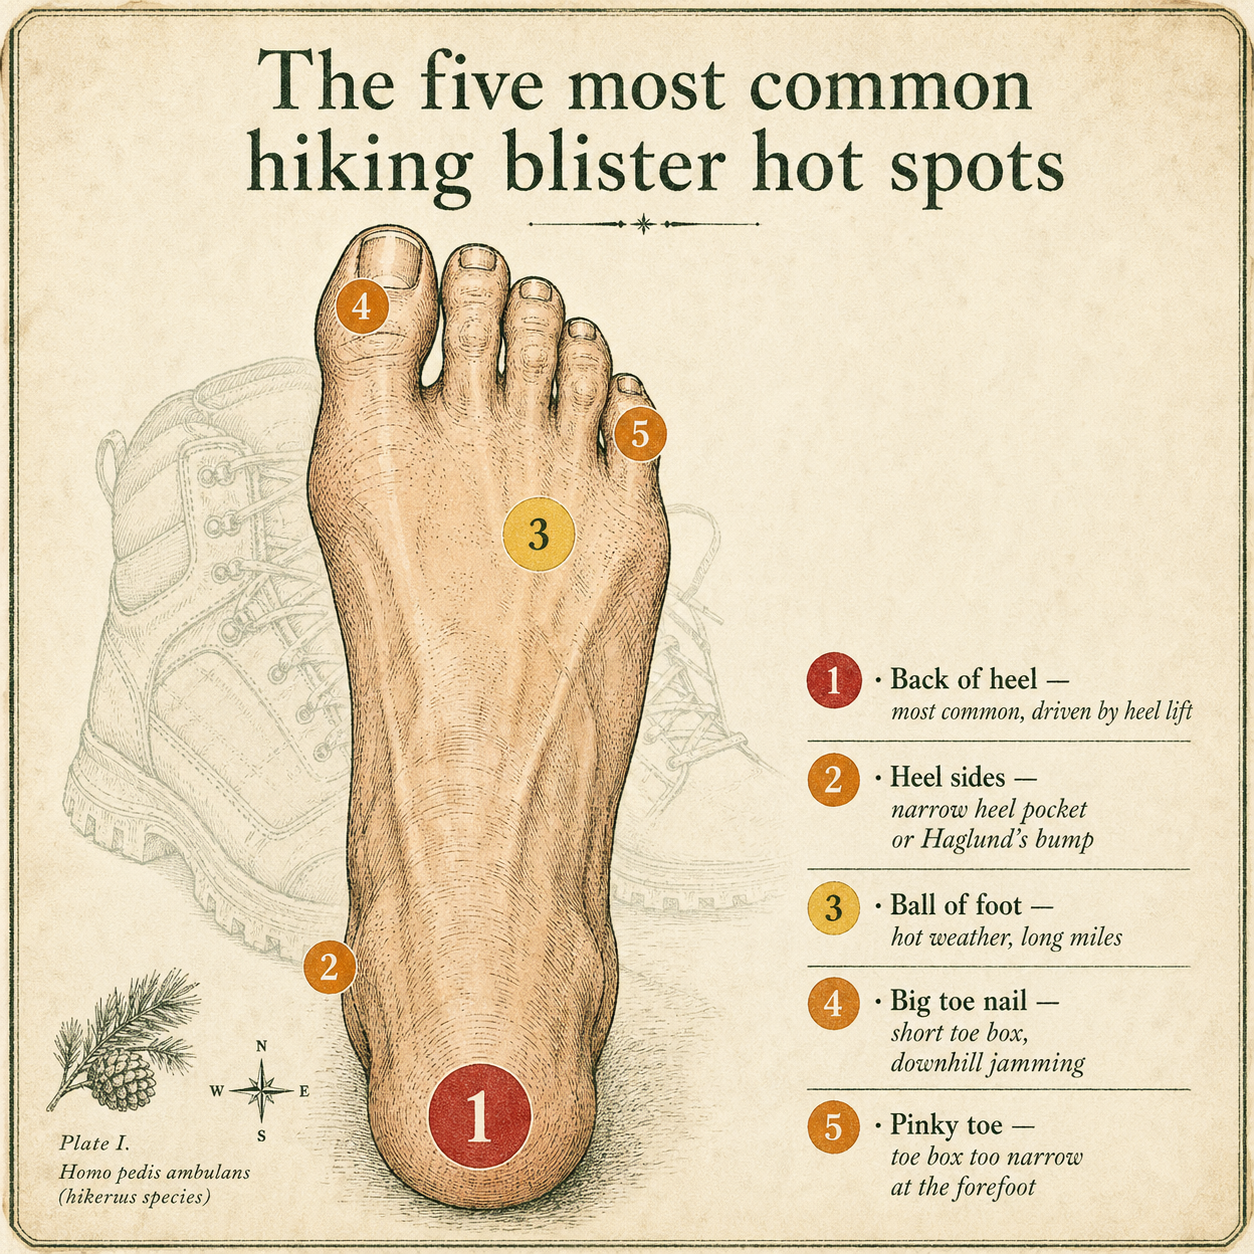
Back of heel
The single most common location. Driven by vertical heel movement on every step. The fix is to reduce that movement (heel-lock lacing, see Section 7), reduce the cost of that movement (friction-reduction patches inside the boot, see Section 8), or make the skin tougher (gradual break-in over weeks).
Heel sides
Often related to a narrow heel pocket or, in some people, a slightly enlarged bony prominence at the back of the heel called Haglund’s deformity. If you blister consistently on the sides of one heel, look at the heel cup of the boot when it’s off your foot: a deep, well-shaped cup matters more than overall boot quality.
Ball of foot
Builds slowly through long, hot days. The forefoot pads compress, the foot lengthens slightly, and shear under the metatarsal heads accumulates. Foot powder, wider toe boxes, and a thicker, wool-blend sock all reduce this.
Big toe top and nail
Almost always a sign your shoes are too short for descents. If your toes touch the front of the toe box during downhill steps, the nail and toe top take the impact. Size up. A “thumb’s width” of space ahead of your longest toe with the boot laced is the rough rule.
Pinky toe and outside of foot
Toe box too narrow. Hard to fix with prevention; usually solved by switching to a wider-lasted shoe. Altra, Topo Athletic, and the wide-fit lines from Keen and Merrell are the usual answers.
4. Catching the hot spot in 30 seconds
A hot spot is the early-warning state of a blister. The skin layers are sliding but haven’t separated yet. You’ll feel one of three things: a burning sensation, an unusual warmth, or a tender spot that wasn’t there a mile ago. Listen to it.
The 30-second rule: stop within 30 seconds of feeling a hot spot. Take the boot off. Look at the spot. The intervention takes longer than the warning, but the warning is the cheapest moment in the whole sequence. Once a hot spot becomes a fluid pocket, you have a wound for the next three to seven days.
What to do at the hot spot
- Sit down, take the boot and sock off, look at the skin.
- If the skin is red but intact, dry the spot, then cover it with a strip of Leukotape or a piece of moleskin extending well beyond the red area.
- If your sock is damp, swap to a dry pair before you put the boot back on.
- If lacing was loose, retighten, especially the upper eyelets if it’s a heel hot spot.
- If lacing was tight on top of the foot, loosen by one or two crossings.
The cost is five minutes. The cost of skipping it is the next three days of your trip.
5. Boot and shoe fit: the five tests
If a boot doesn’t fit, no amount of socks or tape will save you. Run all five of these tests in the store, and re-run them at home before any new boot goes on a long trail.
The heel slip test
Lace the boot fully and walk a dozen steps on a hard surface. Your heel should rise no more than about 3 to 5 millimetres (roughly 1/8 to 3/16 inch) inside the boot. Anything more and that vertical movement is going to drive shear into your skin every step you take. If a boot fails this test, try a heel-lock lacing pattern (Section 7) before you give up on it; sometimes that’s enough.
The downhill toe slam
Loosen the laces, slide your foot all the way forward in the boot, and check the gap behind your heel. You want exactly one finger flat against the back of your heel: no more, no less. Less than that and your toes will slam the front of the toe box on every descent, which is how big-toe-nail blisters and lost toenails happen on long downhills. More than that and your foot will swim forward when you point downhill anyway.
The flex point check
Hold the boot by the heel cup and the toe, and gently bend the sole. The crease should form across the forefoot, exactly where your own foot bends at the ball. A boot that creases mid-arch is fighting your stride; every step pushes the upper into the top of your foot in a way it wasn’t designed for, and that pressure becomes a hot spot two hours into a hike. Stiff boots that crease in the wrong place don’t break in to the right place.
The lace-and-walk test
Lace the boots properly and walk for five to ten minutes, on the store’s slope ramp if there is one. Hot spots that show up in ten minutes are guaranteed by mile two, so this is your last chance to catch a fit problem before you’ve owned the boots. Pay attention to the back of the heel, the top of the toes, and the sides of the little toe; those are the early warning sites that tell you whether this boot will work for you.
The end-of-day fit
Try boots in the late afternoon or evening, when your feet have been weight-bearing all day and have swollen to their working size. A boot that feels perfect at 8am will be tight by 4pm on a hot trail, which means tight at the exact moment your feet are most vulnerable. The afternoon try-on is the closest you can get to mile-twelve conditions inside an air-conditioned store. It’s worth a second trip.

For a deeper dive on sizing the right pair to begin with, see how should hiking boots fit.
Boot material and break-in time
The other variable that decides blister risk in your first 50 miles is what the boot upper is made from. Stiffer materials need longer to soften and conform, and the break-in window is when most “new boot” blisters happen. Pick the material that matches how patient you can afford to be.


The non-obvious implication for blisters: if you’re buying boots two weeks before a multi-day trip, a synthetic upper is the lowest-risk choice. The traditional advice to buy leather and break it in over months only applies if you actually have months. For a deeper read on the break-in process itself, see how to break in hiking boots.
6. The sock system that actually works
Socks are the single highest-leverage purchase you can make for blister prevention, and the easiest one to get wrong. The two decisions that matter are fibre and layering.
Fibre: cotton, merino, synthetic
Cotton holds water, dries slowly, and loses all its loft when wet. Wet cotton is the worst possible interface between your skin and a boot for blister prevention. Avoid it for hiking, full stop.
Merino wool is the best all-around fibre for hiking socks. It absorbs moisture into the fibre rather than onto the skin, dries faster than cotton, and resists odour over multi-day trips. Brands worth knowing: Darn Tough (lifetime warranty, dense knit), Smartwool, Farm to Feet.
Synthetic socks (polyester, polypropylene, nylon blends) wick more aggressively than wool and dry faster on the body. They tend to be thinner and run hotter. Some hikers prefer them in summer or for fast-and-light trips.
Layering: liner sock plus outer sock
The two-sock system is the single most effective sock change you can make if you blister. A thin liner sock (silk, nylon, or merino, around 25–60 grams per pair) goes against your skin. A regular hiking sock goes over it. The result: when shear happens, it happens between the liner and the outer sock, not between the sock and your skin. Your skin still moves, but it moves with the liner instead of against it.
| Sock setup | Best for | Why it works (or doesn’t) |
|---|---|---|
| Cotton, single layer | Nothing on the trail | Holds water, fails when wet, fastest to blister |
| Merino, single layer | Day hikes, dry conditions | Regulates moisture well, comfortable, good warmth-to-weight |
| Synthetic, single layer | Trail running, hot weather | Dries fastest, runs hot but light |
| Liner + merino outer | Multi-day, blister-prone feet | Shear shifts to between socks, skin protected |
| Toe-liner (Injinji) + merino | Toe blisters, hot conditions | Separates each toe, eliminates between-toe rubbing |

For more detail on fibres, see merino wool vs synthetic hiking socks.
7. Heel-lock lacing and other rope tricks
Most hikers tie their boots the same way they tie their sneakers and never think about it again. That’s a missed opportunity. Three lacing tweaks can make a meaningful difference, and the first one is the single most important non-gear change you can make for back-of-heel blisters.
Heel-lock (surgeon’s knot)
The goal is to anchor the heel against the back of the boot so it can’t lift. Lace the boot normally up to the second-from-top eyelet. Then, instead of crossing the laces, run each lace up the same side and through its own top eyelet, creating a small vertical loop. Now thread each lace through the opposite loop and pull tight. Tie off as normal. The two loops cinch down on the ankle and lock the heel in place.

Window lacing
If you have a high arch or a tender spot on top of your foot, skip a crossover at the painful eyelet. Lace straight up the side past the spot, then cross over again. The “window” lifts pressure off the sensitive area without loosening the rest of the boot.
Two-zone tightening
For descents on technical trail, tie a half-knot at the boot’s flex point (about the third or fourth eyelet from the bottom). Lace tight above, lighter below. This locks the foot back into the heel so it can’t slide forward and slam your toes on the downhill, while leaving the forefoot room to swell.
8. Pre-trail prep: tape, lube, patches, powder
If a spot on your foot has blistered before, treat it like a known weakness and pre-treat it before you start. There are five categories of preventive product. They do different jobs, and the comparison below is more useful than picking a single brand.
| Tool | Mechanism | Best for | Trade-off |
|---|---|---|---|
| Leukotape P | Spreads shear load over a wider skin area | Pre-taping known hot spots, multi-day trips | Aggressive adhesive can irritate sensitive skin |
| Paper tape (Micropore, KT) | Light barrier, slight load spreading | Sensitive skin, day hikes | Falls off when wet |
| Moleskin | Cushioning, donut padding | Padding around an existing blister | Bulky, peels off in heat |
| Anti-chafe stick (Body Glide) | Reduces surface friction temporarily | Day hikes, trail runs, hot conditions | Wears off in 3–5 hours |
| Bag Balm / Hike Goo | Lubricates and waterproofs the skin | Wet conditions, ultra-distance feet | Greasy, attracts grit |
| ENGO patches | Low-friction patch applied to the shoe | Recurring heel blisters | Have to apply correctly to last; not for skin |
| Hydrocolloid (Compeed) | Wound dressing, fluid absorption | Already-popped blisters | Not for intact skin or hot spots |
| Foot powder (Gold Bond, talc) | Reduces moisture, lowers shear damage | Heavy sweaters, hot trails | Cakes when very wet |
The non-obvious one in this list is ENGO. Most blister products are applied to the skin, where they peel, sweat off, and create their own irritation. ENGO patches are applied to the inside of the shoe (usually the heel cup or under the ball of the foot) and create a slick, low-friction surface against the sock. They last for weeks and don’t shift with sweat. For hikers with a chronic, recurring blister in the same spot, this is the most reliable single intervention available.
9. Wet feet: the Oregon trails problem
Most national blister advice assumes a dry trail. Oregon trails are wet. The Coast Trail crosses creeks and walks on rain-soaked sand. The Cascades hold snowmelt into August. The Gorge is a permanent moss garden. If your feet are going to be wet for hours at a time, your strategy has to change.
The wet-feet rule
Wet skin tears at far lower shear loads than dry skin. The thresholds that work in dry conditions stop working when your feet are wet. You can’t just out-tape a wet foot. The strategy becomes: dry the feet when you can, manage the damage when you can’t.
Strategies that work
- Trail runners that drain instead of waterproof boots that fill. A waterproof boot is great in the rain, but on a creek-crossing-heavy trail, the moment water tops the cuff it’s trapped inside. Mesh trail runners drain in minutes. Many Oregon thru-hikers default to drainable shoes for everything but winter.
- Lunch sock change. Carry one dedicated pair of dry socks. Halfway through the day, sit down, dry your feet with a bandana, and swap. Hang the wet pair on the outside of your pack to dry while you walk.
- The 10-minute boot break. Every two hours, take the boots and socks off for ten minutes. Skin re-firms surprisingly fast in moving air. This single habit cuts blister rates noticeably on long days.
- Pre-tape before the wet. Tape applied to dry skin in the morning will outlast tape applied to wet skin at lunchtime. If you know you’re crossing creeks, tape your known hot spots before the first crossing, not after.
- Lubricant under tape on long wet days. A thin layer of Bag Balm or Hike Goo on the foot under taped hot spots gives the skin a moisture barrier that lasts hours longer than tape alone.
- Gaiters for debris and creek splash. Low gaiters seal the boot collar against pine needles, sand, and small rocks that work their way in and create pressure-point blisters. Tall gaiters add water and snow protection for stream crossings or shoulder-season miles. They don’t replace the rest of the wet-feet strategy, but they buy you a useful first layer. See how to choose and use gaiters.
10. Treating a blister you already have
You did everything right and it still blistered. That happens. The treatment depends on whether the skin is intact.
If the skin is intact
Don’t pop it. The roof of an unbroken blister is the cleanest, most effective dressing the wound will ever have. Cushion it with a donut pad: cut a piece of moleskin or foam in a doughnut shape with a hole the size of the blister, and stick it down so the blister sits in the hole, untouched. The pad takes the pressure; the blister heals underneath.
If the skin has popped
- Wash hands or use hand sanitiser.
- Clean the wound with water and mild soap, or an antiseptic wipe.
- Apply a thin layer of antibiotic ointment (Neosporin, Bacitracin).
- Cover with a hydrocolloid dressing (Compeed, Spenco 2nd Skin) or a sterile gauze plus tape.
- Re-cover with Leukotape over the top to keep the dressing in place.
When to drain a blister deliberately
The case for deliberate draining is narrow: a very large blister, or one in a position that will burst on its own under load anyway. If you must drain, sterilise a needle with flame and alcohol, pierce the side of the blister at its lowest point so fluid drains down, leave the roof of skin in place, apply ointment and dressing. Never tear the roof off; you turn a one-day problem into a one-week wound.
11. When to push through, when to bail
You can almost always finish a day hike with a small, well-treated blister. You can usually finish a multi-day trip with one, if you treat it right and your gait stays normal. The honest tests are:
Push through if
- The blister is small, intact or freshly drained, and well-padded.
- You can walk with a normal gait: no limping, no shifted weight.
- You have less than a full day’s distance remaining.
- The skin around the blister looks normal: not red beyond the blister edge, not warm, not painful at rest.
Bail (or take a rest day) if
- The blister is blood-filled, rather than clear or straw-coloured.
- You’re limping enough that you’d notice a friend doing it.
- The wound shows any infection sign from the warning above.
- You can’t get the boot back on without sharp pain.
The reason a limp is the dealbreaker isn’t the blister itself; it’s the cascade. An altered gait shifts load to the other foot, the knees, the hips. A single heel blister that you walk through wrong can produce a second blister on the opposite foot, an IT band flare-up, and an Achilles strain by day three. The blister heals in five days. The compensation injuries don’t.


Should I pop a hiking blister?
No, not if the skin is intact. The roof of an unbroken blister is the cleanest, most effective dressing the wound will ever have, and popping it raises infection risk on a trail where your hands and water sources are not sterile. Offload pressure with a donut-shaped pad and let it heal on its own. The only exception is a blister so large or so badly placed that you cannot continue without bursting it, in which case a sterilised needle, drainage from the side, and an antibiotic ointment plus hydrocolloid dressing is the protocol.
Do liner socks really prevent blisters?
Yes, for many people. A thin liner sock under your hiking sock moves the shear plane from the boundary between sock and skin to the boundary between liner and outer sock. Your skin still moves with the liner, but the relative sliding happens between two layers of fabric instead of fabric against skin. It is not a universal fix, but if you are blister-prone and have not tried liners, this is the cheapest and fastest improvement available.
Are hydrocolloid blister bandages or moleskin better?
They do different jobs. Hydrocolloid pads (Compeed, Spenco 2nd Skin) are best for an already-popped blister: they cushion, absorb fluid, and keep the wound bed moist for faster healing. Moleskin is a felt-like padding best used preventively or to build a donut pad around an intact blister to take pressure off it. Carry both. The mistake is treating an intact blister with hydrocolloid: you do not need the wound dressing yet, and the slick surface can shift under load.
Why do my heels still blister even in well-fitted boots?
Some heels are blister-prone regardless of fit. Research at the University of Salford in 2013 showed that under identical controlled conditions, one volunteer blistered after only four minutes while another lasted thirty-two. If your boots fit and you still blister, the problem is shear inside your skin, not the shoe. The two strategies that work for blister-prone heels are heel-lock lacing to reduce vertical heel movement, and friction-reduction patches (such as ENGO) applied to the inside of the boot rather than to the skin.
How do I prevent blisters when my feet get wet on the trail?
Wet skin tears far more easily than dry skin, so the strategy is to keep feet dry where you can and to manage damage where you cannot. Change into dry socks at lunch, take a ten-minute boot-off break every two hours, and pre-tape any spot that has blistered before. On all-day wet trails like stretches of the Oregon Coast Trail or creek-heavy Cascades routes, many hikers prefer trail runners that drain quickly over waterproof boots that hold water inside.
Do anti-chafe sticks like Body Glide work for hiking blisters?
They reduce surface friction for a few hours, which is enough for short hikes and trail runs. They do not last for a full backpacking day, especially in heat or wet conditions, and reapplication on the trail is awkward. For day hikes, an anti-chafe stick on known hot spots is a quick, light, low-effort layer of protection. For multi-day hikes, combine it with tape or with friction-reduction patches inside the shoe.
What is the best tape for hiking blister prevention?
Leukotape P (zinc-oxide athletic tape) is the gold standard for hikers and ultrarunners. It sticks aggressively, stays on for several days through sweat and stream crossings, and is thin enough that it does not change boot fit. Apply it to clean, dry skin with rounded corners so the edges do not peel. KT Tape and paper tape are gentler alternatives if Leukotape irritates your skin. Moleskin works best as a doughnut pad around an existing blister rather than as adhesive over a hot spot.
Can I keep hiking with a blister?
Often, yes, with proper field treatment. Cover a small intact blister with a donut pad and continue if the pain does not change your gait. Stop and reassess if the blister is blood-filled, if it has popped and the wound is contaminated, if you see signs of infection (spreading redness, warmth, pus, red streaks), or if you are limping enough to overload your knees, hips or other foot. An altered gait is how a single blister becomes three blisters and a tendon strain by day three.
