Hiking field guide
How to Choose & Use Gaiters
A gaiter is a sleeve engineered to seal one specific gap: the slot between the top of your boot and your shin. The terrain you hike, the height you pick, and how the strap is built are the difference between a gaiter that quietly does its job and one that flops loose on the first creek crossing.
Gaiters are one of the few pieces of hiking gear that do exactly one thing well, and most people never need the technical version they end up buying. A short trail running gaiter and a tall mountaineering gaiter share a name and almost nothing else: different fabrics, different heights, different straps, different jobs.
This guide walks through what gaiters actually do, the four real categories you will see in stores, how to match height and fabric to your terrain, and the specific way to put them on so they hold their seal for an entire trip. If you are still working out your full footwear setup, the sister guides on how to choose hiking boots and hiking boots vs trail runners are worth reading first.
1. What gaiters actually do
A gaiter is a fabric sleeve that wraps around your lower leg and the top of your boot, sealing the gap where debris, water, and snow would otherwise enter. The technical-looking ones in catalogs share that single core function with the lightest trail-running models. They only differ in how they seal it and against what.
A gaiter has three real jobs. Everything else marketed onto the side of the package is secondary.
- Block debris. Sand, fine grit, pine needles, small twigs, and snow that would otherwise drop into the top of your shoe through the gap above the laces. Grit grinding against your sock for a few hours is one of the leading causes of hiking blisters.
- Block low water and snow. Splash from creek crossings, postholing snow, slush, and rain that would run down your shin and pool at the boot collar.
- Protect the lower leg. Brush, blackberry, devil’s club, scree abrasion, ticks crawling up the sock line, and the occasional crampon snag for the people who need that.
What gaiters do not do: they are not a substitute for a waterproof boot, they do not add real warmth, they do not make a low-cut shoe into a high-cut one, and they do not turn a fragile pair of pants into bushwhacking armor. If you understand the three jobs above, the rest of this guide is mostly about matching the right type to the worst job your hike actually contains.
When gaiters earn their place
Most short summer day hikes on graded trail do not need them. The trips that genuinely benefit from gaiters share a few specific signatures:
- You are hiking in snow deeper than your boot top.
- You are crossing wet brush, mud, or sustained scree.
- You are wearing low-cut trail runners on dusty, sandy, or gritty trail.
- You are hiking with rain pants in sustained rain and want to stop water funneling into the boot.
- You are heading off-trail through dense brush, blowdown, or devil’s club.
- You are in tick-heavy terrain in summer and want a physical barrier above the sock line.
If none of those apply, gaiters are dead weight in your pack.
2. The four types of gaiters
Marketing copy will list a dozen subtypes. There are four that matter.
Trail running gaiters
Three to five inches tall, stretch nylon, no waterproofing, no instep strap. They attach with a small Velcro patch glued to the heel of the shoe and a hook over the top of the laces. Their only job is to keep dust, sand, and trail grit out of the top of a low-cut running shoe. Light enough to forget you have them on. Useless in real snow or sustained brush. Representative models: Dirty Girl Gaiters and the Kahtoola INSTAgaiter Mid.
Low to mid hiking gaiters
Five to nine inches tall, ending somewhere between the boot top and mid-calf. Light coated nylon or polyester, usually water-resistant rather than waterproof, with a real instep strap and a front closure. The default day-hiking gaiter. Handles mud, light brush, light snow, and creek splash. The one most hikers should own and the one most hikers do not. Representative models: the REI Co-op Sahara and the Outdoor Research Helium.
Full-height (tall) gaiters
Fourteen to eighteen inches tall, ending just below the knee. Heavier coated nylon, often with a Cordura panel up front for abrasion. Built for serious snow, deep mud, river crossings, and bushwhacking. This is the category most people picture when they hear the word “gaiter” and the one most often misbought. They are warm, slightly noisy, and overkill for graded summer trail. Representative models: the Outdoor Research Rocky Mountain High and the Outdoor Research Crocodile.
Mountaineering gaiters
Fourteen to eighteen inches tall, but built differently. Insulated, fully waterproof breathable membranes (Gore-Tex or eVent), reinforced with Hypalon or rubber where crampons sit, and designed to clip to a mountaineering boot specifically. Heavy. Hot. Necessary on glaciers, ice routes, and winter alpine objectives, and only there. Representative models: the Outdoor Research Expedition Crocodile and the Hillsound Armadillo Nano.

| Type | Height | Best for | Weight (pair) |
|---|---|---|---|
| Trail running | 3 to 5 in | Dry trail, sand, fine grit, fastpacking | 1 to 2 oz |
| Low / mid hiking | 5 to 9 in | Day hiking, mud, light snow, creek crossings | 5 to 8 oz |
| Full height | 14 to 18 in | Postholing snow, bushwhacking, expedition | 9 to 14 oz |
| Mountaineering | 14 to 18 in (insulated) | Crampons, glacier travel, ice climbing | 14 to 22 oz |

If you only own one pair, own a low to mid hiking gaiter. It covers more terrain than any other category, weighs little enough to carry as an afterthought, and fits over the widest range of footwear.
3. Heights, ankle to knee
Height is the single most overbought spec on a gaiter. Taller is not better. Taller is hotter, heavier, noisier, more expensive, and harder to fit. The only honest reason to size up in height is that the worst section of your trip exceeds the height you have.
- 3 to 5 inches. Just covers the top of a trail runner. Stops grit. Useless against anything wetter than dew.
- 5 to 7 inches. Reaches mid-shin on most adults. Handles mud, ankle-deep snow, and most creek splash. The sweet spot for general hiking.
- 7 to 9 inches. Reaches the calf. Handles knee-deep brush and shin-deep snow. Slight bulk increase.
- 14 to 18 inches. Tucks under the knee. Required for postholing, sustained snow travel, river fords above the calf, and serious off-trail work.
Two heights cover almost every Oregon use case: a 7-inch hiking gaiter for everyday trail work and a 16-inch full-height gaiter for snow, brush, and shoulder-season backcountry.
4. Fabric and waterproofing
Gaiter fabric trades three properties against each other: breathability, waterproofness, and abrasion resistance. No single fabric wins on all three.
| Fabric | Waterproof | Breathable | Abrasion | Typical use |
|---|---|---|---|---|
| Stretch nylon | No | High | Low | Trail running |
| Coated nylon / polyester | Water-resistant | Medium | Medium | Day hiking, light snow |
| Gore-Tex or eVent | Yes | Medium-high | Medium | Sustained snow and rain |
| Cordura / Dyneema X | No (alone) | Medium | Very high | Bushwhacking, scree, expedition |
Most full-height backcountry gaiters layer two fabrics: a waterproof breathable upper for the calf and a Cordura or rubberized lower for the part that drags through scree and crampon points. This is the right design and worth the small weight penalty.
5. Attachment systems
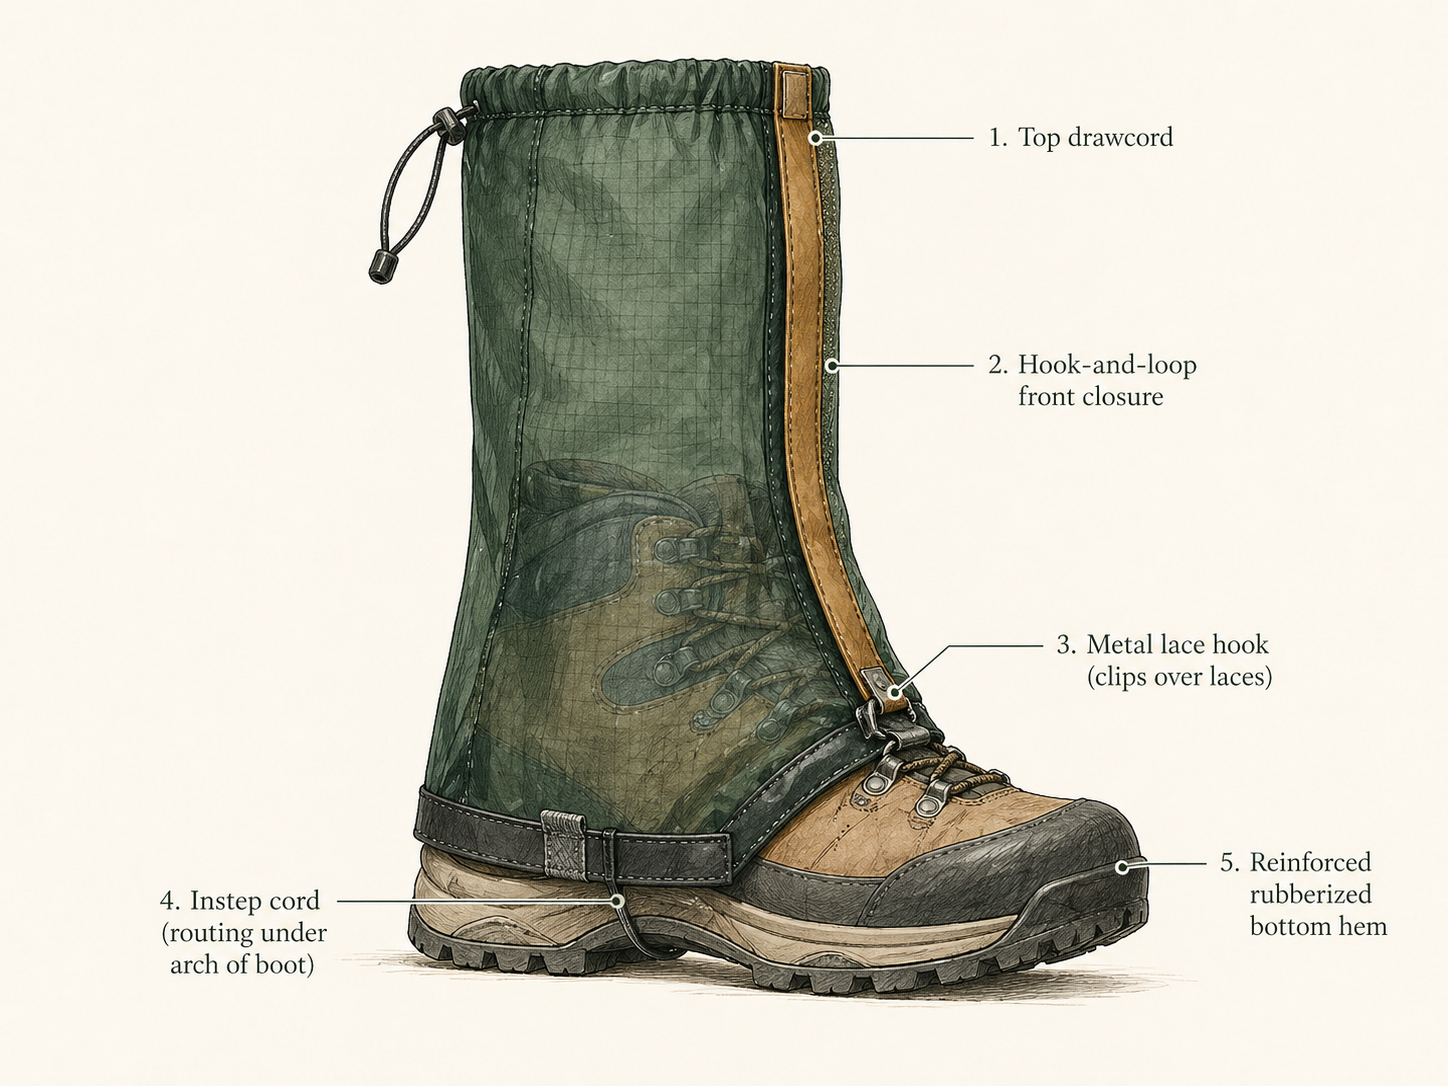
A gaiter only works if it stays put. Five components keep it there, and any one of them failing makes the gaiter useless.
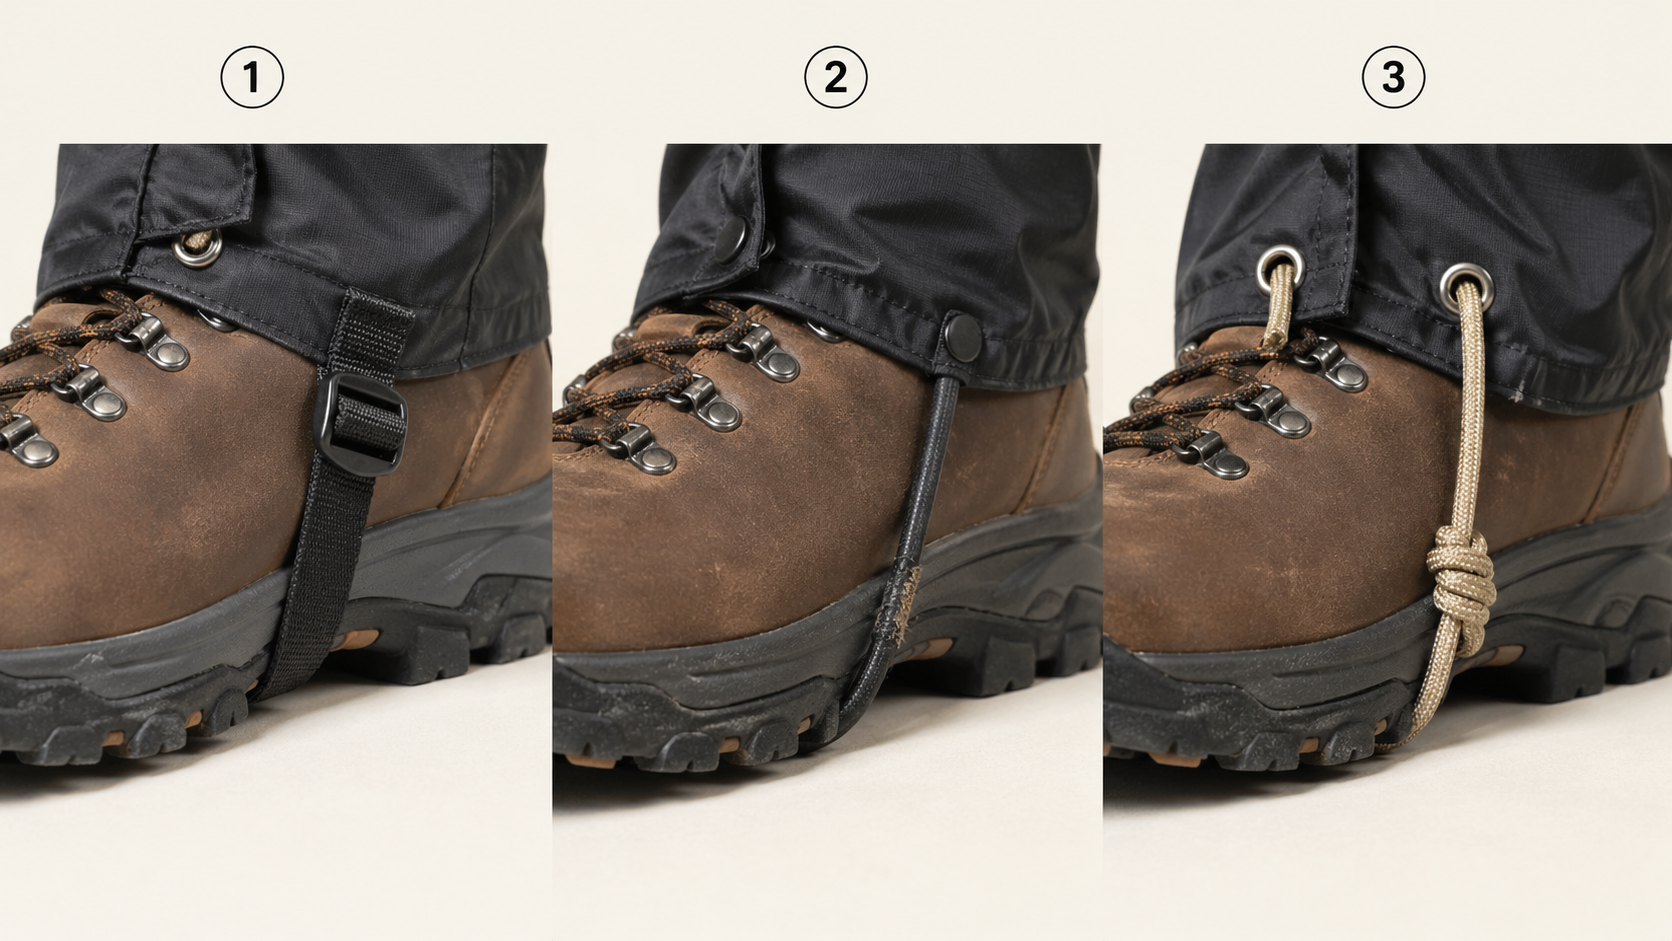
Lace hook
A small metal hook at the front lower edge that clips over your boot laces, anchoring the gaiter forward and down. Simple, durable, and the first thing to clip when putting them on. Plastic hooks bend; stainless wire hooks last for years.
Instep strap or cord
The strap or cord that runs under the arch of your boot and locks the bottom of the gaiter against the sole. The single most important component, and the one that fails the most. Three styles to know:
- Bonded nylon webbing. Light, comfortable, decent durability on dirt and snow. Wears fast on bare rock.
- Rubber or coated cord. Cheap and stretchy. Snaps without warning after a season of scree.
- Replaceable accessory cord. The backcountry standard. Threads through reinforced eyelets and ties under the arch. When it wears out, you swap it on the trail with a foot of paracord and a knot.
Front closure
A vertical opening that lets you get the gaiter on and off without removing your boot. Three common designs: hook-and-loop overlap, two-way zipper with a Velcro storm flap, and snap closure. Velcro is fastest and quietest. Zippers seal best in deep snow but ice up. Pure snap closures are now mostly obsolete.
Top closure
An elastic or drawcord seal at the top of the gaiter, pressed against your shin or pant leg. Drawcord with a small cord lock is adjustable and reliable. Pure elastic eventually stretches out.
Bottom hem
The lower edge of the gaiter that wraps the boot. A reinforced or rubberized hem prevents the gaiter from riding up onto the boot collar mid-stride. Cheap gaiters skip this and creep up by lunch.
6. Sizing and fit
Gaiters fit by two measurements: shoe size and calf circumference. Both must work, and most fit failures come from ignoring one of them.
Shoe size determines whether the bottom hem and instep strap have the right geometry. A women’s medium gaiter on a men’s size 12 boot leaves the hem riding up and the strap stretched too tight to function.
Calf circumference determines whether the top closure can actually seal. Measure at the widest part of your calf, while standing, in the same socks and pants you will hike in. Most manufacturer charts list both shoe range and calf range. Use the more restrictive of the two.
| Size | US shoe (men’s / women’s) | Calf at widest |
|---|---|---|
| Small | 5-7 / 6-8 | up to 13 in |
| Medium | 7.5-9.5 / 8.5-10.5 | 13-15 in |
| Large | 10-11.5 / 11+ | 15-17 in |
| X-Large | 12+ | 17+ in |
Generic guide. Always check the actual manufacturer chart for the model you are buying.
7. How to put gaiters on correctly
The order matters. Most people put gaiters on out of order and then spend the day adjusting them.
- Put your boots on, but leave the laces loose. Make sure your pant legs are inside or outside the boot the way you actually want them. Changing your mind once the gaiter is on is a five-minute job.
- Step into the gaiter from the top. Pull it down over the boot like a pant leg, not from below. Trying to wrap it around an already-tied boot is harder than it needs to be.
- Clip the lace hook over the laces. Hook the metal clip over the lower laces, not the boot collar. This anchors the gaiter forward and pulls it down toward the toe.
- Close the front. Wrap the front closure around your shin and seal it: Velcro top to bottom or zipper bottom to top. Press the storm flap flat against the gaiter body.
- Route the instep strap under the arch. Not under the toe, not under the heel. The arch of the boot, the natural low point of the sole. Adjust until snug, not crushing.
- Tie or tighten the boot laces. Now that the lace hook and instep are positioned, lace your boots normally.
- Cinch the top drawcord. Just enough to stop debris from falling in. If you can feel pressure on your shin after a hundred yards of walking, loosen it.

8. When to wear them on Oregon trails
Oregon hiking covers six distinct regions and four real seasons, and the right gaiter changes for each. The table below is the shortcut most readers actually want.
| Where and when | Conditions | Right gaiter |
|---|---|---|
| Coast trail, summer | Sand, dry grit, occasional surf | Trail running gaiter |
| Coast Range, fall | Wet brush, mud, slick basalt | Mid hiking gaiter, water-resistant |
| Cascades, summer | Some lingering snowfields, dry above | Low to mid hiking gaiter |
| Cascades, late spring or early summer | Postholing snow, slush, wet feet | Full-height waterproof breathable |
| Three Sisters or Crater Lake, winter | Deep snow, wind, possible crampons | Mountaineering gaiter |
| Eastern Oregon, summer | Dust, fine volcanic grit, scree | Trail running or low hiking gaiter, abrasion-resistant |
| Columbia Gorge, year-round | Mud, wet rock, occasional brush | Mid hiking gaiter |
| Off-trail anywhere | Bushwhacking, devil’s club, blowdown | Full-height with abrasion fabric |
For a deeper read on terrain by region, see the hiking hub page and the backpacking guide, both of which break down conditions by area and season.
9. Care, washing, and storage
A gaiter is a piece of coated fabric, not a piece of leather. It does not need much, but the small amount it needs matters.
After every trip
- Brush off dried mud and grit with a stiff brush before it works into the fabric.
- Rinse with cold water if you crossed salty surf, alpine streams, or any chemical-treated road.
- Hang to dry inside-out. Mildew grows on the inner face first.
Periodic washing
- Hand wash in cool water with a mild technical wash like Nikwax Tech Wash. Avoid regular detergent, fabric softener, and anything with a fragrance.
- Do not put coated or membrane gaiters in a hot dryer. Air dry, or tumble on no-heat if the manufacturer allows it.
Reproofing the DWR
Every six to twelve months, or whenever water stops beading on the outer face, run a wash-in DWR product like Nikwax TX.Direct or Granger’s Performance Repel through the gaiters. This is what restores the water-shedding behavior the gaiter was built for. Letting the DWR die is the most common reason a “waterproof” gaiter feels suddenly useless.
Storage
- Store fully dry and loosely folded. Do not crush them at the bottom of a pack bin for six months.
- Replace the instep cord at the start of every season if you hiked them hard.
10. Common mistakes
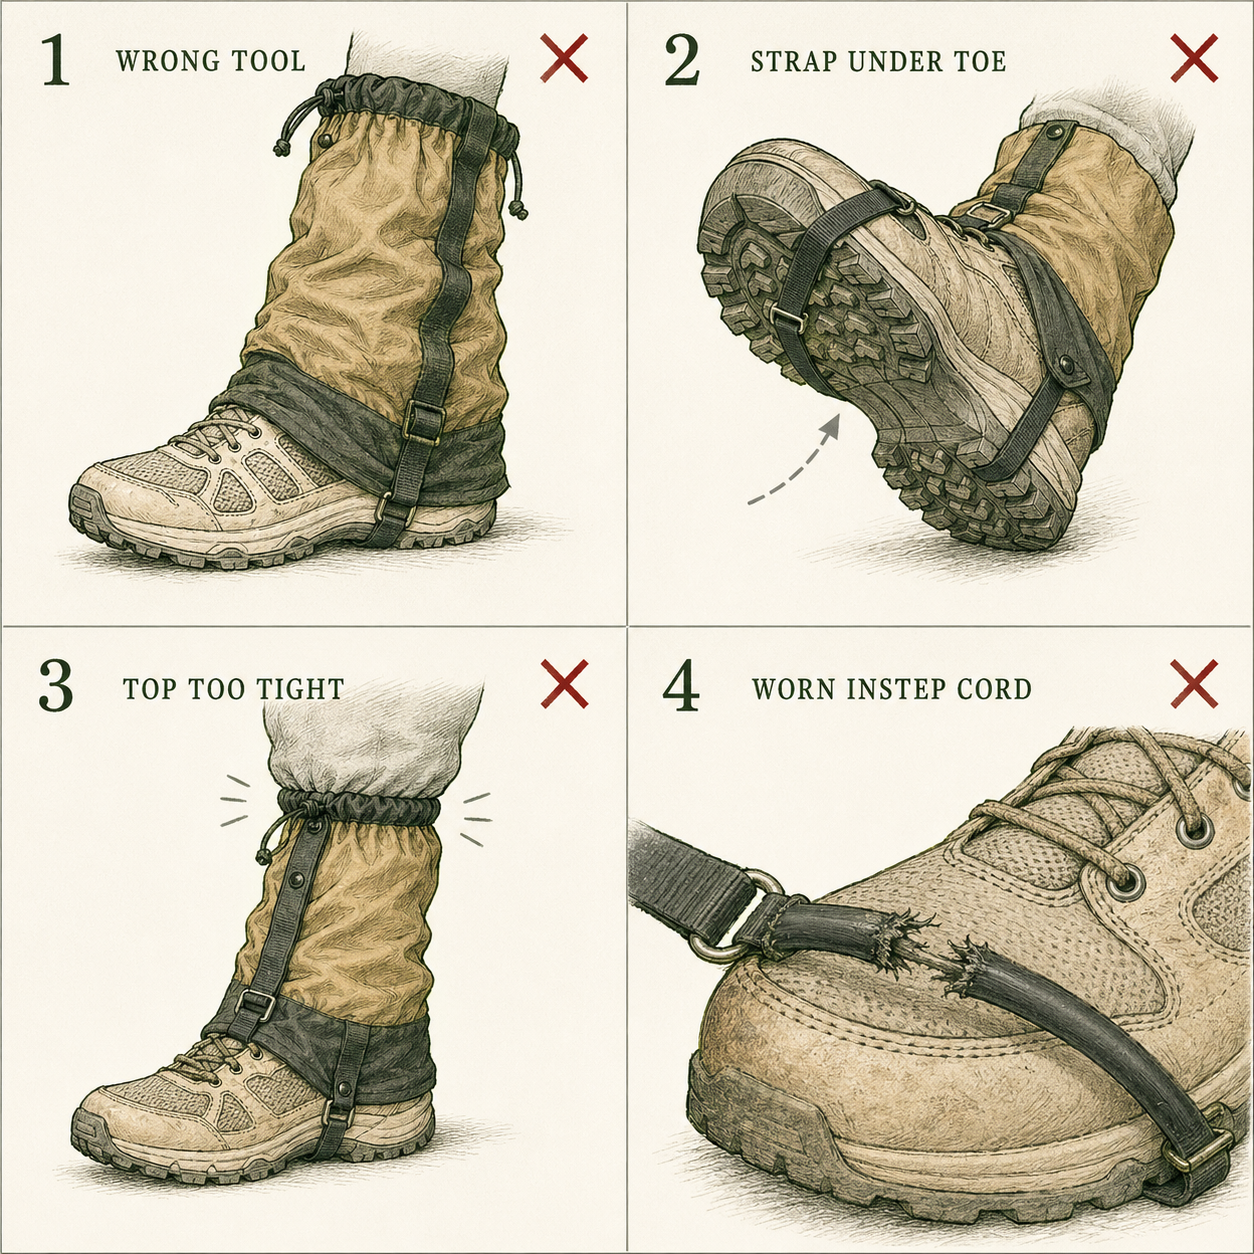
Buying mountaineering gaiters for casual day hiking
The most expensive, heaviest, hottest gaiter in the store is not the best gaiter for a Forest Park day hike. It is the wrong tool. A 7-inch hiking gaiter at a third of the price will outperform it for everything that is not glacier travel.
Routing the instep strap under the toe or heel
The strap belongs under the arch, the natural low point of the boot sole. Anywhere else either bunches the gaiter forward, crushes the toe box, or wears through the strap in a single trip.
Cinching the top drawcord too tight
The top is a dust seal, not a tourniquet. The instep strap and lace hook do the structural work. A cold or tingling foot at the trailhead means the top is the only thing failing, and it is not failing in a useful way.
Using gaiters as a substitute for waterproof boots
Gaiters seal the top of the boot. Water that wicks through the boot leather, the seam tape, or the tongue is unaffected by the best gaiter on earth. If keeping feet dry matters, the boot has to do the dry work and the gaiter has to do the seal work. They are paired, not substituted.
Skipping the seasonal cord swap
An instep cord is consumable. Replacing it once a year on backcountry gaiters takes two minutes and prevents the worst-case failure: the strap snapping mid-stream and the gaiter floating off downstream.
Gear that pairs with the right gaiter
A gaiter is one piece of a system. The boot, the sock, and the pant leg all matter. Start with the foundation.

Hiking footwear, reviewed
Boots, mids, and trail runners we have actually hiked in. Sorted by terrain and use case.

Hiking apparel
Pants, baselayers, and shells that work with a gaiter rather than fight it.

Trekking poles
Stability for the same trips where gaiters earn their place: snow, mud, scree.

Hiking backpacks
Day packs and overnight packs sized for Oregon trails.
Common questions about gaiters
For most dry summer day hikes on graded Oregon trails, no. Gaiters earn their place when conditions get wet, dusty, brushy, or snowy. Spring and early summer hikes in the Cascades, fall hikes in the Coast Range, any winter trip, and almost all off-trail travel are when a low or mid gaiter goes from optional to genuinely useful.
Trail running gaiters are short, stretchy nylon sleeves under five inches tall, designed to keep fine grit out of low-cut shoes. They have no waterproofing, no abrasion fabric, and rely on a Velcro patch glued to the back of the shoe. Hiking gaiters are taller, use stiffer fabrics, attach with a lace hook plus an instep strap, and are built to handle sustained mud, brush, and snow.
Snug enough to seal against your pants or skin, loose enough that you cannot feel the drawcord cutting in after an hour of walking. If your foot tingles or your calf feels cold, the top is too tight. The seal at the boot and the instep strap do most of the work, not the top.
Only at the top. A gaiter stops water and snow from entering through the boot collar, but it does nothing for water that soaks through the boot itself. Pair waterproof gaiters with waterproof boots if dry feet matter, and pair non-waterproof gaiters with trail runners if you are willing to get wet and dry fast.
Both work. Many trail runners now ship with a small Velcro patch on the heel specifically for trail running gaiters, and most full-height hiking gaiters include a lace hook that fits any laced shoe. The fit is sometimes loose at the boot top because trail runners have lower collars, so look for a gaiter with an elastic or adjustable lower cuff.
Rubber and nylon webbing wear quickly on rough rock, scree, and sustained pavement. If you hike in those conditions often, switch to bonded nylon, leather, or stainless cable. On full-height backcountry gaiters, look for a model with a user-replaceable cord, which lets you swap a worn strap on the trail with a foot of accessory cord and a quick knot.
It depends where and when you hike. For Cascade snow trips, river crossings on the Coast Trail, or muddy fall and winter hiking in the Coast Range, waterproof breathable gaiters in Gore-Tex or eVent are worth the price. For dry Eastern Oregon trail or summer Cascade hiking, a coated nylon gaiter sheds enough water and breathes better.
