Hiking field guide
How to Use Trekking Poles
A trekking pole is a force-transfer system, not a walking stick. Strap technique, pole length, plant pattern, and terrain adjustments decide whether you get the engineering benefits or just carry the weight.
How to use trekking poles correctly comes down to four techniques, in order: set the length so your forearm sits parallel to flat ground when the tip is planted next to your foot (your height in cm × 0.66 is the starting estimate); use the strap from below, hand up through, so the load travels through your wrist instead of your fingers; plant opposite arm to opposite leg with the tip slightly ahead of your foot; and shorten 5 to 10 cm for climbs and lengthen 5 to 10 cm for descents.
Done right, your shoulders share the work, your knees absorb 12 to 25 percent less force on descents, and the poles disappear into the rhythm of the hike. Done wrong, your hands ache by mile 6 and the poles feel like dead weight.
Three things to do before the trail
Most pole problems start at the trailhead: length set wrong, rubber tip caps left on for trail use, baskets that don’t match the conditions. Five minutes of setup before you start moving prevents the most common technique problems for the rest of the day.
1. Set flat-ground length
Stand on level ground, plant a pole tip next to your foot, and bring your hand to the grip. Your forearm should sit parallel to the ground, with your elbow at a 90-degree angle. A useful starting estimate is your height in centimeters multiplied by 0.66, which puts most adults between 110 cm and 125 cm. Set both poles to the same number; you’ll fine-tune on the trail.
2. Decide on rubber tip caps
Most poles ship with rubber covers over the carbide tips. The decision rule is simple: caps on for pavement, smooth rock, and indoor or travel use. Caps off for dirt trail, mud, scree, and wet rock where the bare carbide needs to bite the surface. A lot of beginners leave them on permanently because removing them feels fiddly, and then wonder why the poles slip on every steep descent. Keep a spare set of covers in your pack so you can swap as the trail changes.
3. Match the basket to the conditions
The basket is the small disk just above the tip. Three sizes cover 95 percent of hiking. Visualizing the differences before you head out is the easiest way to get this right.
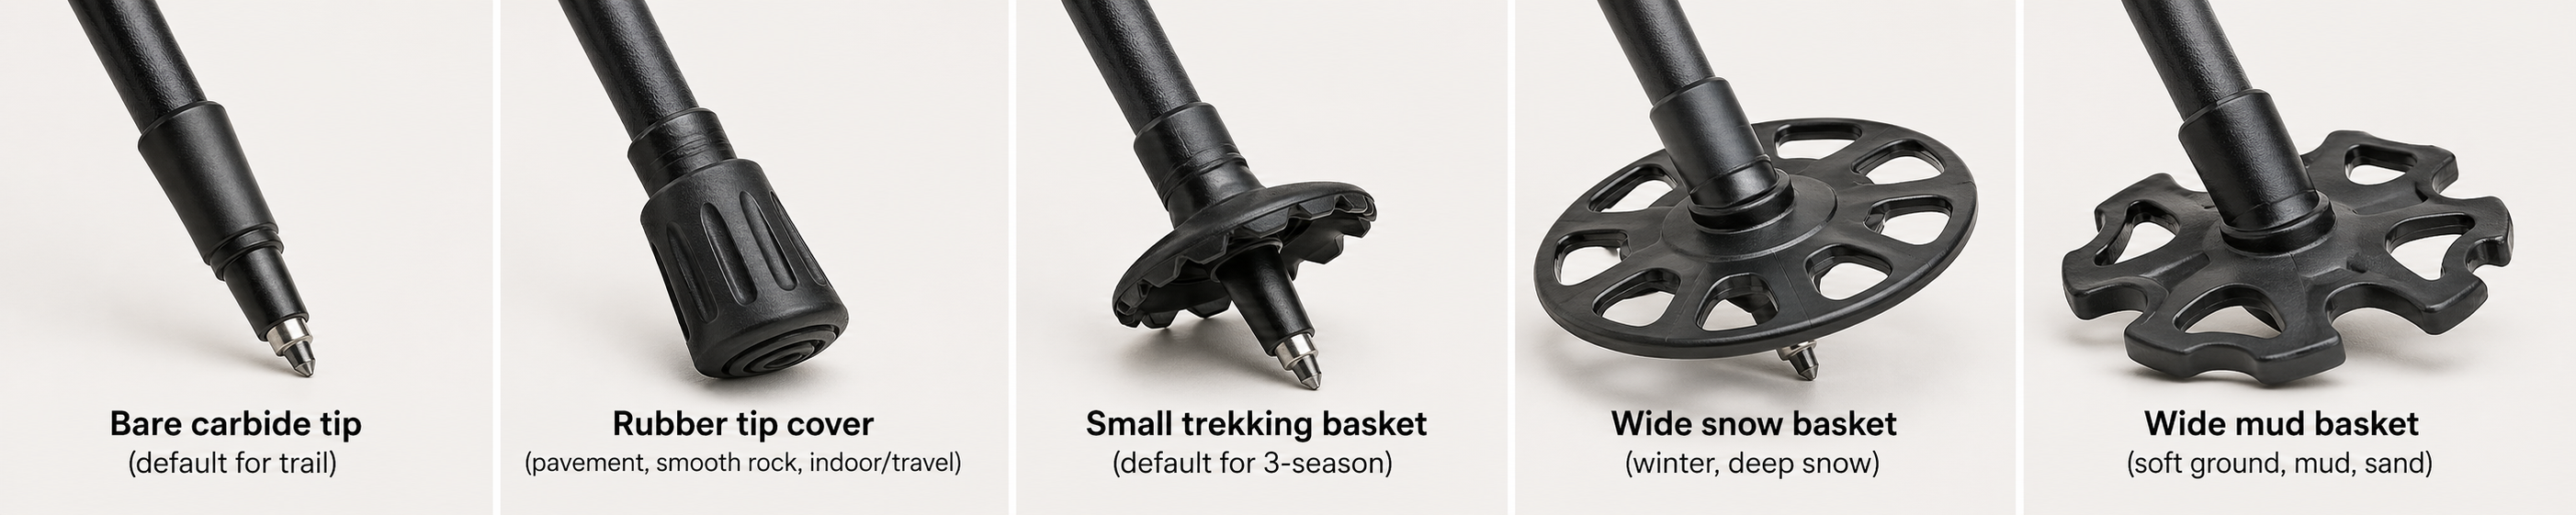
For typical 3-season Oregon hiking, small trekking baskets are the default. Swap to wide snow baskets for winter so the pole doesn’t sink to the grip on every plant. Wide mud baskets are the niche option for sandy beaches, soft estuary mud, and very soft early-season trail.
The strap is the technique nobody tells you about
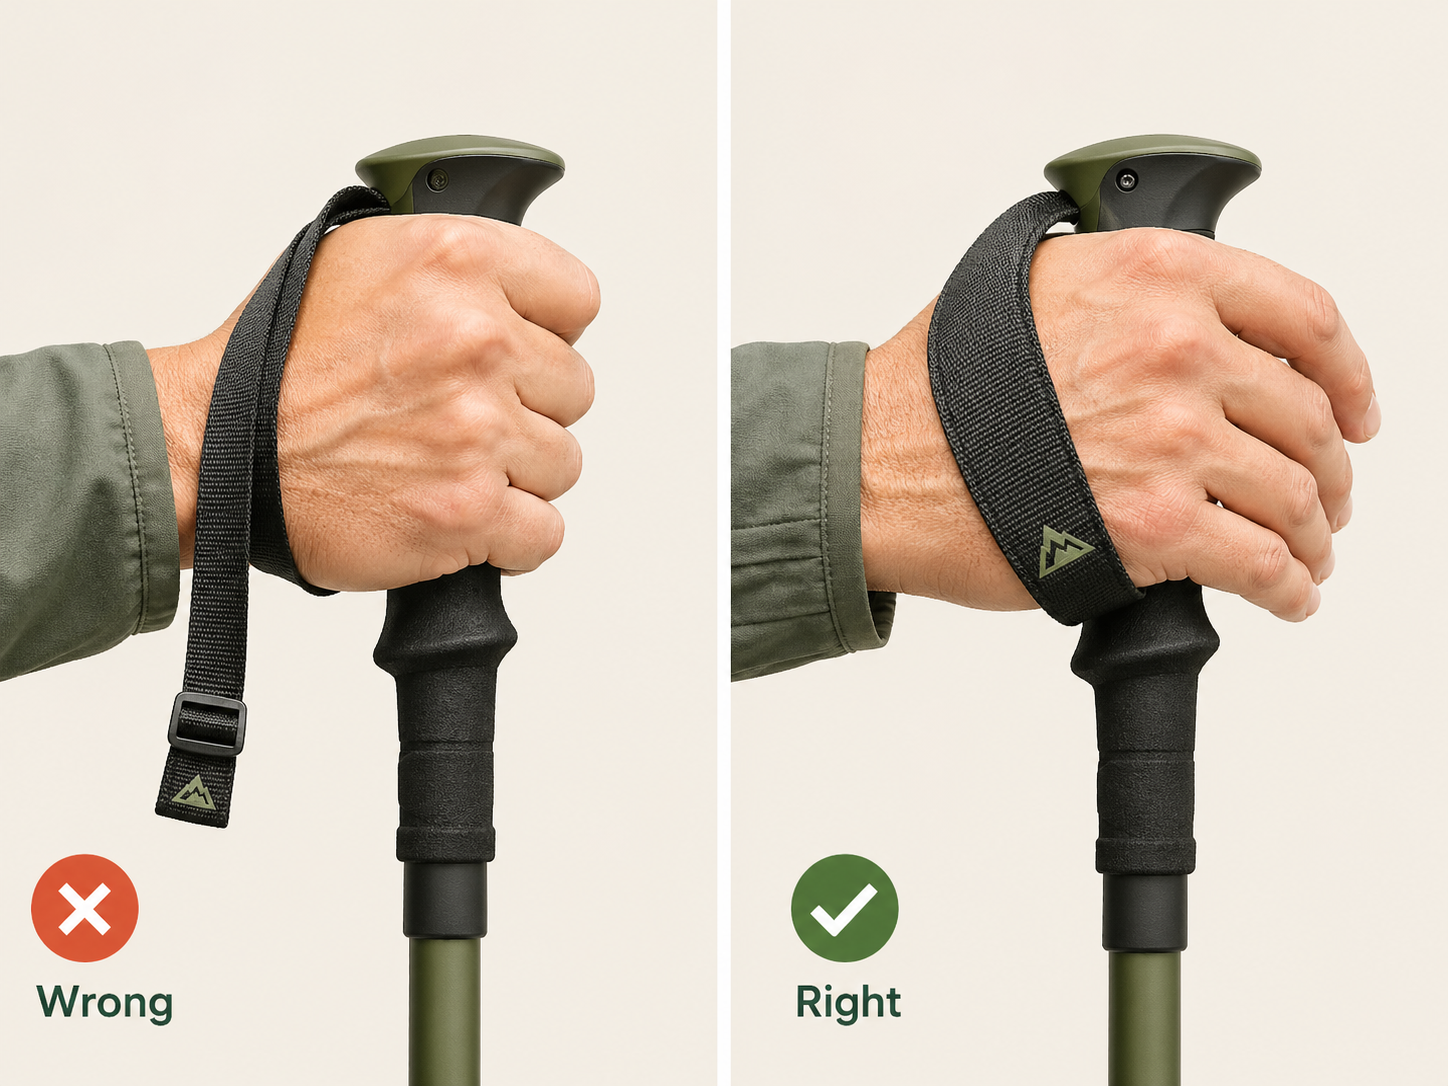
If you only learn one thing from this guide, learn this. The strap is not a wrist-leash that keeps you from dropping the pole. It is the load-bearing surface that lets the pole transfer force into your skeleton instead of into your fingers.
Bring your hand up through the strap from below, then close it loosely around the grip. The strap now sits across the back of your wrist. When you push down on the pole during a plant, the force travels through the strap into your wrist bones and up your forearm. Your fingers don’t need to grip; they just steer.
Strap fit matters too
The strap should sit snug across the back of your wrist, not loose enough to slide. Too loose and the load won’t transfer; too tight and it cuts off circulation. Spend 30 seconds at the trailhead to size both straps for your wrists.
Adjust to the grade, not just your height
Flat-ground length is the baseline. Real hikes aren’t flat. The cm targets that turn poles from useful into excellent are the ones you set after the trail starts climbing or dropping. The good news: lever-lock poles let you make these changes in 30 seconds without taking your pack off.

Targets, by grade
Flat: elbow at 90 degrees with pole tip planted next to foot. Uphill: 5–10 cm shorter. Downhill: 5–10 cm longer.
Starting estimates by height
When to bother adjusting
Not every grade change. The threshold is sustained: a climb or descent lasting more than 5 to 10 minutes, gaining or losing more than a couple hundred feet, or with a consistent grade you can feel in your legs. Below that, leave the poles at flat-ground length and let your body adapt.
The adjustment workflow on the trail
Stop. Open both lever locks. Press the upper section in or pull it out by the cm you want. Close both levers. With practice this takes 20 to 30 seconds without removing your pack. On 3-section poles, adjust the upper section only and leave the lower locked at a default.
The plant pattern most hikers get wrong
Watch ten hikers using poles on a typical Oregon trail and at least seven will be planting wrong. The wrong pattern is same-side: right pole forward when the right foot steps forward. It feels intuitive because both halves of your body are doing the same thing at the same time. It also gives up most of the leverage poles are supposed to provide.
The right pattern is opposite-side, mirroring the natural arm swing of normal walking. Right pole forward when the left foot steps. Left pole forward when the right foot steps. The pole shares load with the trailing leg the way your arm naturally swings opposite your stride.

Plant ahead of your foot, not next to it
The pole tip should land slightly ahead of where your foot will plant, not beside it. A few inches forward, angled back toward your body. The pole catches a portion of the impact before your foot lands, which is the whole point on descents. Planting next to your foot or behind it converts the pole into a balance stick rather than a load-transfer system.
The double-plant alternative for steep climbs
On grades where the opposite-side rhythm starts to feel inefficient (very steep stairs, switchbacks, scrambling-adjacent climbs), switch to a double-plant. Both poles forward at once, push down on both as you take a step or two, repeat. You lose the natural-gait rhythm but gain maximum upper-body assist. Most hikers naturally fall into this on serious climbs without thinking about it.
Technique adjusts by what’s under your feet
Once length, strap, and cadence are dialed, the next layer of how to use trekking poles is terrain-specific technique. Each surface needs slightly different inputs from the poles. The image below maps the six most common cases. The four interactive panels under it cover the deepest-needed scenarios.
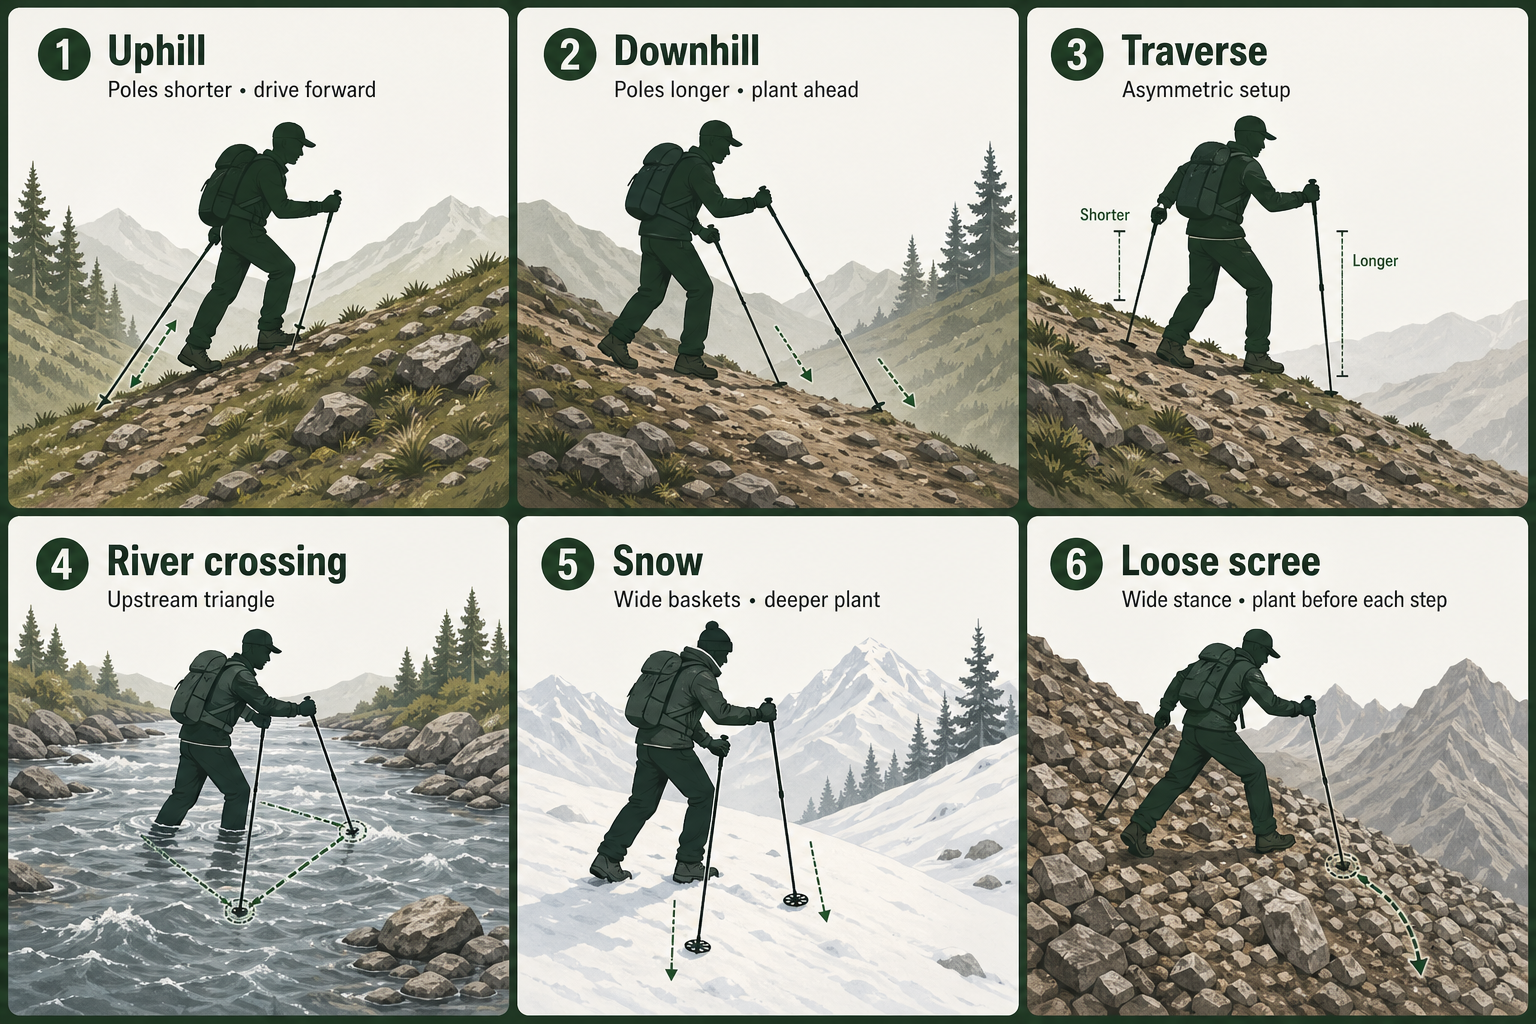
Uphill · sustained climbs
Shorten poles 5 to 10 cm from flat-ground length. Take shorter, more frequent strides. Plant each pole tip slightly ahead of your foot and push down and back as your foot lands; that propels you uphill rather than just supporting your weight. On grades steeper than about 20 percent, switch to a double-plant rhythm and use the poles as climbing assist for one or two steps at a time.

Plus snow and loose scree
Two terrain types that don’t get their own tab but matter on Oregon trails. Snow: swap to wide snow baskets so the pole doesn’t sink to the grip. Plant deeper than you would on dirt, and expect the tip to take a moment to set. On consolidated snow, baskets matter less; on fresh powder, they’re the difference between useful and useless. Loose scree and talus: widen your stance, plant each pole before each step (not in the standard cadence), and accept that the poles are doing more work than they would on solid trail. The carbide tip needs to find purchase between rocks; don’t trust the first plant.
When to put them away (and how)
Part of how to use trekking poles well is knowing when not to use them. The mark of an experienced pole user isn’t constant use; it’s recognizing the moments when poles slow you down or get in the way and stowing them without complaint. Four contexts call for it.
- Class 3 and above scrambling. Anywhere you need both hands on rock. Poles strapped to your wrists during scrambling are dangerous; a snag can throw your balance.
- Photography or birding stops. Anytime you need both hands free for a few minutes. The constant pole-stowing during a 200-yard photo loop eats more time than the poles save.
- Narrow ridge walks. Where a pole-plant could throw you off-balance more than it stabilizes you.
- Sustained bushwhacking. Brush snags poles, poles snag brush. Faster and less frustrating to push through with both hands free.

The fastest stow workflow
Collapse the poles fully before reaching the section that needs both hands, not in the middle of it. Telescoping poles: close both lever locks and press the sections in. Folding poles: unlock the joint and fold to the 13–16 inch carry length. Slide them through the side compression straps tips-down and close the straps. Twenty seconds with practice.
The five most common mistakes, at a glance
Almost every pole-user mistake is one of five things. The figure below maps the wrong-versus-right for each, and the prose below covers the why and the fix.

1. Gripping the pole instead of using the strap
By far the most common. Your fingers are clenched around the grip, the strap is dangling unused, and after six miles your forearms ache.
Fix: hand up through the strap from below, fingers loose around the grip, load through the wrist. Section 2 covers this in detail; this is the single change that pays back every other technique.
2. Keeping flat-ground length on a sustained climb or descent
Poles that are right for the flat are wrong for steep grades. On uphill, a too-long pole forces you to overreach; on downhill, a too-short pole means the tip never reaches the ground a step ahead.
Fix: 5 to 10 cm shorter for sustained climbs, 5 to 10 cm longer for sustained descents. Lever locks make this 30 seconds of work.
3. Same-side cadence
Right pole forward when right foot steps forward. Feels natural; gives up most of the leverage.
Fix: opposite arm to opposite leg, mirroring natural arm swing. Five minutes of conscious practice at the start of a hike makes it automatic.
4. Dragging tips behind instead of planting ahead
The tip lands next to your foot or behind it, where it can only support your weight after the impact has already happened.
Fix: plant the tip slightly ahead of where your foot will land, angled back toward your body. The pole catches some of the impact before your foot lands, which is the whole point on descents.
5. Treating poles like ski poles on descents
Holding poles vertically beside your hips and using them only for balance, the way you would on a ski slope. Poles do their best work on descents when planted ahead, not vertically beside you.
Fix: on every steep descent, the tip lands ahead of your downhill foot and you push down through the strap as your foot comes through.
Five minutes of care extends a pair by years
Knowing how to use trekking poles correctly is half the battle; keeping them working is the other half. Trekking poles are simple machinery and most failures are preventable. Five minutes after each wet trip and once-a-season maintenance is enough to keep a pair working for a decade.
Dry them after wet trips
This is the big one for Pacific Northwest hiking. Unlock both sections, pull them apart, and stand the empty pieces tip-up overnight in a warm dry place. Water trapped inside locked pole sections corrodes the internal lock mechanism. Pole locks that fail in the field almost always failed because they spent a winter wet and locked.
Wipe down the lock cams once a season
For lever-lock poles, open the lever, look at the cam mechanism, and wipe off any grit, mud, or dried sap with a damp rag. A drop of light oil on the pivot once a year keeps the action smooth. Twist locks need disassembly to clean (one of several reasons to prefer lever locks), but the same principle applies.
Replace tips before they’re done
Carbide tips are replaceable on most quality poles. They wear down gradually over hundreds of miles. When the tip looks rounded instead of pointed, or the pole starts slipping on surfaces it used to grip, it’s time. Replacement tips run $5 to $15 per pair from the manufacturer.
Store extended in the off-season
If you put the poles away for winter, store them extended with the lock mechanisms open, not collapsed and locked. Pole locks that sit closed for months can seize. A few minutes of preventive storage saves a lot of frustration in the spring.
Find the right pair of poles
Roundups tested on Oregon trails, organized by what you actually need.

Best Trekking Poles
Top picks across aluminum, carbon, telescoping, and folding designs. Tested for grip, lock reliability, and durability.
See picks →
Best Trekking Poles for Backpacking
Built for heavy loads and shelter pole double-duty. Ranked by hipbelt-pocket reach, weight-to-durability, and tent compatibility.
See picks →
Best Trekking Poles for Women
Shorter length ranges, narrower grip diameters, and lighter swing weights. Tested for fit on smaller hands and shorter torsos.
See picks →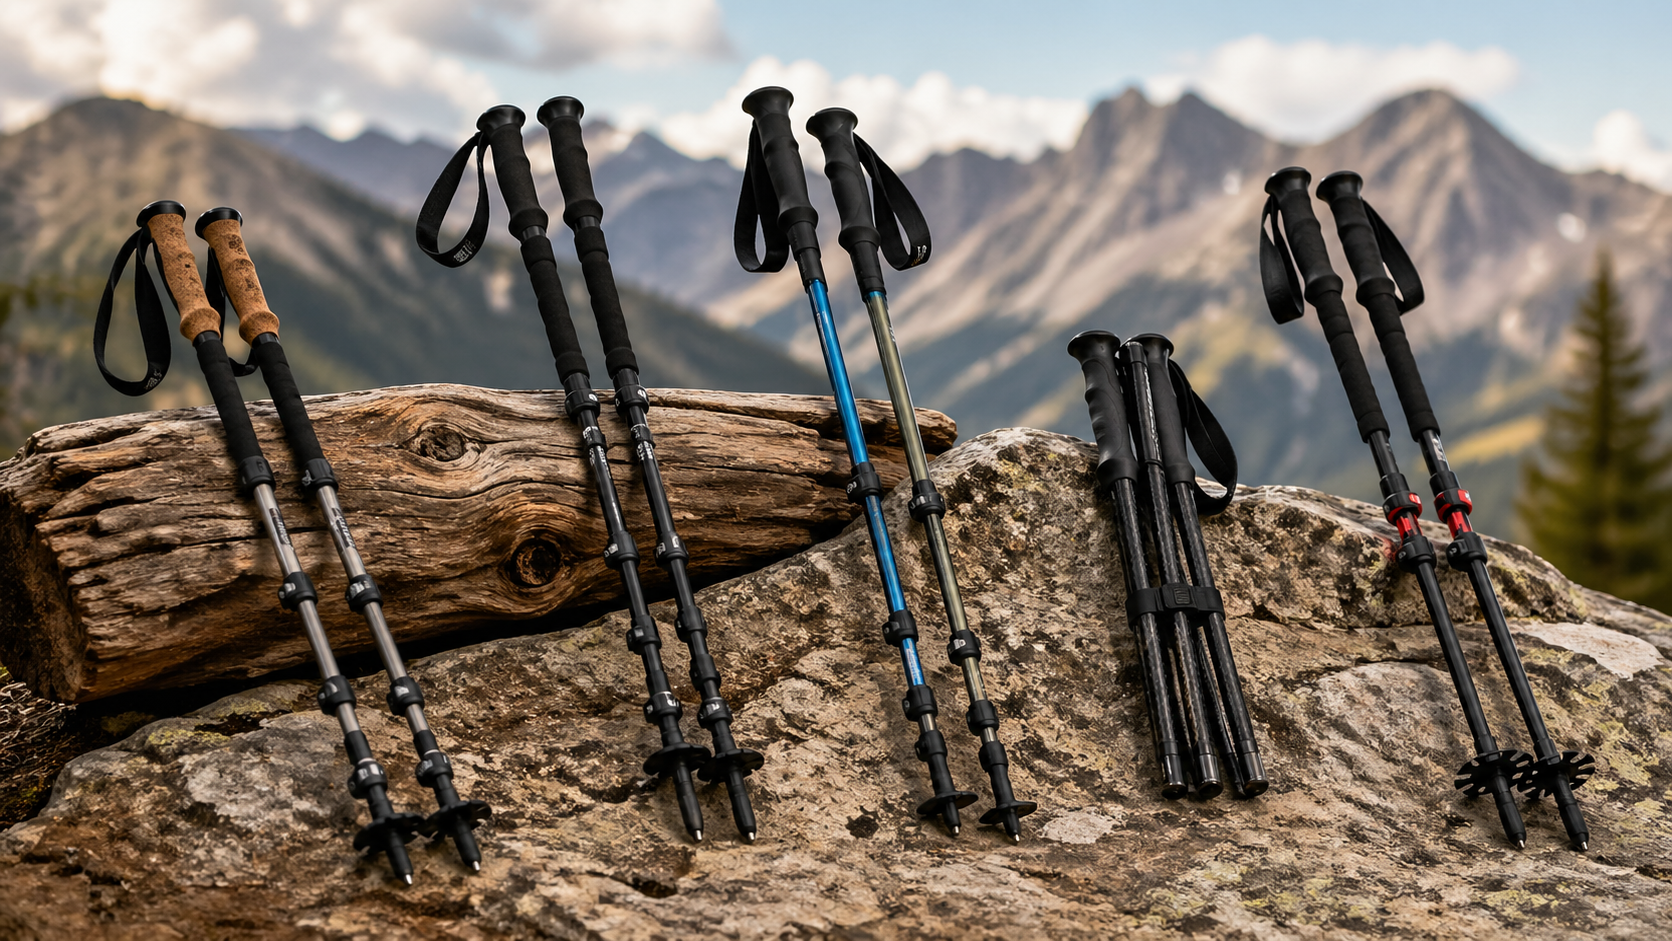
All Trekking Pole Reviews
Every trekking pole roundup on Oregon Tails in one place, sorted by use case, audience, and price tier.
View hub →Using trekking poles, answered
Four things, in order. First, set the pole length so your forearm is parallel to the ground when the tip is planted next to your foot on flat ground (roughly your height in centimeters times 0.66). Second, bring your hand up through the strap from below so the load travels through your wrist, not your fingers. Third, plant opposite arm to opposite leg as you walk, with the tip landing slightly ahead of your foot. Fourth, shorten 5 to 10 cm for sustained climbs and lengthen 5 to 10 cm for sustained descents.
Done correctly, your shoulders share the work and your knees absorb 12 to 25 percent less force on descents.
On flat ground with the pole tip planted next to your foot, your forearm should be parallel to the ground and your elbow at a 90-degree angle. A useful starting estimate is your height in centimeters multiplied by 0.66, which puts most adults between 110 cm and 125 cm.
From that flat-ground length, shorten 5 to 10 cm for sustained climbs and lengthen 5 to 10 cm for sustained descents.
Almost certainly because you’re gripping the pole instead of letting the strap carry the load. Most beginners hold the grip the way they’d hold a hammer, with fingers wrapped tight around the handle and the strap dangling unused.
The fix is to bring your hand up through the strap from below, then close your fingers loosely around the grip. The strap now sits across the back of your wrist, and when you push down on the pole, the force travels through the strap into your wrist instead of through clenched fingers. Done right, your hand barely needs to close on the grip at all.
Plant them in opposite-side rhythm: right pole forward when your left foot steps forward, left pole forward when your right foot steps. This mirrors a natural walking gait and lets the pole share weight with your trailing leg.
The double-plant pattern (both poles forward, then a step) works for very steep climbs where you need maximum upper-body assist, but it’s not the default. Most hikers default to same-side rhythm without thinking about it; spending five minutes consciously practicing the opposite-side pattern at the start of a hike makes it automatic for the rest.
Shorten the poles 5 to 10 cm from your flat-ground length so you can drive forward without overreaching. Take shorter, more frequent strides. Plant each pole tip slightly ahead of your foot and push down and back as your foot lands; that pushes you uphill rather than just supporting your weight.
On very steep grades, switch to a double-plant rhythm (both poles forward, take a step or two, repeat) where you drive both poles down at once for maximum upper-body assist.
Lengthen the poles 5 to 10 cm from your flat-ground length so the tips reach the ground a step ahead of your foot. Plant the pole tip ahead of your downhill foot, then let your foot land in line with or behind the tip.
The pole intercepts a portion of the impact that would otherwise travel through your knee. Take controlled, slightly shorter steps on steep descents and don’t lock your downhill knee on the landing.
Stow them. Class 3 and above scrambling needs both hands on rock, and a pole strap around your wrist while climbing is genuinely dangerous (a snag can throw your balance).
Collapse the poles fully and stash them in your pack’s side compression straps or ice axe loop before the scrambling section starts, not in the middle of it. Folding Z-style poles collapse to 13 to 16 inches and stow easiest; telescoping poles collapse longer and may stick out the top of a side pocket.
Position both poles upstream, plant them firmly into the streambed, then move one foot at a time while keeping three points of contact (two poles and one foot, or one pole and two feet). Angle your body slightly into the current so it pushes you toward your planted poles, not away from them.
Lengthen the poles a bit if the water is deeper than knee-high. Unbuckle your hipbelt before stepping in, so you can shed the pack quickly if you fall. The poles convert most river crossings from sketchy to methodical, especially in fast or knee-deep water.
On for pavement, smooth rock, and indoor or travel use. Off for dirt trail, mud, scree, and wet rock where the bare carbide tip needs to bite.
Most pairs ship with rubber covers and many hikers leave them on permanently because removing them feels like a hassle, but you give up the carbide grip in the conditions where you most need it. Keep a spare set of covers in your pack so you can swap as the trail changes.
