Hiking field guide
When to Replace Hiking Boots
A boot does not announce when it is finished. It quietly stops supporting your foot, your gait shifts to compensate, and the injury arrives weeks later somewhere that is not your foot. The signs are visible if you know where to look.
The standard advice on this topic is a list of 8 to 14 visible signs your boots are worn out: frayed laces, holes in the upper, worn tread. That advice is correct and incomplete, because by the time those signs are obvious, the boots have been actively hurting you for a few hundred miles already.
This guide flips the order. It starts with a diagnostic test you can run on your kitchen counter in under five minutes, then ranks the visible signs by how dangerous each one actually is, then gives you the honest decision tree on whether to repair, resole, or replace. If you are picking the next pair, the companion guides on how to choose hiking boots and how to break in hiking boots cover what comes after this decision.
1. How long hiking boots actually last
Quality hiking footwear runs 500 to 1,000 miles before mileage alone retires it. That number gets quoted everywhere because it is roughly correct, but the range is wide for a reason. Six factors compress or expand the number significantly:
- Boot construction. A full-grain leather welted backpacking boot like the Lowa Renegade or Asolo Fugitive can hit 1,200 miles. A lightweight fabric mid like the Salomon X Ultra Mid lands closer to 500. Trail runners are 300 to 500.
- Hiker weight. A 220 lb hiker compresses midsole foam roughly 30 percent faster than a 150 lb hiker. The same boot will reach end-of-life at different mileage depending on who is wearing it.
- Terrain. Sharp volcanic rock, scree, and pavement abrade outsoles much faster than packed dirt. Sustained mud and water accelerate upper degradation.
- Pack weight. A 40 lb backpacking load compresses the midsole faster than dayhiking unloaded. Boots used for serious backpacking retire earlier than boots used only for day hikes.
- Care and storage. Boots stored damp, dried near a heat source, or rarely cleaned wear out roughly 20 to 30 percent faster than boots that get rinsed, air-dried, and reproofed annually.
- Calendar age. The least-discussed factor. Adhesives and polyurethane midsoles degrade slowly even sitting unused. A 7-year-old boot with low mileage may have already failed structurally.
Mileage targets by category
| Category | Typical lifespan | What pushes it shorter |
|---|---|---|
| Trail runners | 300-500 miles | Pavement, hot pavement especially, heavy hikers |
| Lightweight fabric mids | 500-700 miles | Sustained mud, scree, mesh tearing |
| Leather/synthetic mids | 700-1,000 miles | Wet climates, salt air, infrequent reproofing |
| Full-grain leather backpacking | 1,000-1,500 miles | Failure to condition leather, heat damage |
| Mountaineering boots | 1,000+ miles, 5 yrs max | PU midsole hydrolysis is the limiting factor |
2. The 5-minute kitchen-counter test
Six tests, in this order, will tell you whether the boot has another 100 miles in it. Set the boots on a flat counter under direct light and work through each one. If a boot fails two or more, retire it now.
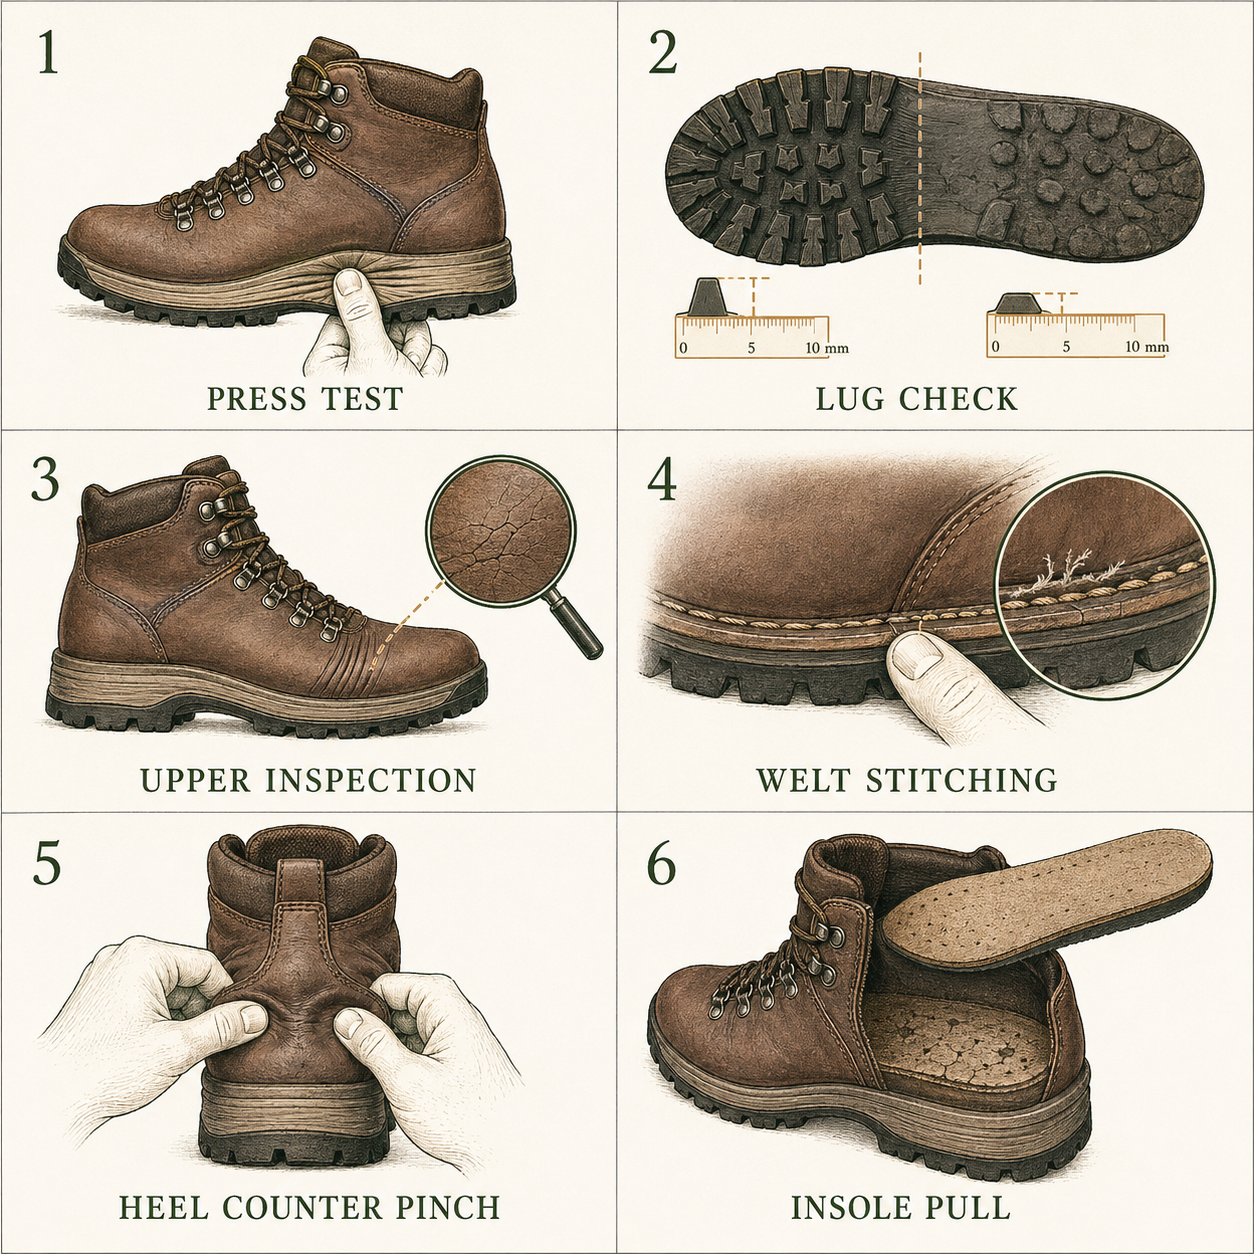
Test 1: The press test (most important)
Place your thumb on the outsole and press up firmly into the midsole, side of the boot. A healthy midsole resists, like pressing into a firm rubber eraser. A dead midsole compresses easily and shows visible horizontal wrinkle lines along the side of the foam. Walk around the boot pressing every few inches. If compression lines appear anywhere, especially under the heel and ball of foot, the midsole is finished. The boot will continue to feel “fine” walking around the kitchen but will fail to absorb shock and stabilize your stride on the trail.
Test 2: Lug height and edges
New hiking boot lugs are 3 to 5 mm tall with sharp edges. Look at the heel and the ball of foot, the two highest-wear zones. Lugs under 2 mm with rounded edges no longer grip wet rock or loose dirt. Slick spots in the heel zone are how people slide on descents.
Test 3: Upper inspection
Look across the bend point of the boot, the area that flexes when you walk. Cracks in leather, mesh tearing in fabric, peeling toe caps, and visible separation between the upper and the midsole are all signs the upper has reached end of life. One sign is a yellow flag and the boot has miles left if everything else passes. Two signs is a red flag.
Test 4: Stitching and welt line
Run a fingernail along the seam where the upper meets the sole. Frayed stitching, missing stitches, or a visible gap between upper and sole means waterproofing is gone and structural integrity is compromised. This area cannot be repaired affordably except on welted boots designed for it.
Test 5: The heel counter pinch
Pinch the back of the heel between your thumb and forefinger, hard. A healthy heel counter has a firm internal stiffener and barely deforms. A dead one collapses inward like cardboard. The heel counter is what gives a mid-cut boot its ankle support, and once the stiffener breaks down, the boot is functionally a sneaker.
Test 6: Pull the insole and look
Remove the insole entirely. Inspect the footbed beneath. The insole itself can always be replaced for $30 to $50. What you cannot replace is the footbed: if you see exposed glue, foam dust, deep pits in the foam where your heel and ball of foot sit, or cracks running across the foam, the boot’s structural foundation is failing.
Test 7 (bonus): The lean test
Set the boot on the counter and step back so you are looking at it from behind, at counter level. A new boot stands symmetric and upright. A worn boot leans inward (overpronation wear) or outward (supination wear) because the midsole has compressed unevenly. If you can see daylight under the high side of the boot, the wear is severe.
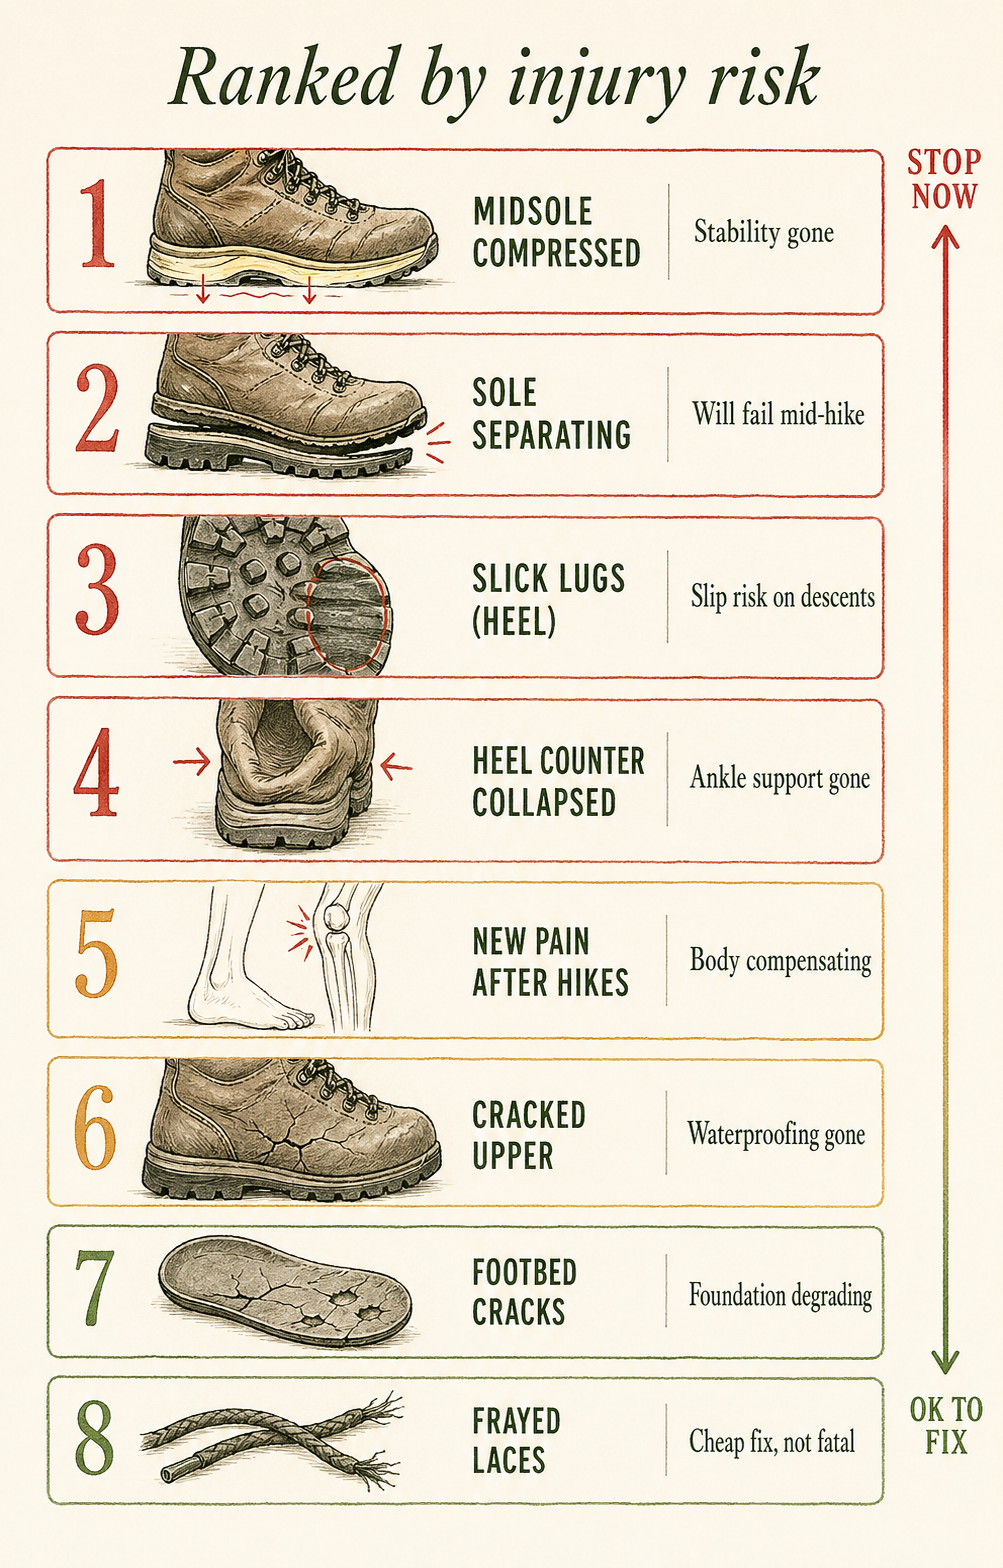
3. The 8 signs, ranked by severity
Most articles list signs in the order they happen to think of them. Below they are ranked by actual injury risk. Top of the list means stop hiking now. Bottom means address it before the next trip.
| Rank | Sign | What it means |
|---|---|---|
| 1 | Midsole compression lines or sponginess | Critical. Stability gone. Replace before next hike. |
| 2 | Sole separating from upper | Critical. Will fail unpredictably mid-hike. |
| 3 | Slick lugs in heel zone | Severe. Slip and fall risk on descents and wet rock. |
| 4 | Heel counter collapsed | Severe. Ankle support effectively gone. |
| 5 | New foot, knee, or hip pain after hikes | High. Body is compensating for failed support. |
| 6 | Cracks across upper bend point | Moderate. Waterproofing gone, structure weakening. |
| 7 | Footbed cracks or pits beneath insole | Moderate. Foundation degrading. Replace soon. |
| 8 | Frayed laces or worn eyelets | Low. Almost always a simple repair, not a death sentence. |
The signs everyone notices but matter least
Most articles lead with frayed laces and the appearance of the upper. Both are visible from a foot away and feel like real signs of wear. Neither is a structural problem. Laces cost $5 to replace. A scuffed upper does nothing to support function. The signs that matter are the ones you cannot see without actively testing for them.
4. Terrain and climate adjustments
The 500 to 1,000 mile range assumes average mixed terrain in a temperate climate. The terrain and climate you actually hike push that range significantly in either direction. The table below covers the seven terrain types most hikers encounter regularly. Find the closest match to where you spend most of your trail time and adjust your replacement timeline accordingly.
| Terrain / climate | What it does to boots | Mileage adjustment |
|---|---|---|
| Sharp volcanic or igneous rock | Highly abrasive outsole wear, faster lug rounding | -15 to -20% on outsole life |
| Granite slabs and exposed bedrock | Smoother but still abrasive, less aggressive on lugs | -5 to -10% on outsole life |
| Sustained mud, wet brush, sea air | Accelerates upper failure, degrades waterproof membranes | -20 to -30% on upper and waterproofing |
| Wet rock, mossy roots, slick basalt | Faster lug-edge wear, traction loss before structural failure | -15% on traction life |
| Soft dirt, leaf-covered trail, packed forest | Mostly kind to outsoles and uppers | +10 to +15% on overall life |
| High-desert, dry abrasive sand and grit | Normal outsole wear, harsh on leather conditioning | Normal mileage, -15% on leather life |
| Snow, ice, sustained sub-freezing | Salt and de-icer eat outsoles, freeze-thaw stresses adhesives | -10 to -15% on outsole and bonded joints |
Three regional examples
Translating the table above into specific mountain regions hikers know:
- Pacific Northwest (Oregon Cascades, Olympics, North Cascades). Volcanic rock plus sustained wet brush and salt-air coastlines. Expect 600 to 800 miles from a leather-synthetic mid that hikers in drier regions might get 1,000 from.
- Sierra Nevada and Rocky Mountains. Granite slabs, exposed scree, dry summer climate. Outsoles wear at roughly the per-mile average. Leather lasts longer thanks to drier conditions but needs annual conditioning.
- Appalachian Trail and Southeast. Wet rock, mud, sustained humidity, and rooted trail. Upper failure usually beats outsole wear, often around 600 to 800 miles. The waterproof membrane is the limiting component.
If you hike multiple regions, run the kitchen-counter test more often than once a year. The boot does not know it is in a softer climate this trip and a harsher one the next.
5. Repair, resole, or replace
Not every aging boot needs replacing. Some failures are cheap to fix, some are expensive but worthwhile, and some are death sentences. The decision tree below covers the common situations.
| Problem | Verdict | Cost |
|---|---|---|
| Frayed laces, worn eyelets | Repair | $5-15 |
| Worn-out insole, footbed intact | Repair (replace insole) | $30-50 |
| Failed DWR, leather drying out | Repair (clean and reproof) | $15-25 |
| Outsole worn but upper healthy, welted boot | Resole (specialist) | $100-200 |
| Outsole worn, cement-construction boot | Replace | – |
| Midsole compressed, any boot | Replace | – |
| Heel counter collapsed | Replace | – |
| Sole delamination, more than 2 inches | Replace | – |
Resoling is real, and underused
If you bought a quality welted leather boot, often $250 to $400 new, resoling for $100 to $200 is excellent value and gives the boot another full lifespan. The candidates are welted construction boots from Lowa, Asolo, Zamberlan, Hanwag, Meindl, and Scarpa. The quickest way to tell if your boot is resolable is to look at the welt: if there is a visible stitched seam running around the boot where upper meets sole, it is welted and resolable. If the upper appears glued directly to the midsole with no stitching, it is cement construction and cannot be resoled affordably.
Where to get resoled in the Pacific Northwest
The most respected option in the region is Dave Page Cobbler in Seattle, who specializes in mountaineering and welted hiking boots and ships nationally. Turnaround is typically 4 to 8 weeks. NuShoe accepts boots by mail nationwide and works with most major brands. Some brands run their own resole programs: Scarpa, Lowa, and La Sportiva all have factory resoling for select models.
Re-proofing is not optional
For leather boots, a single annual reproof with Nikwax Leather Restorer or a manufacturer-recommended product extends boot life by 30 to 50 percent. The reason most boots die prematurely is leather drying out and cracking, which is entirely preventable. Reproof at the start of each hiking season.
6. When pain means the boots are dead
Pain is the most reliable signal a boot has stopped doing its job, and it is also the most often misattributed. Hikers blame their feet, their socks, their pack weight, the trail, the weather. The boot is the most common actual cause, and the pain pattern points straight at it.
Foot pain that points at the boot
- New arch pain. Insole or midsole arch support has compressed flat. Often fixable with a new insole if the boot otherwise passes the kitchen-counter test.
- Heel pain after hikes. Heel cushioning compressed. Sometimes fixable with insole replacement, sometimes structural.
- Ball of foot pain. Midsole foam dead in the forefoot. Replace the boot.
- Toe-end pain on descents. Boot has stretched out and your foot is sliding forward. Lacing fixes can buy time, but the toe box has lost its shape.
- Persistent hot spots in places you never had them. Upper has stretched or developed pressure points. Consider a return to hot-spot diagnostics before replacing.
Pain that is not in your foot but is the boot’s fault
- New knee pain after hikes. Almost always uneven midsole compression changing your stride. The classic “the boots feel fine but my knee hurts” pattern.
- Plantar fasciitis flare-up. Arch support has failed. The body compensates by tightening the plantar fascia.
- IT band tightness or pain. Your stride has subtly changed because the boot is no longer planting consistently.
- Repeated ankle rolls. Heel counter has collapsed and ankle stability is gone, even on terrain you have hiked safely a hundred times in the same boots.
7. What to do with old boots
Hiking boots are mostly synthetic foam, rubber, and adhesive. They take centuries to break down in landfill and contain no organic matter that decomposes meaningfully. There are better options, even for boots that look beyond saving.
If they still have life in them
- Soles4Souls distributes used boots to people in need worldwide. They accept most footwear in usable condition.
- Local Goodwill or thrift store. Boots that still pass the kitchen-counter test can give a beginner hiker a working pair for under $20.
- Donation bins at REI events. Many REI stores run periodic boot donation drives.
If the upper is intact but the sole is dead
Welted construction boots can be resoled even after they look done. A $300 boot with a healthy upper and dead sole is genuinely worth $150 to resole. Ship to Dave Page Cobbler or NuShoe and get another full lifespan.
If they are truly finished
- Nike Reuse-A-Shoe accepts any brand of athletic footwear at participating Nike stores, grinds them down, and turns them into surfaces for tracks and playgrounds.
- Some REI stores partner with TerraCycle for boot recycling. Call ahead to confirm.
- Last resort: trash. Cut the laces off (they are reusable), pull the insoles (sometimes still good for someone else), and bag the rest. Better than dumping a whole boot, but still avoid this if any other option is available.
8. How to extend boot lifespan
Boot longevity is roughly 70 percent construction quality, 30 percent care. The 30 percent is the part you control, and the difference between a well-cared-for boot and a neglected one is easily 200 to 300 miles.
After every hike
- Knock dried mud off the outsole and welt before it sets in.
- Pull the insoles out to dry separately, especially if the boots got wet.
- Stuff lightly with newspaper if soaked. Air-dry at room temperature.
- Never put boots near a fireplace, radiator, hot car dashboard, or electric heater. Concentrated heat shrinks leather and breaks down adhesives.
Annually
- Reproof the leather or fabric upper with a manufacturer-recommended product.
- Replace the insole. Insoles compress out long before the boot itself does, and a fresh insole gives the boot effectively another season.
- Check the laces and replace if frayed.
- Run the kitchen-counter diagnostic.
Storage
- Store fully dry, never damp. Damp storage rots both leather and synthetic foam.
- Cool, dry place out of direct sun. UV degrades synthetic uppers and rubber outsoles.
- Loose tree-shoe inserts or balled-up paper to maintain shape during long-term storage.
- Never store leather boots compressed, like at the bottom of a duffel bag for months.
9. Common mistakes
Waiting for catastrophic failure
The boot does not blow up on the trail. It quietly stops supporting your foot, your gait shifts, and three months later your knee hurts. Catastrophic failures are rare. Slow degradation is the norm, and it is invisible without the kitchen-counter test.
Trusting how the boot feels around the house
Concrete and hardwood are kind to compromised boots. Walking around the kitchen feels comfortable in boots that will fail on the descent off Saddle Mountain. The press test catches what the comfort test misses.
Replacing the insole and assuming the boot is fixed
A new insole hides a few warning signs without addressing the underlying issue. If the midsole and footbed beneath are also degraded, the new insole is treating a symptom and the boot will fail anyway, just slightly later.
Buying the same boot you already loved
Manufacturers update boot lasts every 2 to 3 model years. The Salomon Quest 4 is not the same boot as the Salomon Quest 3 was. Re-fit and re-test even if you are buying the same brand and model number.
Forgetting that age matters
A boot stored in a closet for 5 years has degraded silently. Polyurethane midsoles hydrolyze. Adhesives lose elasticity. Run the press test on any boot over 5 years old before a committed hike, even if mileage is low.
Throwing them in the trash
Synthetic foam, rubber, and adhesive take centuries to break down. Donation, resoling, or recycling all exist for a reason and most are free or cheap.
Picking the next pair
If the kitchen-counter test retired your current boots, these are the buying guides and field guides that get you to the right next pair without repeating the same mistakes.

Hiking footwear, reviewed
Boots, mids, and trail runners we have actually hiked in. Sorted by terrain and use case.

Hiking socks
Merino blends and synthetics that pair well with a fresh boot.

Aftermarket insoles
The cheapest way to extend the life of a boot whose footbed is intact.

Hiking apparel
Pants, baselayers, and shells for the trails that retired the last boots.
Common questions about replacing hiking boots
A quality pair lasts 2 to 3 years for someone hiking 10 miles a week, and 4 to 6 years at lighter use. Mileage matters more than calendar time, but calendar age is its own factor: adhesives and waterproof membranes degrade silently even when boots sit unused. Polyurethane midsoles are the most age-sensitive component and can hydrolyze and crumble after 5 to 8 years regardless of mileage. Run the press test on any boot over 5 years old before a serious hike.
Most quality hiking boots last 500 to 1,000 miles. Trail runners are shorter at 300 to 500 miles. Lightweight fabric mids land at the 500 mark. Leather and synthetic mids reach 700 to 1,000. Full-grain leather backpacking boots can hit 1,000 to 1,500. The number compresses with heavier hikers, heavier packs, sharper rocky terrain, sustained mud, and infrequent cleaning. The number expands with lighter loads, soft trail surfaces, and good annual care.
Six tests done on a kitchen counter in five minutes. Press the midsole with your thumb and look for compression lines along the foam. Inspect the lugs for height under 2 mm and rounded edges. Look at the upper bend point for cracks or tears. Run a fingernail along the welt stitching to check for fraying or gaps. Pinch the heel counter from behind, hard, to confirm the internal stiffener is still firm. Pull the insole and inspect the footbed beneath for cracks or pits. Two failed tests means the boot is structurally finished.
Some can. Welted leather boots from brands like Lowa, Asolo, Zamberlan, and Hanwag are designed for resoling and a good cobbler can give you another full lifespan for $100 to $200. Cement-construction boots, which is most modern fabric and lightweight leather mids, cannot be resoled because the upper is permanently bonded to the midsole. Look for a visible stitched seam running around the boot where upper meets sole: that means welted and resolable.
Dave Page Cobbler in Seattle is the most respected option in the Pacific Northwest and ships nationally. NuShoe accepts boots by mail nationwide. Some manufacturers run their own resole programs: Scarpa, Lowa, and La Sportiva all offer factory resoling for select welted models. Local shoe-repair shops can handle basic resoles, but technical Vibram outsoles or mountaineering boots are worth shipping to a specialist.
No. The most common reason people get injured in old boots is not catastrophic failure on the trail, it is the slow gait change that happens as the midsole compresses unevenly. Knee pain, IT band issues, plantar fasciitis, and ankle rolls almost always trace back to a boot that should have been retired 100 miles ago. The boot’s job is to support, and once it stops supporting it is actively working against you.
If they are still functional, donate them through Soles4Souls or a local Goodwill. If the upper is intact but the sole is dead, ship them to a specialist for resoling. If they are truly done, the Nike Reuse-A-Shoe program accepts them for grinding into athletic surfaces, and some REI stores accept boot returns for recycling. Throwing them in household trash is the worst option since the rubber and synthetic foams take centuries to break down.
